


Premium File
380 Q&A
$76.99$69.99
Microsoft Power Platform PL-900 Exam Questions & Answers, Accurate & Verified By IT Experts
Instant Download, Free Fast Updates, 99.6% Pass Rate

PL-900 Premium File: 380 Questions & Answers
Last Update: Jun 23, 2026
PL-900 Training Course: 76 Video Lectures
PL-900 PDF Study Guide: 378 Pages
$79.99
Microsoft Power Platform PL-900 Exam Screenshots
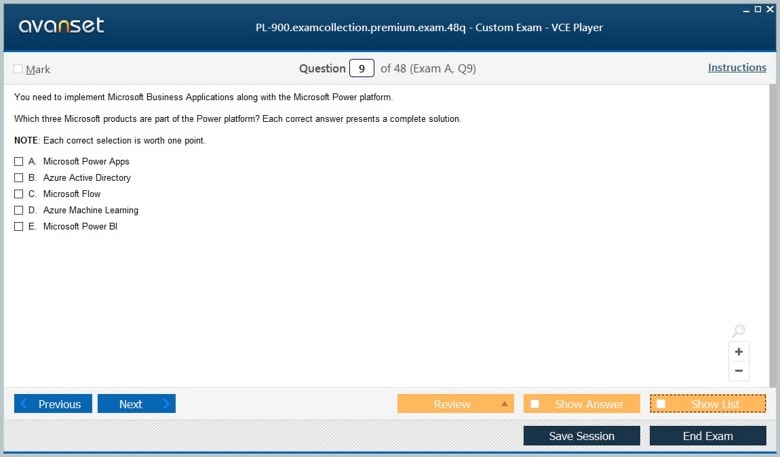
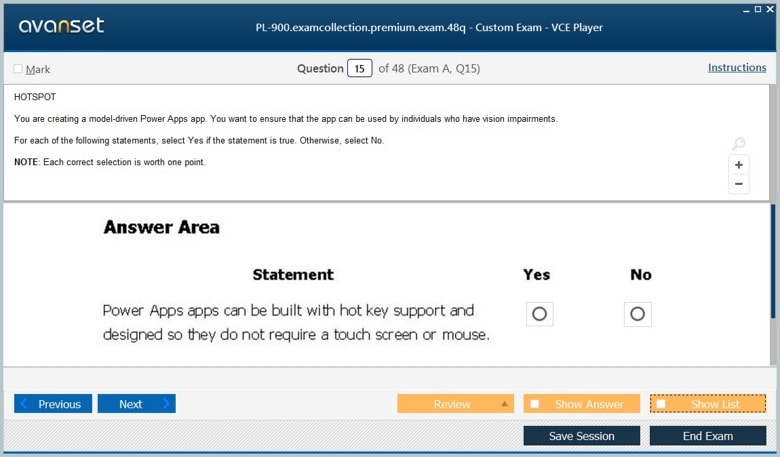
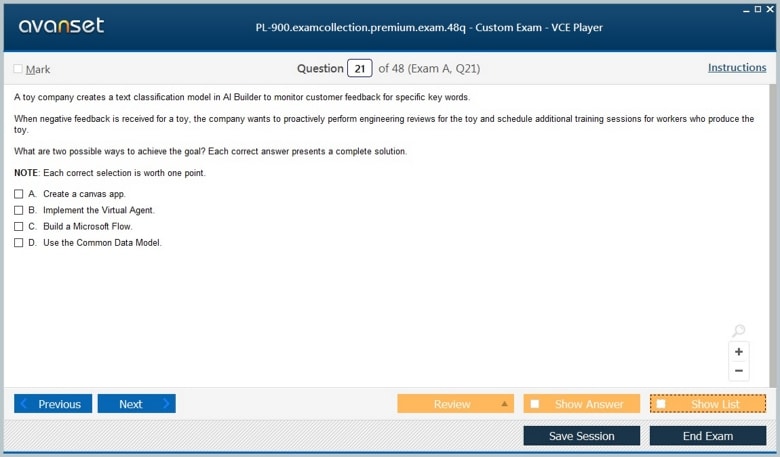
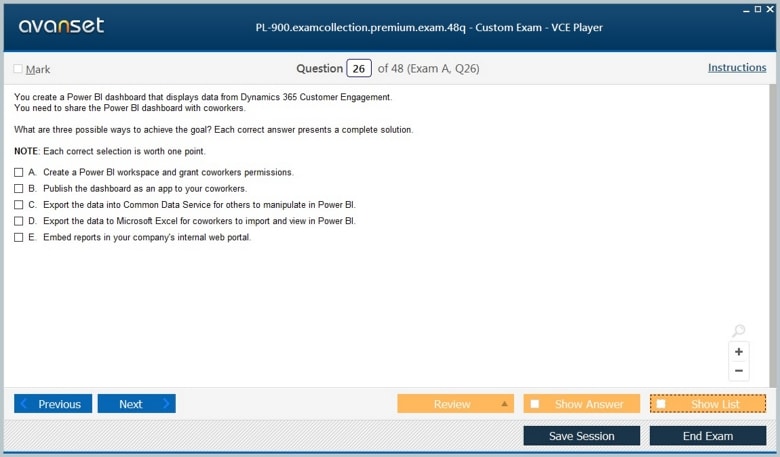
Microsoft Power Platform PL-900 Practice Test Questions in VCE Format
Microsoft Power Platform PL-900 Practice Test Questions, Exam Dumps
Microsoft PL-900 (Microsoft Power Platform Fundamentals) exam dumps vce, practice test questions, study guide & video training course to study and pass quickly and easily. Microsoft PL-900 Microsoft Power Platform Fundamentals exam dumps & practice test questions and answers. You need avanset vce exam simulator in order to study the Microsoft Power Platform PL-900 certification exam dumps & Microsoft Power Platform PL-900 practice test questions in vce format.
Before diving into the technical layers of the Microsoft Power Platform Fundamentals certification, it’s essential to acknowledge the deeper philosophical undercurrent that drives the platform’s vision. Power Platform is not simply a set of productivity tools bundled together for operational convenience. It is, in its essence, a movement—one that calls for the democratization of digital transformation. In a world historically dominated by software engineers and code-heavy development cycles, Power Platform proposes a paradigm shift: what if innovation didn’t need to be coded line by line? What if everyday users—business analysts, project managers, service representatives—could design systems, analyze trends, and automate complexity with the same authority once reserved for technical specialists?
This philosophy is quietly revolutionary. The platform empowers citizen developers to participate in shaping enterprise solutions, collapsing the chasm between idea and execution. Power BI allows users to visualize data in dynamic ways that influence leadership decisions. Power Apps lets them build custom business apps that speak the language of their own workflows. Power Automate takes repetitive tasks and hands them to intelligent automation, while Power Virtual Agents give users the ability to build responsive chatbots that converse naturally with clients and colleagues alike.
Understanding the philosophical roots of this platform is more than a feel-good exercise. For candidates pursuing the PL-900 certification, it's an intellectual foundation. It means you are not merely learning features—you are stepping into the future of work, where digital fluency is not a luxury but a responsibility. The question then is not whether one should learn Power Platform, but how one can afford not to. As businesses seek agility, responsiveness, and self-service technology, the need for digitally bilingual professionals—those who speak the languages of both business and technology—has never been more urgent.
When you begin your certification journey, you are not just preparing to pass a test. You are engaging in a broader conversation about empowerment, inclusion, and transformation. You are learning to speak to both executives and IT, to advocate for change with empathy, clarity, and data. This is where Microsoft’s vision for Power Platform finds its deepest resonance. And this is why mastery begins not with memorizing interface elements but with understanding what the platform stands for.
Power Platform’s real-world utility becomes clear when we step beyond interface screens and examine what it actually enables for an organization. Businesses no longer succeed by merely doing more—they thrive by doing smarter. Power Platform, with its low-code approach and unified ecosystem, becomes a strategic instrument for achieving smarter operations. It’s not enough for PL-900 candidates to understand how to create a flow in Power Automate or build a dashboard in Power BI. What separates an average professional from an impactful one is the ability to connect these technical skills to measurable outcomes.
What does measurable mean in this context? Consider the reduction of IT backlog. Traditional application development can stretch for months, even years, from idea to implementation. Power Apps collapses that timeline dramatically, allowing business users to build apps in days. This results in not only faster delivery but also stronger ownership. Business units stop being passive requesters of technology and begin owning their tools and outcomes. The ripple effect is significant—IT departments shift from gatekeepers to enablers, customer service improves through real-time responsiveness, and frontline workers gain tools tailored to their exact needs.
Or consider how Power BI drives customer insight. By integrating data from multiple sources, organizations create a single version of the truth—one that helps detect churn risk, understand buying behaviors, or predict inventory needs. These insights are not abstract. They directly inform strategy and drive profitability. Similarly, automating approvals, onboarding workflows, or vendor management through Power Automate doesn’t just free up time—it injects consistency, reduces errors, and builds trust in systems.
The business value is also compounded by integration. Power Platform does not exist in a silo; it seamlessly extends Microsoft 365, Dynamics 365, Azure, and even third-party services. A PL-900 candidate should be able to explain, for example, how a SharePoint list can feed into a Power BI dashboard, trigger a flow via Power Automate, and be updated through a Power App—without writing a single line of code. This end-to-end scenario isn’t just technically elegant; it’s operationally transformative.
Mastery of business value means being able to tell these stories—not only to examiners, but to stakeholders in real life. It means being able to advocate for Power Platform as a lever for operational excellence, customer-centricity, and competitive advantage. Professionals who succeed with this certification are often those who think beyond features and into futures—those who can connect the buttons they click with the value they deliver.
One of the most critical technical competencies candidates must acquire on their PL-900 journey is a clear understanding of how the Power Platform ecosystem is architected. Just like a strong building needs a foundation, so too does a software ecosystem rely on data consistency, accessibility, and interoperability. This is where Dataverse enters the conversation—not as a database in the conventional sense, but as a unified data platform that abstracts complexity while enforcing governance.
Dataverse allows different components of Power Platform to speak the same language. Power Apps draws from Dataverse to store form inputs; Power Automate can reference these values in a logic flow; Power BI can then visualize the outcomes. This consistency of schema and relationships reduces friction and promotes scalability. For those unfamiliar with data modeling, Dataverse becomes a gentle introduction to the world of structured data without overwhelming them with SQL queries or complex normalization patterns.
Connectors further extend the platform’s reach. These APIs—both standard and premium—are the lifelines that allow Power Platform to interface with external services. Want to pull data from Twitter, send a Teams notification, or update a Salesforce record? There’s a connector for that. For PL-900 candidates, the real task is to understand not just how to use connectors, but why they matter. They enable hybrid digital workflows that cross application boundaries, blend cloud and on-prem environments, and maintain a consistent user experience.
In a world where data lives in silos—some on legacy systems, others in modern SaaS platforms—connectors act as bridges. They restore continuity. This ability to aggregate, analyze, and act upon dispersed data sets is what gives Power Platform its distinctive power. It is not just an automation tool or a data dashboard or a form builder. It is all of these things—unified under a common architecture that emphasizes accessibility, modularity, and extensibility.
Understanding the technical underpinnings of the platform does not require one to become a developer, but it does demand intellectual curiosity. What does it mean for an environment to be secure yet open? How does data governance work when citizen developers are creating solutions independently? These are the kinds of architectural and strategic questions that elevate PL-900 candidates from users to thinkers, from participants to architects of digital transformation.
The Microsoft Learn platform remains the cornerstone of preparation for the Power Platform Fundamentals exam. Its modular design, interactive assessments, and step-by-step labs make it accessible for learners at all levels. However, those who want to truly excel go beyond passive consumption. They treat each module as an invitation to explore real-world implications. For example, when learning about Power Virtual Agents, don’t just follow the tutorial—imagine how that bot could be deployed in a mental health app, or in an HR onboarding portal, or in a multi-lingual helpdesk. The point is to exercise imagination alongside knowledge.
That said, preparation for PL-900 must also embrace diversity in learning modalities. Some learners benefit from visual explanations offered on platforms like YouTube or Pluralsight. Others prefer community-driven insights shared on forums like Reddit, LinkedIn groups, or Microsoft Tech Community. The key is to blend theory with tangible use cases. The more candidates can connect what they learn with what they see in their organizations or industries, the deeper the understanding becomes.
Moreover, learners must shift from a test-passing mentality to a leadership mindset. The goal is not just to earn a badge but to gain fluency in one of the most forward-looking toolsets in modern enterprise technology. Digital fluency, in this context, is not just technical—it is cultural. It’s the ability to advocate for automation in team meetings, to suggest dashboard enhancements in strategic reviews, to create applications that address frontline pain points before they escalate into operational bottlenecks.
This leadership is what organizations desperately need. The future belongs to professionals who are not just aware of Power Platform but fluent in its use—and fluent in the language of value. They can articulate how a bot improves employee experience, how a Power BI report reveals hidden inefficiencies, how a Power Automate flow eliminates redundant processes. They become catalysts of transformation, not through authority, but through insight.
Let us pause here to reflect on a deeper truth: Certifications, when pursued with intention, are not just career upgrades. They are acts of agency. They represent the decision to engage with technology not passively, but actively. To move from knowing to doing. From doing to leading. Power Platform invites us into this transformation—not just of workflows, but of ourselves.
When you complete the PL-900 certification, you are not merely holding proof of technical competence. You are declaring your readiness to be a translator of business need into digital capability. You are announcing to your organization and to the world that you are prepared to lead from the middle, from the margins, from wherever your voice can shape the future.
To genuinely grasp the architecture of Microsoft Power Platform, one must begin with its central nervous system: Dataverse, formerly known as the Common Data Service. This is not just a database; it is the spine of the entire Power Platform ecosystem. Far beyond a static repository, Dataverse is an intelligent, relational data storage engine that enables secure, structured, and flexible data management. What elevates it from other data services is how naturally it binds the diverse parts of Power Platform together—Power Apps, Power Automate, Power Virtual Agents, and Power BI—into a seamless digital nervous system.
Aspiring PL-900 candidates often make the mistake of thinking about data as just rows and columns. Dataverse demands that we move beyond this reductionist lens. Understanding entities, fields, and relationships is not merely about terminology—it is about architecting how real-world objects and operations are represented within software. Every entity you define mirrors an aspect of reality: a customer, a product, a service ticket. Every relationship you establish isn’t just a link—it’s a behavioral contract that tells the platform how components should respond to each other in context.
Business rules within Dataverse go even deeper. They are declarative logic engines, allowing non-developers to implement policies and controls without writing code. Think of them as the platform’s conscience, keeping data integrity and user behavior aligned with the organization's policies. Mastery of business rules and field behaviors ensures that your applications are not only functional but also resilient to error and misuse.
Moreover, Dataverse enables role-based security, granular permissions, and advanced data access strategies that mirror real-world hierarchies. It encourages governance by design. When you define user roles and control field-level access, you’re embedding ethical data handling principles directly into the system's DNA.
This understanding becomes vital not only in the exam but in every enterprise scenario where security, reliability, and scalability are non-negotiable. Therefore, exploring Dataverse is not just a technical drill—it is an invitation to think about how structured data becomes living knowledge within an organization. It’s a philosophical shift from static documentation to dynamic digital life.
One cannot fully understand the transformative power of the platform without appreciating the role of connectors. These are not merely technical hooks—they are lifelines. Connectors serve as bridges between Power Platform and both external services and internal data silos. From Outlook to SharePoint, Salesforce to SQL Server, connectors open a portal to the outside world, enabling Power Platform to interact, extract, and enrich data from diverse ecosystems.
There is an essential dichotomy in this layer of the platform: standard vs. premium connectors. This distinction is not arbitrary. It shapes the business model, access controls, and scalability of any Power Platform solution. Standard connectors cover everyday Microsoft services and are accessible under most licensing tiers. Premium connectors, on the other hand, offer deeper enterprise integration—linking with services like Salesforce, Oracle, and custom APIs—and require higher-tier licensing. This economic layer introduces a real-world constraint into the design process: great power comes at a cost.
Understanding this balance is not just about knowing what button to click. It requires financial and strategic literacy. A PL-900 candidate must be able to discern when using a premium connector is justified by ROI and when a more frugal solution will suffice. It is the difference between implementing automation for automation’s sake versus automating in alignment with organizational strategy.
Power Automate is where these connectors come alive. It is the circulatory system of Power Platform, pumping data and triggering actions based on logic, context, and intent. Triggers and actions are the building blocks of workflows, but they are also metaphors for decision-making. Every time a flow is activated, a decision tree is executed, and an outcome is reached. The quality of this logic defines how well the digital system mirrors human judgment.
There are instantaneous triggers, scheduled triggers, and those that respond to user interactions. Each requires a different kind of sensitivity to context. Designing a flow to trigger upon the arrival of an email, for instance, demands not just technical know-how but also awareness of business rhythms. Is this email important? Should it be handled automatically or flagged for review? Your logic must mirror human values and priorities.
In this way, building flows is an act of moral and operational design. You are encoding choices. You are deciding what deserves attention, what should be deferred, and what must happen without delay. Connectors and flows aren’t just technical tools—they are cognitive extensions of how organizations choose to behave in digital space.
The rise of artificial intelligence in Power Platform is neither gimmick nor accident. It represents a profound shift toward platforms that don’t just do what they’re told but begin to anticipate, interpret, and evolve based on patterns. AI Builder is the platform’s entry point into this transformation. While many view it as a no-code tool for adding predictions to apps and flows, it is, at a deeper level, the philosophical bridge between human intention and machine intuition.
AI Builder allows users to create models that predict outcomes, recognize forms, process images, and analyze text. These aren’t passive features; they are active interventions into how information is consumed and acted upon. When you teach a model to recognize invoice layouts or scan business cards, you are creating a micro-intelligence that reduces friction in human workflows. You are taking a repeated manual task and replacing it with a learning entity.
More importantly, AI Builder democratizes machine learning. It breaks down barriers for non-technical users, making it possible to deploy intelligent models without needing a background in data science. This democratization is not merely an act of convenience—it is an act of empowerment. It shifts the center of innovation from the IT department to the front lines of business operations.
Yet, with this power comes a new level of responsibility. When you build a model that makes decisions, you are accountable for its training data, its biases, and its outcomes. You are not just automating—you are guiding a form of machine logic that will influence real human experiences. Whether it’s approving loans or categorizing complaints, the implications of your model’s decisions ripple far beyond the interface.
Thus, learning AI Builder for the PL-900 exam is not only about technical mastery. It is about developing ethical intuition. What data is appropriate to use? How do you validate your model’s fairness? What happens when it fails? In a world increasingly ruled by predictive systems, these are not academic questions—they are foundational to trust.
In a corporate environment, being the person who understands both the opportunity and the danger of AI tools sets you apart. AI Builder gives you a chance to build not just smarter apps but more responsible systems. It invites you to take part in a future where intuition is engineered and where your choices shape the ethics of enterprise automation.
Conceptual understanding can only take you so far. The Power Platform, with all its layers and potentials, cannot be mastered in theory alone. It must be experienced, explored, even broken, to be understood. This is why immersive learning environments—Power Apps Studio, Power Automate Designer, AI Builder—are not supplemental tools. They are the crucibles in which understanding is forged.
Setting up your own environment is not just about checking a box. It’s about stepping into the role of a maker, a thinker, a problem-solver. When you build your first model-driven app using Dataverse, define your own entities, set relationships, and apply business rules, you begin to see how abstract concepts translate into real user behavior. When you create flows that respond to calendar events or incoming emails, you feel the pulse of digital transformation through your fingertips.
In these exercises, something deeper happens: intuition begins to form. You start anticipating what the platform will allow and what it will resist. You stop reading documentation for every step and begin to move through the interface with confidence and fluidity. This is the difference between knowing a tool and embodying its logic.
And here lies a powerful insight for the PL-900 candidate: certification is not merely a destination, but a byproduct of immersion. The questions on the exam are not puzzles designed to trick you—they are reflections of real problems and plausible scenarios that every digital worker must face. If you’ve taken the time to build, break, debug, and deploy, you will answer with clarity because you’ve lived the platform, not just studied it.
But beyond the exam, immersion prepares you for a new kind of career. A Power Platform expert is not just someone who configures apps. They are someone who understands process design, user psychology, data flow, and strategic alignment. They can speak to IT and to business, to technical teams and to customers, with equal fluency. This is rare. And it begins with practice.
Here is a deeper truth: technology, no matter how powerful, is meaningless without human imagination. The tools you are learning—Dataverse, connectors, flows, AI Builder—are not the story. You are. Your curiosity, your experimentation, your mistakes, and your breakthroughs are what turn static components into dynamic innovations. And the more you immerse yourself, the more you’ll begin to see that Power Platform is not just a set of tools—it is a canvas for your ideas.
Within every dataset lies an untold story, and Power BI is the brush that brings it to light. For candidates of the PL-900 certification—and for the organizations they aim to serve—Power BI is more than a visualization tool. It is a modern oracle, drawing connections, unveiling anomalies, and presenting evidence-based narratives in a world desperate for clarity. Yet to treat it as merely a chart generator is to overlook its transformative power.
Power BI begins by welcoming data in all its rawness—from Excel sheets and SharePoint lists to SQL databases and Azure services. But the true magic lies in how this data is shaped. The process of cleaning, transforming, and modeling data within Power BI Desktop is not mechanical; it is philosophical. Every column removed, every relationship defined, reflects a judgment about what matters. What is noise? What is signal? These choices are not simply technical steps—they are expressions of intent.
Candidates quickly learn that Power BI Desktop is where design and intelligence converge. It allows for deep modeling with DAX (Data Analysis Expressions), relationships, calculated columns, and measures. But this mastery demands more than syntax. It requires the ability to see implications. For example, when a data model is incorrectly related, even the most beautiful visualization becomes a misleading artifact. Thus, logic and aesthetics must walk together. The dashboard is not the end goal—it is a mirror held up to the business.
Then comes Power BI Service—the online layer of collaboration, scalability, and governance. While Desktop is the canvas, the Service is the gallery, where reports are consumed, refreshed, and interacted with. It introduces the complexity of sharing across roles and departments, setting data permissions, and ensuring that insight does not become leakage. Here, candidates must evolve from solo builders to platform stewards, ensuring that their creations can live and breathe in an enterprise ecosystem.
Yet Power BI is only as valuable as the decisions it provokes. A visual that looks good but goes unnoticed is noise. A dashboard that inspires questions, strategy shifts, or operational changes—this is the gold standard. The PL-900 exam tests a candidate’s grasp on functionality, but the real-world measure is influence. Can you shape minds, steer meetings, and spark movements through your visual storytelling?
This is the challenge and the beauty of working with Power BI: it forces us to ask what kind of decisions we are empowering. Are we reducing complexity or hiding it? Are we showing the truth or a sanitized version of it? These are not just data questions—they are ethical ones.
If Power BI shows us the what and the why, Power Apps delivers the how. It is the kinetic twin of visualization, turning insight into intervention. In practice, Power Apps lets users build applications with speed and specificity, often solving in hours what once took months of development. But to truly wield its power, one must see it not as a set of buttons and screens, but as a design philosophy: rapid empowerment of human decision-making.
At its core, Power Apps operates across two distinct but complementary modes—canvas apps and model-driven apps. The canvas approach is exactly as the name implies: a blank canvas where every control, layout, and data connection is manually placed, giving creators pixel-level flexibility. These apps are ideal for creative thinkers who want total control over the interface and want to rapidly prototype solutions that match specific workflows. The power of creativity lies here—users can define the user experience without being boxed in by rigid data models.
On the other side, model-driven apps are deeply data-centric. They derive structure and UI from the underlying Dataverse schema. Less flexible in layout, but richer in built-in logic, security, and integration, these apps are perfect for enterprise scenarios with complex relationships, multiple users, and standardized processes. Choosing between canvas and model-driven is not just a technical call—it’s a strategic design decision. The former is for fluid interaction; the latter is for structured execution.
Understanding the layers of logic in Power Apps is also critical. Candidates must internalize how controls interact with data, how formulas mimic Excel-like logic, and how screen transitions, conditions, and variables define app behavior. This is the invisible choreography beneath the surface. The Power Fx formula language, while intuitive, requires logical rigor. A single formula can determine whether an employee sees their department’s data or someone else’s. This is where trust is either earned or broken.
App publishing protocols also reflect the tension between agility and governance. In a small team, pushing changes directly to live environments might work. But in a large organization, staging, testing, and versioning become vital. This operational discipline often distinguishes amateurs from professionals. The PL-900 exam may test your awareness of the process, but employers test your consistency in applying it.
What’s most striking is that Power Apps does more than digitize processes—it humanizes them. Every screen, every dropdown, every field must make the user feel competent, informed, and in control. This is where application logic becomes psychological logic. An error message isn’t just feedback; it’s a moment of empathy or frustration. A well-placed control isn’t just UI—it’s an invitation to flow. To build effective apps is to care about experience, not just functionality.
There comes a moment in every Power Platform journey when the silos dissolve and the ecosystem reveals itself as a whole. That moment is often sparked by the integration of Power BI and Power Apps. Individually, they are impressive—together, they become a force of organizational intelligence. Power BI tells you what is happening; Power Apps lets you respond to it directly. This closed-loop cycle is where agility is born.
Imagine this: a manager is reviewing a Power BI dashboard that shows a decline in customer satisfaction scores. Traditionally, that insight might sit idle, or spark a delayed response. But now, embedded within that dashboard is a Power App—a form that lets the manager assign follow-ups, initiate surveys, or trigger a flow for escalation. The gap between insight and action shrinks to a single click.
This fusion requires more than technical setup. It requires systems thinking. The practitioner must design not just a workflow, but a behavioral pattern. What happens when an insight is seen? Who owns the action? Where does the data flow next? The integration isn’t just about embedding apps into visuals—it’s about creating a responsive environment where decisions are executed in real time, with traceability.
Security and context play a pivotal role here. The embedded Power App must respect user roles, data permissions, and business rules. This is not a simple plug-and-play affair. It is an orchestration of access control, identity, and platform behavior. A PL-900 candidate who understands this complexity begins to think like an architect, not just a builder.
Moreover, integration forces reflection on what matters. Not every chart needs an app. Not every app needs a chart. The value lies in intentionality. Ask yourself: where are decisions being delayed? Where are insights dying in dashboards? These are the fertile grounds for integration. They are the moments where Power Platform shifts from utility to strategy.
In the long run, this synergy also defines organizational culture. Businesses that embed response into review—action into analysis—move faster. They adapt better. They learn sooner. Professionals who can build such systems are not just developers or analysts—they are facilitators of agility. And in a world that prizes responsiveness above all, this is a superpower.
We now arrive at the philosophical core of this part of the learning journey. Power BI and Power Apps are not just tools; they are modes of thinking. One reveals what is, the other imagines what could be. They are two halves of a dialectic—diagnosis and design. In a world saturated with data, the real scarcity is interpretation and initiative.
Organizations today are drowning in reports yet starving for relevance. They have dashboards in abundance but few applications that transform insight into momentum. The Power Platform exists to close this gap. But tools alone won’t do it. It takes professionals who see themselves not as technicians, but as translators—interpreters of data who can shape responsive systems from the noise.
This is where deeper reflection matters. Every visual must provoke action. Every app must reflect insight. Together, they form a feedback loop of awareness and execution. Imagine a retail chain where managers monitor sales dips via Power BI and instantly deploy local promotions via Power Apps. Imagine a hospital where patient feedback is visualized in real time and routed to care teams through embedded apps. These are not dreams. They are already happening. And they require minds that can hold complexity, intention, and clarity in the same breath.
At the very core of Microsoft Power Platform’s practical power lies Power Automate—a tool not merely for triggering events but for constructing thoughtful digital sequences that mirror human intention. Often referred to as the operational engine of the platform, Power Automate orchestrates how data flows, tasks are performed, and business decisions are actioned behind the scenes.
Understanding Power Automate begins with distinguishing between its foundational flow types: automated, instant, and scheduled. But to remain at this surface level is to remain an observer. The exam requires more, and so does real-world implementation. Mastery begins when candidates start to see how conditions, controls, and expressions transform static flows into dynamic decision-making systems. This is where Power Automate evolves from a tool into a kind of choreography—where each trigger, action, and branch is a move that contributes to the graceful performance of a digital ecosystem.
What does it mean to automate a process? It means creating an invisible architecture that knows when to act, what to do, how to respond to exceptions, and when to escalate. Think of an approval process for leave requests. A novice might create a flow that sends an email and waits. A professional builds a logic that understands delegation, escalates based on inactivity, logs entries into a database, and adjusts permissions based on the response. The difference is not just in outcome—it’s in resilience.
This resilience is constructed using often-overlooked components: error handling, retry policies, concurrency control, and run history monitoring. These aren’t just advanced features—they’re the framework for durability. Flows will fail. APIs will time out. Systems will disconnect. But the goal is not to create perfection; it is to create reliability in the face of imperfection. Candidates who practice building with these realities in mind earn more than a certificate—they build systems that endure.
Moreover, Power Automate invites a new kind of creativity. Templates offer a springboard, but true growth comes from deconstructing them, understanding their decisions, and iterating beyond them. It’s in these variations that you begin to understand not only what the platform can do, but what your organization needs from it. Power Automate doesn’t just teach automation—it cultivates systems thinking. What should be automatic? What should remain human? What blend ensures speed without sacrificing judgment?
If Power Automate represents the platform’s heartbeat, then Power Virtual Agents (PVA) represent its voice. The no-code chatbot engine within Power Platform is often misunderstood as a novelty—an optional add-on rather than a foundational tool. But this perception is short-sighted. In truth, PVA enables organizations to scale conversations, respond with speed, and build emotional proximity with users in a digital world that too often feels mechanical.
To build with Power Virtual Agents is to become a designer of conversations. This is not simply about technology—it is about psychology. When a user interacts with a bot, they are seeking clarity, connection, and efficiency. Whether it’s a customer asking for support or an employee navigating HR policies, the bot becomes their guide. And like any guide, it must be intelligent, intuitive, and empathetic.
At the technical level, candidates learn to create topics, map trigger phrases, and define branching dialogues. But just as important is the art of conversation design. What happens when a user types something unexpected? How does the bot recover? How do you guide a confused user back on track without friction or frustration? This is where fallback topics, escalation paths, and smart transitions become vital.
Entities also play a crucial role, allowing the bot to extract structured meaning from natural language. When a user says, “I need help resetting my password,” the bot should know that “reset” implies action and “password” implies the subject. These layers of nuance require not only configuration skills but also a deep understanding of user intent.
What elevates PVA to another level is its seamless integration with Power Automate. When a bot reaches a point where it must retrieve data, send an alert, or trigger a business process, it does not end the conversation—it evolves it. Calling a flow from within a chat session adds superpowers to your chatbot. The bot can now become a receptionist, a technician, a booking agent, a document generator, or anything else you can imagine.
Still, success with PVA is not just about launch—it’s about listening. Once published, bots must be monitored. Analytics reveal where users drop off, which topics succeed, and where friction remains. Iteration is not optional. It is the path to relevance. A bot that fails to improve becomes a barrier, not a bridge.
And perhaps most important of all, working with PVA challenges us to consider how machines should speak. What tone should a bot adopt? How should it apologize? What values should it reflect? These questions transform the chatbot from a script into a voice of the organization. And that, in turn, demands integrity.
In our rush to automate, we often forget why we began. The purpose of automation is not to replace humans—it is to unburden them. It is to return time, reduce noise, and create space for thought, innovation, and connection. When done right, automation is not about cutting costs. It is about reclaiming value—emotional, cognitive, and operational.
This deeper dimension of automation is what the best PL-900 candidates begin to understand. It’s why mastering Power Automate and Power Virtual Agents is not just about passing an exam. It’s about contributing to a more human-centric digital world. Automation, after all, is not inherently good. It can entrench bad processes faster. It can distance people. It can obscure accountability. But in the right hands, it becomes liberation.
Imagine a marketing team freed from the tyranny of repetitive reporting because Power Automate compiles and sends weekly insights. Picture a helpdesk that can sleep better at night knowing PVA handles tier-one issues instantly and routes complex ones intelligently. Think of the mental clarity regained when dozens of micro-decisions per day are handled by predictable, auditable flows.
This liberation is not abstract—it is measurable. Organizations with mature automation platforms report better morale, faster decision-making, and higher customer satisfaction. And yet, these benefits only emerge when automation is approached thoughtfully. Automating a broken process merely hides the flaws. Automating without oversight creates new risks.
Therefore, the Power Platform Fundamentals certification is a signal—not just of skill but of readiness. Readiness to participate in the redesign of how work is done. Readiness to consider the consequences of every flow. Readiness to use automation not as a shortcut, but as an instrument of clarity.
This is the mindset that transforms flows into frameworks and bots into bridges. It’s not about what you automate—it’s about why.
Taken together, Power Automate and Power Virtual Agents offer more than technical capabilities. They offer a canvas on which professionals can paint the contours of a more responsive, intelligent, and empathetic enterprise. This canvas is not blank. It is shaped by needs, constraints, ethics, and imagination. And what we build on it reflects who we are—not just as technologists, but as thinkers and stewards.
The final insight of this journey is about synthesis. When flows operate with precision and bots converse with care, we don’t just achieve efficiency—we create trust. We create systems that feel alive, that adapt to context, that understand nuance. And this responsiveness becomes the new measure of maturity.
The journey through the Microsoft Power Platform Fundamentals (PL-900) curriculum reveals far more than a list of tools or features. It offers a portal into a new way of thinking—about data, about people, and about the systems that connect them. This is not simply a certification path. It is a guided transformation, a mindset shift from passive technology consumption to active solution design.
We saw how low-code tools democratize development, how Dataverse serves as the core data model, and how this ecosystem fosters innovation even in non-technical roles. This foundation is not only technical—it is cultural. It sets the tone for a workplace where empowerment is no longer limited to developers and IT.
It was here that Power Platform transitioned from a toolkit to a living organism—capable of sensing, responding, and even learning. We came to understand that building on the platform is not about assembling features, but about designing lifecycles: data lifecycles, decision lifecycles, human workflows.
Visualizing data is important, but only meaningful if it provokes real-time decisions and triggers purposeful outcomes. We saw that building apps was more than coding—it was storytelling through interaction. We recognized that dashboards must do more than report—they must guide. In this light, the platform emerged not just as a convenience, but as a compass.
These tools do not just increase productivity—they redefine what it means to focus, to engage, to delegate. Through thoughtful flows and empathetic bots, the digital environment itself becomes an extension of organizational values. Automation is no longer a matter of “how fast,” but of “how thoughtfully.”
So what is the real value of the PL-900? It is not a test of memory. It is a test of perspective. It measures whether you understand how systems interact, how people think, and how technology can bridge the two. The questions on the exam may ask about triggers, connectors, or app types—but what they are truly asking is: Can you think across silos? Can you build with empathy? Can you imagine solutions that scale beyond tasks into transformation?
The future belongs to professionals who can connect dots, tell stories with data, automate with intention, and build interfaces that care. With Power Platform, you’re not just learning to build software. You’re learning to design experiences, architect responsiveness, and foster a new rhythm of work—one that is human-centered, data-informed, and deeply agile.
Passing PL-900 means you are ready. But more than that, it means you’ve begun. The real certification isn’t printed. It’s lived. Every app you build, every bot you shape, every flow you streamline is part of a new narrative—one where technology doesn’t just serve business goals, but human aspirations. And in that story, you’re no longer just a user. You are the author.
Go to testing centre with ease on our mind when you use Microsoft Power Platform PL-900 vce exam dumps, practice test questions and answers. Microsoft PL-900 Microsoft Power Platform Fundamentals certification practice test questions and answers, study guide, exam dumps and video training course in vce format to help you study with ease. Prepare with confidence and study using Microsoft Power Platform PL-900 exam dumps & practice test questions and answers vce from ExamCollection.
Purchase Individually


Microsoft PL-900 Video Course

Top Microsoft Certifications


Top Microsoft Certification Exams
Site Search:

SPECIAL OFFER: GET 10% OFF

Pass your Exam with ExamCollection's PREMIUM files!
SPECIAL OFFER: GET 10% OFF
Use Discount Code:
MIN10OFF
A confirmation link was sent to your e-mail.
Please check your mailbox for a message from support@examcollection.com and follow the directions.

Download Free Demo of VCE Exam Simulator
Experience Avanset VCE Exam Simulator for yourself.
Simply submit your e-mail address below to get started with our interactive software demo of your free trial.
Premium questions and answers are valid. THX to Exam Collection I passed the exam PL-900.
questions and answers examen premium is valid
I passed my PL-900, 875, new 4 question but Premium dump is valid and enough for pass exam.
I had a wonderful experience with these PL-900 practice questions and answers. The content is highly valid, and there were no new questions in the exam. So, I had an easy time tackling them. I scored highly thanks to ExamCollection.
The questions and answers for the PL-900 test offered on this website are very useful. I confirmed this myself when I took my exam yesterday. When I saw the questions in the exam, my confidence increased immediately. Almost all of them were already familiar!
I just passed my PL-900 exam today with the help of this dump. It is really valid and accurate to the questions in the real exam. There were some of them reworded, but it is possible to connect them to the questions from the test. I was able to pass the test with a good result, so will you! I wish you all the best!