


Premium File
448 Q&A
$76.99$69.99
Microsoft 365 MS-203 Exam Questions & Answers, Accurate & Verified By IT Experts
Instant Download, Free Fast Updates, 99.6% Pass Rate

MS-203 Premium File: 448 Questions & Answers
Last Update: May 12, 2026
MS-203 Training Course: 89 Video Lectures
$74.99
Microsoft 365 MS-203 Exam Screenshots
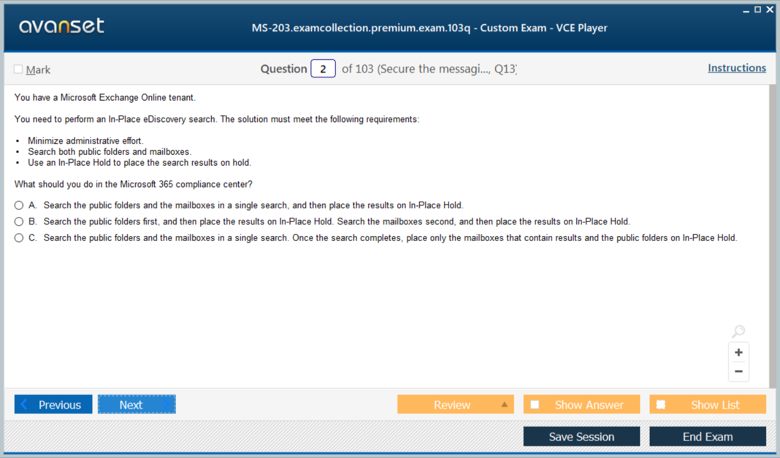
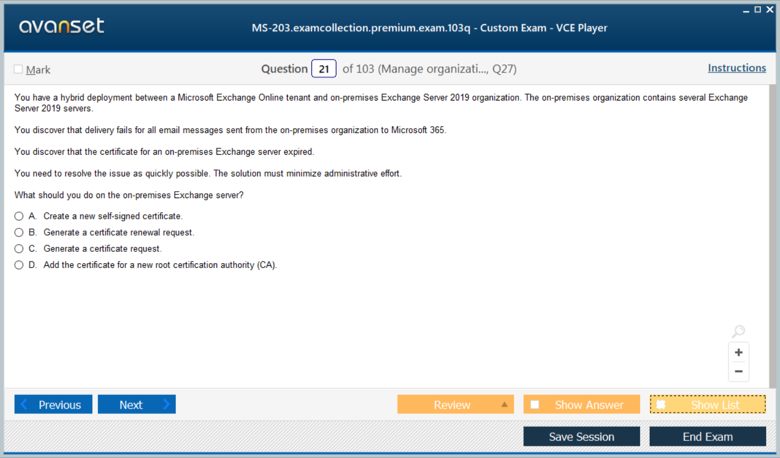
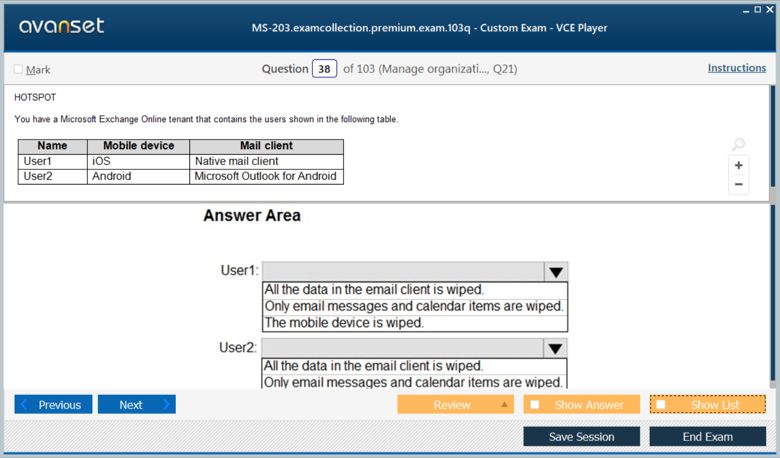
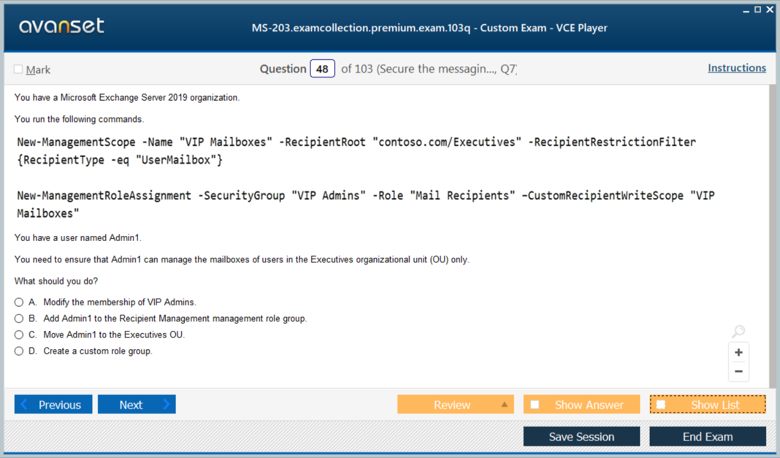
Microsoft 365 MS-203 Practice Test Questions in VCE Format
| File | Votes | Size | Date |
|---|---|---|---|
File Microsoft.examanswers.MS-203.v2026-02-17.by.limin.153q.vce |
Votes 1 |
Size 8.98 MB |
Date Feb 17, 2026 |
File Microsoft.examquestions.MS-203.v2022-02-08.by.matthew.137q.vce |
Votes 1 |
Size 4.14 MB |
Date Feb 08, 2022 |
File Microsoft.questionpaper.MS-203.v2021-12-14.by.nicholas.133q.vce |
Votes 1 |
Size 3.98 MB |
Date Dec 14, 2021 |
File Microsoft.train4sure.MS-203.v2021-11-05.by.maddison.119q.vce |
Votes 1 |
Size 5.55 MB |
Date Nov 05, 2021 |
File Microsoft.questionpaper.MS-203.v2021-09-02.by.liqiang.103q.vce |
Votes 1 |
Size 1.62 MB |
Date Sep 02, 2021 |
File Microsoft.braindumps.MS-203.v2021-07-08.by.toby.86q.vce |
Votes 1 |
Size 2.23 MB |
Date Jul 08, 2021 |
File Microsoft.testking.MS-203.v2021-04-06.by.adam.62q.vce |
Votes 1 |
Size 743.93 KB |
Date Apr 06, 2021 |
File Microsoft.pass4sure.MS-203.v2020-10-23.by.wangjun.19q.vce |
Votes 2 |
Size 60.16 KB |
Date Oct 23, 2020 |
Microsoft 365 MS-203 Practice Test Questions, Exam Dumps
Microsoft MS-203 (Microsoft 365 Messaging) exam dumps vce, practice test questions, study guide & video training course to study and pass quickly and easily. Microsoft MS-203 Microsoft 365 Messaging exam dumps & practice test questions and answers. You need avanset vce exam simulator in order to study the Microsoft 365 MS-203 certification exam dumps & Microsoft 365 MS-203 practice test questions in vce format.
The MS-203 Certification, officially known as Microsoft 365 Messaging, represents a crucial benchmark for professionals aiming to excel as messaging administrators within Microsoft 365 ecosystems. In today’s IT landscape, organizations rely heavily on Microsoft technologies to manage communication, collaboration, and operational continuity. Messaging administrators play a pivotal role in maintaining this infrastructure, and MS-203 validates their expertise in a formal, globally recognized manner.
MS-203 encompasses a comprehensive set of skills and knowledge areas designed to prepare candidates for the complexities of modern messaging administration. These include planning, deploying, configuring, and managing Microsoft 365 messaging systems across cloud, on-premises, and hybrid environments. The certification emphasizes hands-on experience, ensuring that professionals are not just theoretically aware of Microsoft tools but capable of applying their knowledge to solve real-world organizational challenges.
One of the central aspects of MS-203 is the focus on messaging security. Messaging administrators must protect organizational data from threats such as phishing, spam, malware, and unauthorized access. The exam equips professionals with the ability to implement Microsoft 365 security protocols, utilize Advanced Threat Protection, configure email policies, and monitor system integrity. In addition, administrators gain skills in auditing, compliance reporting, and user access management, all critical components for securing enterprise communication channels.
The MS-203 exam format tests candidates across multiple domains that mirror the responsibilities of a messaging administrator. Professionals are expected to demonstrate expertise in managing organization settings, planning mail architecture, configuring hybrid deployments, and securing messaging environments. This broad coverage ensures that certified professionals can handle a wide spectrum of tasks, from routine maintenance and troubleshooting to strategic planning and architectural design.
Another essential skill area is hybrid configuration and migration. Many organizations maintain a combination of on-premises Exchange servers and cloud-based Microsoft 365 services. MS-203 prepares administrators to plan and execute hybrid deployments, ensuring seamless integration, minimal disruption, and continuity of operations. Candidates learn to migrate mailboxes, configure connectors, and implement coexistence strategies that bridge legacy and modern infrastructures effectively.
MS-203 also emphasizes the value of understanding reporting and monitoring. Messaging administrators must track system health, review audit logs, and generate compliance reports. This knowledge ensures proactive management of the messaging environment, enabling administrators to identify potential issues, enforce organizational policies, and demonstrate adherence to regulatory standards. Reporting and analytics are not merely operational tools but strategic assets that support informed decision-making and governance.
A unique aspect of the MS-203 certification is its alignment with the career trajectory of messaging administrators. While foundational knowledge can be obtained through prior roles or experience, the certification formalizes expertise, validating both practical and theoretical skills. IT professionals who earn MS-203 distinguish themselves in the job market, signaling their readiness to handle complex messaging scenarios and contribute to organizational resilience.
The certification also underscores the importance of continual learning. Microsoft regularly updates the exam objectives to reflect changes in Microsoft 365 services, security practices, and enterprise messaging strategies. This ensures that certified professionals remain current with industry standards, new features, and evolving threats. Candidates are expected to adapt to these changes, demonstrating ongoing commitment to professional development and technical excellence.
Finally, MS-203 focuses on user experience and operational efficiency. Messaging administrators are tasked not only with securing and maintaining systems but also with ensuring that users can communicate effectively and efficiently. The certification teaches candidates to configure Outlook, manage mobile device integration, streamline mailbox access, and implement policies that balance security with usability. This holistic approach ensures that administrators can support organizational productivity while maintaining rigorous security and compliance standards.
The MS-203 Certification serves as a strategic credential for messaging administrators. It validates expertise across Microsoft 365 messaging systems, hybrid deployment, security, compliance, and operational management. Professionals who achieve MS-203 demonstrate readiness to handle complex enterprise messaging scenarios, safeguard communication infrastructure, and enhance both productivity and organizational resilience. The certification is a reflection of advanced skill, practical knowledge, and strategic capability in the rapidly evolving world of Microsoft 365 messaging administration.
The MS-203 Certification exam is designed to rigorously evaluate the capabilities of messaging administrators managing Microsoft 365 environments. The exam not only tests theoretical knowledge but also the practical application of skills in real-world scenarios. This ensures that candidates are prepared to handle the complex demands of a professional messaging administrator. Understanding the structure and domains of the exam is critical for success and for planning an effective study strategy.
The MS-203 exam is divided into four primary domains. The first domain, managing organization settings and resources, accounts for approximately 30 to 35 percent of the exam. This domain focuses on configuring organizational settings, including policies, compliance rules, and messaging resources. Candidates learn how to create and manage mailboxes, distribution groups, shared mailboxes, and resource mailboxes, ensuring efficient communication channels throughout the organization. Knowledge of Azure Active Directory and identity management is also essential within this domain, as administrators must assign roles, configure permissions, and manage access controls to protect sensitive information.
The second domain, planning and managing the mail architecture, covers 20 to 25 percent of the exam. This domain emphasizes designing, implementing, and optimizing the email environment. Administrators are expected to plan mail routing, configure mail flow, manage connectors, and understand transport rules. This area also includes mailbox quotas, archiving strategies, and retention policies, which help maintain organizational compliance and ensure efficient data management. Candidates must understand how to design mail architecture for performance, scalability, and security, ensuring that messaging services operate reliably and efficiently for all users.
Planning and implementing hybrid configurations and migrations form the third domain, also accounting for 20 to 25 percent of the exam. Many organizations operate in hybrid environments that combine on-premises Exchange servers with Microsoft 365 cloud services. Administrators need the skills to deploy hybrid configurations, migrate mailboxes, and maintain coexistence between cloud and on-premises systems. This includes configuring hybrid connectors, enabling secure mail routing, and ensuring uninterrupted access for users during migration. Candidates also need to troubleshoot migration issues, resolve synchronization errors, and implement strategies that minimize downtime while preserving data integrity.
The fourth domain, securing the messaging environment, also represents 20 to 25 percent of the exam. Security is a foundational element of the MS-203 Certification, as messaging administrators must protect the organization from threats such as phishing, malware, spam, and data breaches. Candidates learn to implement Advanced Threat Protection, manage encryption, configure email authentication protocols such as DKIM and SPF, and enforce data loss prevention policies. Administrators are expected to monitor security alerts, investigate incidents, and apply remediation strategies to mitigate risks effectively. Knowledge of compliance features, such as auditing, retention, and reporting, ensures that the organization adheres to regulatory requirements while maintaining a secure messaging environment.
The exam format itself is designed to simulate real-world problem-solving. It includes multiple-choice questions, multiple-select questions, case studies, and scenario-based exercises. Candidates are presented with practical situations, requiring them to analyze information, make decisions, and apply their knowledge to resolve messaging challenges. Time management is crucial, as the exam contains approximately sixty questions, with an average of two minutes allocated per question. This requires candidates to be familiar with all domains while maintaining the ability to reason quickly and accurately under pressure.
Retake policies are another important aspect of the exam structure. If a candidate does not pass the first attempt, they can retake the exam once within the first 24 hours. Subsequent attempts require a 14-day waiting period. Understanding this policy helps candidates plan their preparation, ensuring that they attempt the exam with the highest probability of success and are ready to address knowledge gaps identified in previous attempts.
Preparation for the MS-203 exam requires a combination of theoretical study, hands-on practice, and familiarity with Microsoft 365 tools. Candidates should engage with lab environments that simulate organizational messaging scenarios, providing experience in configuring mailboxes, managing policies, implementing hybrid deployments, and securing the messaging environment. This practical experience is invaluable, as it allows candidates to apply knowledge in realistic contexts and reinforces their understanding of complex concepts.
Study materials and practice exams are critical components of preparation. Candidates benefit from comprehensive guides that cover all exam domains, including detailed explanations of policies, configuration steps, troubleshooting procedures, and security best practices. Practice exams help identify knowledge gaps, familiarize candidates with the exam format, and build confidence in answering scenario-based questions. Consistent practice ensures that candidates are not only familiar with Microsoft 365 features but also capable of applying them effectively in diverse environments.
The value of understanding the MS-203 exam structure extends beyond test preparation. Professionals who master these domains become adept at managing organizational messaging environments strategically. They can design efficient mail architectures, enforce security protocols, streamline hybrid deployments, and maintain regulatory compliance. This expertise positions them as indispensable contributors to enterprise IT operations, capable of enhancing productivity, minimizing risk, and supporting organizational growth.
In addition, the certification reinforces the importance of staying current with Microsoft technologies. The messaging landscape evolves continuously, with updates to Microsoft 365, Exchange Online, and security protocols. MS-203 encourages candidates to embrace ongoing learning, ensuring that their skills remain relevant and aligned with industry best practices. Administrators who maintain this mindset can proactively address emerging threats, implement new features, and optimize messaging infrastructure to meet evolving business requirements.
MS-203 also strengthens problem-solving and analytical skills. Scenario-based questions require candidates to evaluate complex situations, consider multiple variables, and determine the most effective solutions. This analytical approach mirrors the real-world challenges faced by messaging administrators, ensuring that certified professionals are equipped to make informed decisions that enhance organizational efficiency and security.
Understanding the MS-203 exam structure and core domains provides candidates with a roadmap for success. By mastering organization management, mail architecture, hybrid deployments, and security, professionals demonstrate a comprehensive ability to administer Microsoft 365 messaging environments effectively. This expertise enhances marketability, increases career opportunities, and establishes the candidate as a trusted authority in messaging administration.
One of the central pillars of the MS-203 Certification is the ability to plan and manage the mail architecture of an organization. Messaging administrators are tasked with ensuring that the email environment operates efficiently, securely, and reliably. This responsibility spans both on-premises Exchange servers and cloud-based Microsoft 365 services, making the mastery of mail architecture essential for any professional pursuing the MS-203 certification.
Planning the mail architecture begins with understanding organizational requirements. Messaging administrators must assess factors such as the number of users, mailbox sizes, data retention needs, compliance requirements, and integration with other communication tools. These factors influence decisions regarding mailbox types, storage quotas, and routing policies. MS-203 candidates learn to evaluate these requirements systematically to design an architecture that balances performance, cost, and security considerations.
Mailbox management is a core component of mail architecture. Administrators must configure user mailboxes, shared mailboxes, resource mailboxes, and distribution groups. They also need to manage mailbox features such as archiving, retention policies, and litigation holds. These capabilities allow organizations to comply with legal and regulatory requirements while ensuring that users have seamless access to communication resources. In the MS-203 exam, candidates are expected to demonstrate proficiency in configuring and managing these mailboxes in real-world scenarios.
Email routing and transport are also critical areas. Administrators must understand how mail flows within the organization and between external systems. This involves configuring connectors, managing mail routing rules, and troubleshooting transport issues. Efficient mail routing ensures that messages are delivered promptly, reduces the risk of delivery failures, and enhances the overall reliability of the messaging system. Candidates also learn to implement transport rules to enforce organizational policies, prevent data leaks, and manage message prioritization.
Hybrid mail architecture adds another layer of complexity. Many organizations operate with a combination of on-premises Exchange servers and Microsoft 365 cloud services. Administrators must design a hybrid environment that ensures seamless coexistence between these platforms. This includes configuring hybrid connectors, establishing secure mail flow between on-premises and cloud systems, and planning mailbox migrations. MS-203 teaches candidates to handle these scenarios efficiently, minimizing disruptions to end-users and maintaining operational continuity.
Performance and scalability are critical considerations in planning mail architecture. Messaging administrators must ensure that the system can handle peak loads, maintain low latency, and accommodate organizational growth. MS-203 emphasizes strategies for scaling mail services, including database sizing, mailbox distribution, and load balancing. Candidates also learn to monitor system performance, identify bottlenecks, and implement corrective measures to maintain optimal operation.
Security is deeply integrated into mail architecture planning. Administrators must design the environment to protect against spam, malware, phishing, and unauthorized access. This includes configuring Microsoft 365 security features such as Advanced Threat Protection, encryption, and authentication protocols. MS-203 candidates are trained to implement security measures that are both effective and transparent to end-users, ensuring that communications remain protected without disrupting workflow.
Compliance and data governance are additional aspects of mail architecture. Administrators must enforce retention policies, implement audit logging, and ensure adherence to regulatory standards. MS-203 teaches professionals to configure compliance features across mailboxes, distribution groups, and resource mailboxes. This includes setting up retention labels, managing legal holds, and monitoring compliance reports. By integrating these elements into the mail architecture, administrators support organizational accountability and regulatory compliance.
Troubleshooting is a vital skill within mail architecture management. MS-203 candidates learn to diagnose issues related to mailbox configuration, mail flow, connectivity, and hybrid integration. This involves analyzing logs, monitoring system health, and applying remediation techniques. Effective troubleshooting ensures that issues are resolved promptly, minimizing downtime and maintaining user confidence in the messaging system.
Another focus of MS-203 is mobile and client access management. Messaging administrators must configure Outlook, Exchange ActiveSync, and other clients to ensure seamless access to mailboxes across devices. This includes setting up mobile device policies, managing synchronization, and addressing security risks associated with remote access. Candidates learn to implement conditional access policies, monitor device compliance, and enforce security measures to protect organizational data on mobile platforms.
The certification also covers advanced features of Microsoft 365 messaging. This includes configuring transport rules for content filtering, setting up connectors for third-party systems, implementing journaling for compliance, and managing public folders. Candidates gain experience in applying these features to optimize mail flow, enforce policies, and support organizational requirements. Understanding these advanced features ensures that administrators can handle complex scenarios and provide robust messaging services.
MS-203 encourages administrators to adopt proactive management strategies. This involves monitoring mailbox sizes, tracking message queues, reviewing audit logs, and analyzing transport reports. By staying ahead of potential issues, administrators can maintain system health, optimize performance, and prevent disruptions to business operations. Proactive management also allows administrators to identify trends, plan capacity, and anticipate the impact of organizational changes on the messaging environment.
Training for mail architecture includes hands-on labs and simulation environments. Candidates gain practical experience in configuring mailboxes, setting up hybrid systems, managing policies, and troubleshooting issues. This experiential learning reinforces theoretical knowledge and prepares candidates for real-world scenarios they will encounter as messaging administrators. The MS-203 exam emphasizes this practical application, ensuring that certified professionals are job-ready and capable of managing complex environments.
Collaboration and integration are also important. Messaging administrators must work closely with security, compliance, and IT support teams to ensure that the mail architecture aligns with organizational policies and objectives. MS-203 candidates learn to coordinate with other departments, communicate technical requirements, and implement solutions that support enterprise goals. This holistic approach ensures that messaging systems contribute to overall business efficiency while maintaining security and compliance standards.
Planning and managing the mail architecture is a cornerstone of the MS-203 Certification. By mastering mailbox management, mail flow, hybrid deployments, security, compliance, and performance optimization, administrators develop the expertise required to support complex Microsoft 365 messaging environments. The knowledge gained through MS-203 enables professionals to design robust, secure, and efficient mail systems, positioning them as indispensable assets in any organization.
A critical component of the MS-203 Certification is the ability to implement hybrid configurations and execute mailbox migrations. Organizations increasingly adopt hybrid models that integrate on-premises Exchange servers with Microsoft 365 cloud services. This transition provides flexibility, scalability, and access to advanced collaboration tools, but it also introduces unique challenges for messaging administrators. MS-203 equips candidates with the knowledge and skills to plan, deploy, and manage these hybrid environments effectively.
The first step in implementing a hybrid configuration is assessing the existing infrastructure. Messaging administrators must evaluate on-premises Exchange servers, network topology, user distribution, and security policies. Understanding these parameters allows administrators to design a hybrid environment that maintains seamless communication while minimizing disruption to users. MS-203 emphasizes the importance of detailed assessment, as inadequate planning can lead to synchronization issues, downtime, and compliance gaps.
A hybrid configuration involves connecting on-premises Exchange servers to Microsoft 365. This requires configuring connectors, federated services, and secure mail flow between the two environments. Administrators must ensure that authentication mechanisms, such as Modern Authentication and OAuth, are properly configured to provide secure access for users. MS-203 teaches candidates to implement these configurations in a way that supports uninterrupted access, enabling users to send and receive email seamlessly across platforms.
Mailbox migration is another fundamental aspect of hybrid environments. MS-203 candidates learn to plan and execute migrations from on-premises Exchange to Microsoft 365, considering factors such as mailbox size, data retention, and user impact. Migration strategies may include cutover, staged, or hybrid migration approaches, each suited for different organizational sizes and requirements. Administrators are trained to select the most appropriate strategy based on technical constraints and business needs, ensuring a smooth transition without compromising security or performance.
Synchronization of user identities is a core element in hybrid deployments. MS-203 emphasizes integrating on-premises Active Directory with Azure Active Directory to maintain consistent identity management across environments. Tools such as Azure AD Connect facilitate this synchronization, ensuring that user credentials, groups, and access permissions are accurately reflected in both cloud and on-premises systems. Proper identity synchronization is essential for enabling single sign-on, managing conditional access policies, and preventing unauthorized access to messaging resources.
Security considerations in hybrid configurations are paramount. Administrators must configure secure mail flow, implement encryption, and apply Advanced Threat Protection to protect data during migration and in day-to-day operations. MS-203 teaches candidates to monitor for potential security threats, set up alerts, and respond proactively to incidents. By integrating security best practices into hybrid deployments, administrators ensure that organizational data remains protected throughout the migration process and in ongoing operations.
Administrators also need to manage coexistence between on-premises and cloud mailboxes. MS-203 covers techniques to maintain consistent mail routing, free/busy calendar availability, and mailbox delegation across environments. This ensures that users experience uninterrupted collaboration, even as some mailboxes reside on-premises and others in the cloud. Candidates learn to troubleshoot issues related to mail routing, directory synchronization, and client access to maintain operational continuity.
Compliance and regulatory requirements are integral to hybrid deployments. Messaging administrators must ensure that data retention, auditing, and reporting policies are consistently applied across both environments. MS-203 teaches professionals to configure retention policies, legal holds, and journaling to meet organizational and regulatory obligations. This ensures that organizations remain compliant while transitioning to or operating within a hybrid model.
Monitoring and reporting are vital for maintaining hybrid environments. MS-203 candidates learn to leverage tools such as the Microsoft 365 admin center, Exchange Admin Center, and PowerShell to track migration progress, monitor system health, and generate compliance reports. Effective monitoring allows administrators to identify potential issues early, implement corrective actions, and maintain the reliability and security of the messaging environment.
Troubleshooting hybrid deployments is another key skill area. Candidates are trained to diagnose connectivity issues, replication errors, and synchronization problems. MS-203 emphasizes a methodical approach to troubleshooting, combining log analysis, monitoring tools, and diagnostic cmdlets. By mastering these techniques, administrators can resolve issues efficiently, minimizing downtime and ensuring that users maintain uninterrupted access to messaging services.
The certification also highlights the importance of automating hybrid management tasks. PowerShell scripting allows administrators to configure connectors, migrate mailboxes, synchronize identities, and manage policies at scale. MS-203 teaches candidates to develop scripts that streamline routine tasks, improve consistency, and reduce manual errors. Automation is particularly valuable in large organizations where hybrid environments may include thousands of users and complex mail routing configurations.
MS-203 encourages proactive planning for hybrid expansion. As organizations grow, new users, departments, or subsidiaries may require integration into the hybrid environment. Messaging administrators learn to plan for future scalability, considering mailbox growth, infrastructure capacity, and evolving security requirements. This strategic approach ensures that hybrid deployments remain efficient, reliable, and secure as organizational needs evolve.
End-user experience is also emphasized in hybrid deployments. Administrators must ensure seamless access to mailboxes, calendars, and contacts regardless of whether a mailbox resides on-premises or in the cloud. MS-203 teaches candidates to configure Outlook, mobile devices, and web access to provide a consistent experience. By prioritizing user satisfaction and minimizing disruption, administrators support productivity while maintaining a secure and compliant messaging infrastructure.
MS-203 also integrates advanced features for hybrid environments. Candidates learn to manage public folders, shared mailboxes, and resource mailboxes across platforms. They also gain experience in implementing advanced security measures such as multi-factor authentication, conditional access policies, and encrypted mail flow. These features ensure that hybrid deployments meet enterprise requirements for security, compliance, and operational efficiency.
Implementing hybrid configurations and migrations is a critical component of the MS-203 Certification. By mastering planning, deployment, identity synchronization, security, compliance, and troubleshooting, administrators gain the expertise needed to manage complex messaging environments effectively. MS-203-certified professionals are equipped to ensure seamless communication, protect sensitive information, and support organizational growth, making this certification a valuable asset for IT careers in messaging administration.
Security is a cornerstone of the MS-203 Certification. Messaging administrators are entrusted with protecting the flow of communication, safeguarding sensitive data, and ensuring organizational compliance within Microsoft 365 environments. The ability to secure mail systems is not just a technical requirement; it is essential for maintaining trust, operational continuity, and regulatory adherence. MS-203 provides candidates with the skills to implement robust security measures, monitor threats, and respond proactively to potential incidents.
Securing the messaging environment begins with identity and access management. Administrators must ensure that users have appropriate permissions, that roles are assigned according to job responsibilities, and that access to sensitive data is controlled. MS-203 candidates learn to implement role-based access control, configure administrator roles, and monitor access rights. Proper identity management reduces the risk of unauthorized access, which is one of the most common vulnerabilities in any enterprise environment.
Conditional access policies are another critical component of security. These policies allow administrators to enforce access controls based on factors such as user location, device compliance, and risk levels. For instance, a user accessing mail from an unfamiliar device or location may be required to undergo multi-factor authentication. MS-203 teaches candidates to design and implement conditional access policies that balance security with user convenience, ensuring that policies are both effective and minimally disruptive to productivity.
Microsoft Defender for Office 365 plays a central role in messaging security. It provides advanced protection against threats such as phishing, malware, and zero-day attacks. MS-203 candidates gain expertise in configuring Defender features, including Safe Links, Safe Attachments, and anti-phishing policies. Administrators learn to monitor alerts, analyze threat reports, and respond to incidents in real-time. This proactive approach helps prevent breaches and ensures that users and data remain protected.
Data Loss Prevention (DLP) is another vital security measure covered in MS-203. Messaging administrators must create policies that prevent sensitive information from being shared inappropriately. This includes protecting credit card numbers, social security numbers, confidential business data, and personally identifiable information. Candidates learn to configure DLP rules, apply sensitivity labels, and monitor policy violations. By enforcing DLP, administrators mitigate the risk of data leaks while maintaining compliance with legal and regulatory standards.
Encryption and secure messaging protocols are critical for protecting communications. MS-203 candidates are trained to implement email encryption, transport layer security, and secure mail routing. Encryption ensures that messages remain confidential during transit and storage, reducing the risk of interception or unauthorized access. Administrators also learn to configure authentication protocols such as DKIM, SPF, and DMARC, which verify the legitimacy of senders and protect against spoofing attacks.
Monitoring and auditing are integral to maintaining a secure messaging environment. Administrators must track user activity, review access logs, and generate compliance reports. MS-203 emphasizes the use of Microsoft 365 audit tools, Security & Compliance Center, and PowerShell scripts to monitor system health and detect anomalies. Proactive monitoring enables administrators to identify potential threats early, investigate incidents, and implement corrective actions before they escalate.
Securing mobile and remote access is increasingly important as organizations adopt Bring Your Own Device (BYOD) policies and remote work arrangements. Messaging administrators must ensure that mobile devices, tablets, and laptops accessing Microsoft 365 mailboxes comply with security policies. MS-203 teaches candidates to configure mobile device management, enforce conditional access, and monitor device compliance. By securing endpoints, administrators reduce vulnerabilities and protect organizational data from unauthorized access.
Threat investigation and response form another core aspect of security. Administrators must be able to analyze alerts, identify the root cause of incidents, and apply remediation measures. MS-203 provides training on using Microsoft 365 Defender to investigate phishing attempts, malware infections, and suspicious login activities. Candidates learn to implement automated response actions, such as quarantining emails, blocking compromised accounts, and applying conditional access restrictions to prevent further threats.
Public folder and shared mailbox security are also emphasized in MS-203. Administrators must manage permissions, configure access controls, and monitor usage to prevent unauthorized access or data leakage. Candidates learn to apply security measures consistently across mailboxes and folders, ensuring that sensitive information is protected while enabling collaboration.
Hybrid security considerations are critical for organizations operating both on-premises and in the cloud. MS-203 teaches administrators to secure hybrid environments by configuring connectors, enforcing transport rules, and monitoring mail flow between on-premises Exchange servers and Microsoft 365. Candidates also learn to implement unified threat management across hybrid deployments, ensuring that both cloud and on-premises components meet security standards.
MS-203 emphasizes the importance of compliance in security management. Administrators must ensure adherence to legal, regulatory, and organizational policies while implementing security measures. This includes retention policies, legal holds, audit logging, and reporting. Candidates learn to configure compliance features in Microsoft 365, ensuring that messaging systems meet industry standards and organizational expectations.
Automating security tasks is another focus of MS-203. PowerShell scripting allows administrators to apply security configurations, enforce policies, and monitor alerts at scale. Candidates learn to develop scripts for repetitive tasks such as updating permissions, applying DLP rules, and generating security reports. Automation enhances efficiency, reduces human error, and ensures consistency in maintaining a secure messaging environment.
End-user education is an often-overlooked component of security. Messaging administrators must work with organizational stakeholders to raise awareness about phishing, email hygiene, and best practices for handling sensitive information. MS-203 candidates are trained to develop strategies for user education, fostering a culture of security consciousness that complements technical measures.
In addition, MS-203 teaches candidates to prepare for incident response and disaster recovery scenarios. Administrators must plan for potential security breaches, data loss, or system failures. This includes backup strategies, mailbox restoration, and continuity planning. Candidates gain practical experience in designing and implementing response plans, ensuring that the organization can recover quickly from incidents while minimizing operational disruption.
Finally, the certification reinforces ongoing professional development. Microsoft 365 messaging environments are constantly evolving, with updates to features, security protocols, and compliance requirements. MS-203 encourages administrators to stay informed, adopt best practices, and continuously enhance their skill set. This commitment to learning ensures that certified professionals remain effective, proactive, and adaptable in safeguarding organizational communication infrastructure.
Securing the Microsoft 365 messaging environment is a multifaceted responsibility encompassing identity management, threat protection, data loss prevention, encryption, monitoring, compliance, and user education. MS-203 prepares candidates to implement these security measures comprehensively, ensuring that organizations can communicate efficiently while maintaining rigorous protection against evolving threats. Certified professionals gain expertise in safeguarding communication channels, mitigating risks, and supporting organizational resilience, making this knowledge indispensable in the modern IT landscape.
One of the essential aspects of the MS-203 Certification is ensuring compliance and effective data governance within Microsoft 365 environments. Messaging administrators are not only responsible for the operational health of mail systems but also for ensuring that organizational communication adheres to regulatory standards and internal policies. In a world where data privacy regulations are increasingly stringent, understanding compliance frameworks and implementing data governance strategies is vital for administrators, and MS-203 equips candidates with the expertise to manage these responsibilities effectively.
Compliance begins with understanding organizational and regulatory requirements. Messaging administrators must assess which regulations apply to their industry, such as GDPR, HIPAA, or SOX, and design policies to ensure adherence. MS-203 emphasizes evaluating data retention, access controls, auditing, and reporting requirements. This understanding helps administrators implement strategies that minimize legal risks while maintaining the integrity and accessibility of organizational communications.
Retention policies are a cornerstone of compliance management. MS-203 candidates learn to configure retention labels and policies that determine how long emails and other messages are stored. Proper retention ensures that important records are preserved for legal or operational purposes while unnecessary data is removed to reduce storage overhead and mitigate exposure to risks. Administrators are trained to apply retention policies consistently across mailboxes, distribution groups, and shared resources to maintain uniform compliance standards.
Legal holds are another critical compliance tool. Messaging administrators must be able to place specific mailboxes or items on hold in response to legal or regulatory investigations. MS-203 teaches candidates how to implement legal holds without disrupting normal operations. This ensures that critical information is preserved for e-discovery or litigation purposes while users can continue working without interruption. Understanding how to manage legal holds efficiently is a skill that directly impacts an organization’s ability to meet regulatory obligations.
Auditing and monitoring are fundamental components of compliance management. Administrators must track user activity, document changes to mail systems, and generate detailed audit logs. MS-203guidesn using Microsoft 365 compliance tools to monitor mailbox access, configuration changes, and policy enforcement. By analyzing audit data, administrators can detect anomalies, investigate suspicious activities, and demonstrate compliance during regulatory inspections. Proactive auditing reduces the risk of compliance violations and strengthens organizational accountability.
Data governance encompasses the classification and protection of sensitive information. MS-203 trains candidates to implement sensitivity labels and classification schemes that categorize data based on its sensitivity and compliance requirements. By labeling emails, documents, and other communication assets appropriately, administrators can enforce policies that protect sensitive information from unauthorized access or accidental disclosure. This classification also supports DLP policies, ensuring that sensitive data is not shared inappropriately across organizational boundaries.
Advanced data loss prevention (DLP) strategies are critical for both security and compliance. Messaging administrators configure DLP rules that identify and block the transmission of sensitive information via email. MS-203 candidates learn to create policies that balance security with productivity, preventing accidental leaks without unduly restricting user communication. Effective DLP implementation reduces organizational risk while supporting compliance with data protection laws and internal policies.
Compliance management also involves monitoring and reporting. Administrators must generate reports that provide insights into policy enforcement, mailbox activity, and security incidents. MS-203 emphasizes the use of Microsoft 365 compliance tools, Security & Compliance Center, and PowerShell to automate reporting and maintain visibility into messaging operations. These reports are invaluable during audits, demonstrating that organizational practices meet regulatory standards and internal governance expectations.
The integration of security and compliance is a recurring theme in MS-203. Messaging administrators must ensure that security measures, such as encryption, conditional access, and identity management, support compliance objectives. For example, enforcing multi-factor authentication protects sensitive information and aligns with regulatory requirements for data protection. Candidates learn to apply security and compliance controls cohesively to create a messaging environment that is both secure and compliant.
Hybrid environments present unique compliance challenges. MS-203 teaches candidates to manage compliance across both on-premises Exchange servers and Microsoft 365 cloud services. This includes ensuring that retention policies, audit logs, and legal holds are consistently applied across all systems. Administrators also learn to monitor hybrid mail flow for potential compliance breaches and implement corrective measures to maintain adherence to regulations. Ensuring uniform compliance across hybrid deployments is critical for organizations with complex infrastructures.
End-user collaboration and compliance awareness are important aspects of governance. Administrators must educate users about policies regarding email retention, sensitive data handling, and reporting suspicious activities. MS-203 candidates learn strategies for fostering a culture of compliance within the organization, emphasizing that users play an essential role in maintaining regulatory adherence. By engaging employees and providing clear guidance, administrators reduce the likelihood of policy violations and reinforce organizational governance.
Incident response is another integral part of compliance management. Administrators must be prepared to address situations such as accidental data exposure, policy violations, or suspected breaches. MS-203 teaches candidates to investigate incidents methodically, document findings, implement remediation, and update policies to prevent recurrence. This structured approach ensures that organizations can respond effectively to compliance challenges while minimizing operational disruption.
Automation enhances compliance and governance efforts. PowerShell scripts allow administrators to enforce retention policies, manage legal holds, generate audit reports, and apply DLP rules at scale. MS-203 candidates gain experience in leveraging automation to reduce manual workload, increase consistency, and maintain comprehensive oversight over messaging systems. Automated compliance management ensures that organizational policies are applied uniformly, regardless of the size or complexity of the user base.
Monitoring service health is also a compliance consideration. Administrators must track the availability and performance of Microsoft 365 messaging services, ensuring that outages or disruptions do not compromise data integrity or regulatory requirements. MS-203 teaches candidates to utilize monitoring tools, configure alerts, and respond proactively to service issues. Maintaining service continuity supports both operational efficiency and adherence to compliance standards.
MS-203 encourages administrators to adopt a proactive approach to data governance. This includes planning for data growth, evaluating emerging regulatory requirements, and continuously improving policies and procedures. By staying informed about evolving compliance frameworks and integrating best practices into messaging operations, administrators ensure that organizations are prepared to meet future challenges.
Finally, MS-203 emphasizes the importance of continuous professional development in compliance and governance. Messaging environments, regulations, and security threats evolve rapidly, requiring administrators to remain up-to-date. Candidates are encouraged to engage with ongoing training, community resources, and industry updates to maintain expertise in managing secure, compliant Microsoft 365 messaging systems.
Managing compliance and data governance in Microsoft 365 is a multifaceted responsibility encompassing retention policies, legal holds, auditing, DLP, sensitivity labeling, hybrid compliance, and incident response. MS-203 prepares candidates to implement these measures effectively, ensuring that organizational communication systems are secure, compliant, and reliable. Certified professionals gain the skills to mitigate regulatory risk, enforce policies consistently, and maintain operational integrity, making them indispensable assets in the modern IT landscape.
Achieving the MS-203 Certification is a significant milestone for messaging administrators and IT professionals working with Microsoft 365 environments. The certification demonstrates expertise in managing mail systems, implementing security measures, ensuring compliance, and troubleshooting complex issues. MS-203 not only validates technical skills but also enhances professional credibility and opens doors to advanced career opportunities in enterprise messaging administration.
Preparation for the MS-203 exam begins with understanding the exam objectives and domains. The certification evaluates candidates across four primary areas: managing organizational settings and resources, planning and managing mail architecture, implementing hybrid configurations and migrations, and securing the messaging environment. Each domain represents a critical skill set for administrators, and thorough knowledge in these areas is essential for success.
A structured study plan is vital for effective exam preparation. Candidates should start by reviewing Microsoft 365 messaging fundamentals, gaining hands-on experience with Exchange Online, Microsoft 365 Defender, and related tools. MS-203 emphasizes practical application, so working in real-world environments or lab setups provides invaluable experience. Administrators can configure mail flow, manage users and groups, apply security policies, and troubleshoot issues to reinforce theoretical knowledge.
MS-203 encourages candidates to leverage official Microsoft documentation, community resources, and training modules. Understanding the latest updates to Microsoft 365 services, new security features, and best practices is crucial, as the platform evolves rapidly. Staying current ensures that administrators can apply the most effective solutions and align with industry standards. Practice tests and scenario-based exercises are particularly helpful for simulating the types of questions encountered on the exam, enhancing confidence and problem-solving skills.
Time management is another critical factor for success. The MS-203 exam typically contains multiple-choice questions, case studies, and scenario-based assessments. Candidates must balance speed with accuracy, carefully analyzing each question and applying practical knowledge to arrive at correct solutions. MS-203 trains candidates to prioritize information, recognize key indicators, and systematically approach complex scenarios, which mirrors real-world administrative challenges.
In addition to technical preparation, understanding the broader implications of messaging administration is beneficial. Administrators must consider organizational policies, user experience, compliance requirements, and security objectives when making decisions. MS-203 emphasizes integrating technical expertise with strategic thinking, allowing candidates to implement solutions that meet organizational goals while maintaining efficiency, security, and compliance.
Career advancement is one of the most compelling reasons to pursue the MS-203 Certification. Messaging administrators with this credential are well-positioned for roles such as Microsoft 365 Messaging Administrator, Exchange Administrator, Security Administrator, and IT Operations Specialist. Employers value certified professionals who can design, manage, and secure complex messaging environments, particularly in enterprises with hybrid or cloud-focused infrastructures.
The certification also enhances professional credibility. Holding an MS-203 demonstrates a commitment to continuous learning and mastery of Microsoft 365 messaging technologies. This credibility can influence hiring decisions, salary negotiations, and promotion opportunities. In competitive IT environments, certification provides a tangible indicator of expertise and reliability, distinguishing professionals from their peers.
MS-203-certified administrators are better equipped to manage modern threats and security challenges. The certification emphasizes advanced threat protection, identity management, data loss prevention, and conditional access policies. Candidates gain the skills to proactively detect, investigate, and mitigate security incidents, protecting both organizational data and user productivity. In an era where cyber threats are increasingly sophisticated, this capability is invaluable.
Compliance management is another key advantage of the MS-203 Certification. Organizations must adhere to complex regulatory requirements regarding data retention, auditing, and reporting. Administrators who understand these compliance frameworks and can implement appropriate controls provide strategic value to their organizations. MS-203 candidates learn to apply retention policies, legal holds, and sensitivity labels effectively, ensuring that messaging systems meet regulatory obligations while supporting operational needs.
The MS-203 also fosters problem-solving and analytical skills. Messaging administrators frequently encounter complex scenarios involving mail flow issues, hybrid configurations, or security incidents. The certification prepares candidates to analyze these situations systematically, identify root causes, and apply effective solutions. These problem-solving abilities are transferable across IT roles and enhance an administrator’s capacity to address unforeseen challenges confidently.
Automation and efficiency are emphasized in MS-203 training. Administrators learn to leverage PowerShell scripts and other tools to automate routine tasks, enforce policies, and generate reports. Automation not only saves time but also reduces the risk of errors, ensuring consistent application of security, compliance, and operational policies. By mastering these tools, administrators can scale their operations effectively, managing larger environments with greater precision.
Networking and community engagement are also encouraged. MS-203 candidates benefit from connecting with other professionals, participating in forums, and sharing insights about Microsoft 365 messaging. These interactions provide exposure to diverse challenges and solutions, offering practical perspectives beyond the classroom or lab environment. Engaging with the broader community fosters continuous learning and professional growth.
Maintaining certification is an ongoing process. Microsoft updates its exams and training materials regularly to reflect platform changes, security enhancements, and new features. Administrators must stay informed about updates, renew certifications when required, and continue developing their skills. MS-203 emphasizes a mindset of lifelong learning, ensuring that certified professionals remain current and effective throughout their careers.
In conclusion, the MS-203 Certification is a highly valuable credential for IT professionals seeking expertise in Microsoft 365 messaging administration. It equips candidates with comprehensive skills in mail architecture, hybrid deployments, security, compliance, monitoring, and troubleshooting. Certification validates technical proficiency, enhances professional credibility, and opens doors to advanced career opportunities. By investing in preparation, gaining hands-on experience, and staying engaged with evolving technologies, administrators can leverage MS-203 to secure sensitive communications, support organizational growth, and advance their careers in the dynamic world of IT.
Go to testing centre with ease on our mind when you use Microsoft 365 MS-203 vce exam dumps, practice test questions and answers. Microsoft MS-203 Microsoft 365 Messaging certification practice test questions and answers, study guide, exam dumps and video training course in vce format to help you study with ease. Prepare with confidence and study using Microsoft 365 MS-203 exam dumps & practice test questions and answers vce from ExamCollection.
Purchase Individually

Microsoft MS-203 Video Course

Top Microsoft Certifications


Top Microsoft Certification Exams
Site Search:

SPECIAL OFFER: GET 10% OFF

Pass your Exam with ExamCollection's PREMIUM files!
SPECIAL OFFER: GET 10% OFF
Use Discount Code:
MIN10OFF
A confirmation link was sent to your e-mail.
Please check your mailbox for a message from support@examcollection.com and follow the directions.

Download Free Demo of VCE Exam Simulator
Experience Avanset VCE Exam Simulator for yourself.
Simply submit your e-mail address below to get started with our interactive software demo of your free trial.
Exam Passed...Premium Dump is enough to pass the exam
Took the exam today and passed .Premium is valid.
Previmium files good enouch to pass the exam plus knowning your stuff to answer few new questions and a case study. All the best guys
Need to study MS-203
need to study MS-203
Need to study MS-203
Need to study MS-203
Need to study MS-203