


Training Course
141 Lectures
$27.49$24.99
Microsoft Power Platform PL-100 Exam Questions & Answers, Accurate & Verified By IT Experts
Instant Download, Free Fast Updates, 99.6% Pass Rate
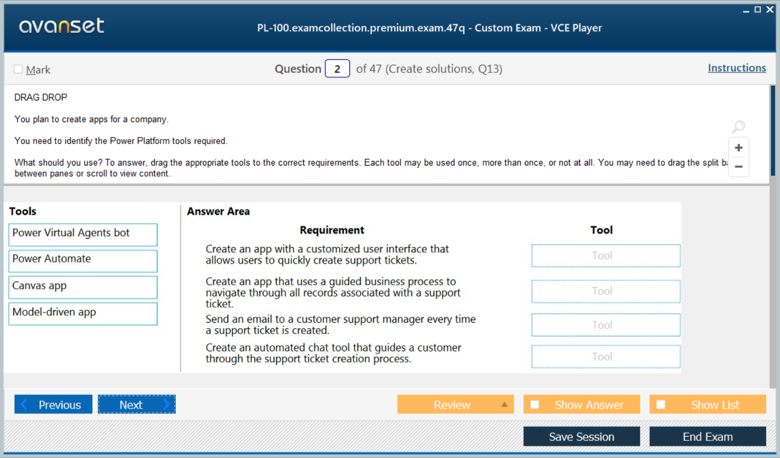
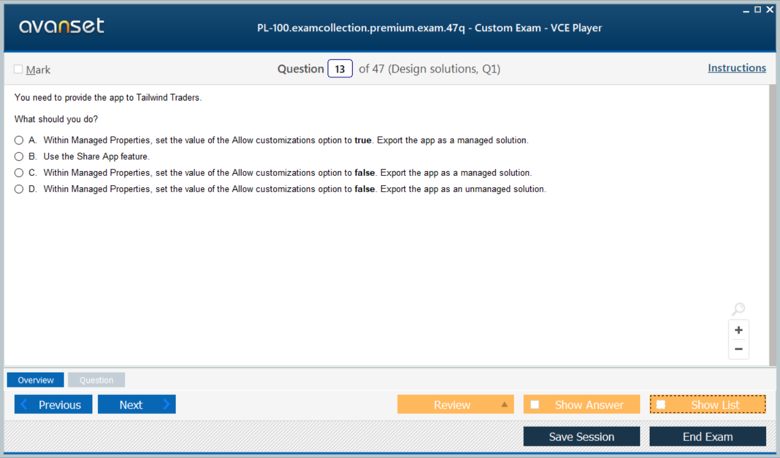
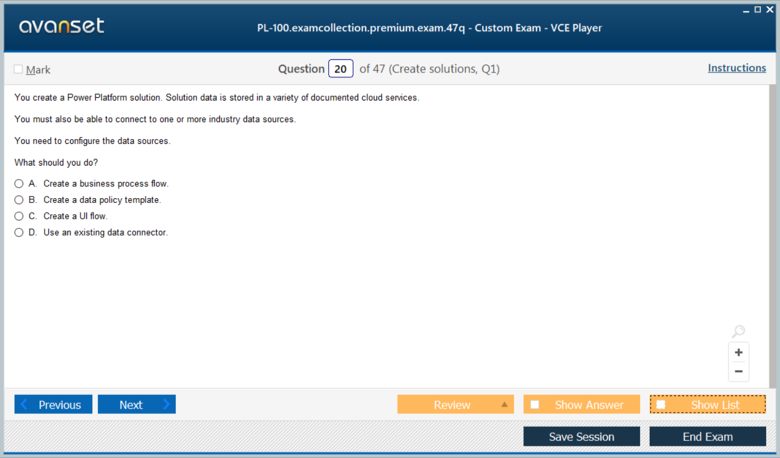
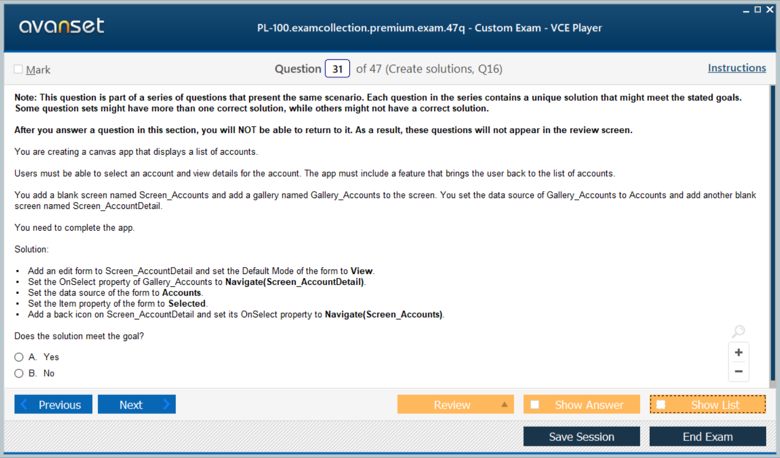
Microsoft Power Platform PL-100 Exam Screenshots
Microsoft Power Platform PL-100 Practice Test Questions in VCE Format
| File | Votes | Size | Date |
|---|---|---|---|
File Microsoft.pass4sure.PL-100.v2024-06-01.by.santiago.122q.vce |
Votes 1 |
Size 1.67 MB |
Date Jun 01, 2024 |
File Microsoft.examanswers.PL-100.v2021-12-22.by.holly.116q.vce |
Votes 1 |
Size 1.42 MB |
Date Dec 22, 2021 |
File Microsoft.examlabs.PL-100.v2021-11-03.by.martina.93q.vce |
Votes 1 |
Size 1.53 MB |
Date Nov 03, 2021 |
File Microsoft.actualtests.PL-100.v2021-09-30.by.ethan.78q.vce |
Votes 1 |
Size 1019.34 KB |
Date Sep 30, 2021 |
File Microsoft.realtests.PL-100.v2021-08-26.by.gabriel.49q.vce |
Votes 1 |
Size 866.34 KB |
Date Aug 26, 2021 |
File Microsoft.pass4sure.PL-100.v2021-07-20.by.captainmarvel.38q.vce |
Votes 1 |
Size 685.59 KB |
Date Jul 20, 2021 |
File Microsoft.testking.PL-100.v2021-04-27.by.thea.20q.vce |
Votes 1 |
Size 350.88 KB |
Date Apr 28, 2021 |
File Microsoft.pass4sure.PL-100.v2020-10-01.by.leo.21q.vce |
Votes 2 |
Size 954.52 KB |
Date Oct 01, 2020 |
Microsoft Power Platform PL-100 Practice Test Questions, Exam Dumps
Microsoft PL-100 (Microsoft Power Platform App Maker) exam dumps vce, practice test questions, study guide & video training course to study and pass quickly and easily. Microsoft PL-100 Microsoft Power Platform App Maker exam dumps & practice test questions and answers. You need avanset vce exam simulator in order to study the Microsoft Power Platform PL-100 certification exam dumps & Microsoft Power Platform PL-100 practice test questions in vce format.
The Microsoft PL-100 Power Platform App Maker certification is a role-based associate-level credential that validates your ability to design, build, and deploy solutions using the Microsoft Power Platform suite of tools. It is designed for individuals who use low-code and no-code development approaches to solve business problems, automate repetitive processes, and build custom applications without requiring deep programming expertise. The certification targets business technologists, citizen developers, and power users who work closely with business stakeholders to translate operational needs into working digital solutions that improve productivity and efficiency.
Microsoft introduced this certification to address the growing demand for professionals who can bridge the gap between business requirements and technical implementation using the Power Platform ecosystem. Traditional software development requires specialized programming skills that many business users do not possess, but the Power Platform tools including Power Apps, Power Automate, Power BI, and Power Virtual Agents democratize application development by making it accessible to people with deep business knowledge but limited coding experience. The PL-100 certification validates that you have the skills to use these tools effectively, responsibly, and in alignment with organizational governance standards and security requirements.
The Microsoft Power Platform is an integrated suite of low-code tools that allows organizations to analyze data, build solutions, automate processes, and create virtual agents. It consists of four primary components that work together seamlessly and integrate deeply with Microsoft 365, Azure, and hundreds of external services through a rich connector ecosystem. Power Apps enables the creation of custom business applications for web and mobile devices. Power Automate enables the automation of workflows and business processes across different applications and services. Power BI enables the creation of interactive data visualizations and business intelligence reports. Power Virtual Agents enables the creation of intelligent chatbots that can handle common questions and tasks without human intervention.
The platform is built on Microsoft Dataverse, a scalable cloud-based data storage and management service that provides a common data layer for all Power Platform applications. Dataverse stores application data in a structured, secure, and governed environment with built-in support for business rules, calculated fields, relationships between tables, and role-based security. The Common Data Model provides standardized data schemas that make it easier to integrate data from different sources and share data between different applications built on the platform. Understanding how these components fit together and how they interact with each other is foundational knowledge for the PL-100 certification and for building effective Power Platform solutions in real organizational environments.
Canvas apps are one of the two primary types of applications that can be built with Power Apps, and they represent the most flexible approach to application development on the platform. In a canvas app, the developer has complete control over the layout, design, and behavior of every screen, placing controls exactly where they are needed and connecting them to data sources through formulas. This pixel-perfect design approach makes canvas apps ideal for situations where the user experience must be carefully tailored to specific workflows or where the application needs to work across both phone and tablet form factors with different screen layouts optimized for each.
Building canvas apps requires familiarity with the Power Apps formula language, which is similar to Excel formulas in syntax and approach, making it accessible to users with spreadsheet experience. Common functions used in canvas app development include If for conditional logic, Filter and Search for working with data collections, Patch for writing data back to a data source, and Navigate for moving between screens within the application. Canvas apps can connect to data stored in Microsoft Dataverse, SharePoint lists, Excel files stored in OneDrive, SQL Server databases, and hundreds of other data sources through the connector ecosystem. Understanding how to design efficient data connections and minimize the number of data calls made by the application is important for building canvas apps that perform well even when accessed over mobile networks.
Model-driven apps take a fundamentally different approach to application development compared to canvas apps, generating the user interface automatically based on the data model and business logic defined in Microsoft Dataverse. Instead of designing screens from scratch, the developer defines the data tables, forms, views, charts, and dashboards that the application will use, and the Power Apps framework generates a consistent, responsive user interface that works across web browsers and mobile devices without additional design work. This approach makes model-driven apps faster to build for data-intensive business scenarios where a standardized interface is acceptable and the focus is on business logic and data management rather than custom visual design.
Model-driven apps are particularly well-suited for complex business scenarios involving multiple related data tables, sophisticated business rules, and large numbers of records. They include built-in features such as activity tracking, relationship management, business process flows that guide users through multi-step procedures, and integration with Microsoft Teams for collaboration. Business rules in model-driven apps allow administrators to define conditional logic that runs directly in the browser without requiring custom code, such as showing or hiding fields based on other field values or requiring certain fields when specific conditions are met. Understanding when to choose a model-driven app over a canvas app based on the requirements of a given scenario is an important judgment skill tested in the PL-100 certification exam.
Microsoft Dataverse is the preferred data storage solution for Power Platform applications and is deeply integrated with both canvas apps and model-driven apps. It provides a rich data management environment with support for standard and custom tables, multiple column data types, relationships between tables, calculated and rollup columns, business rules, and row-level security. Dataverse handles the complexities of data storage, indexing, backup, and compliance automatically, allowing app makers to focus on building solutions rather than managing database infrastructure.
Tables in Dataverse are organized into standard tables that come pre-built with common business entities like Account, Contact, and Activity, and custom tables that app makers create to store data specific to their organizational needs. Relationships between tables can be one-to-many, many-to-many, or one-to-one, and these relationships are reflected in the application interface through lookup columns and related record subgrids. Security in Dataverse is managed through a role-based model where security roles define what operations users can perform on each table and which rows they can access, enabling fine-grained control over who can read, create, update, and delete records within the application. Understanding how to design a Dataverse data model that supports the requirements of a given solution is a critical skill for the PL-100 exam and for building production-ready Power Platform applications.
Power Automate is the workflow automation component of the Power Platform that allows users to create automated processes connecting different applications and services without writing traditional code. Flows in Power Automate are built by defining a trigger that starts the flow and a series of actions that execute in response to that trigger. Triggers can be events like a new item being added to a SharePoint list, a new email arriving in an Outlook inbox, a scheduled time being reached, or a button being tapped in a Power Apps application. Actions can include sending emails, creating records in Dataverse, posting messages to Microsoft Teams, updating spreadsheets, calling external APIs, and hundreds of other operations available through the connector library.
Power Automate supports three main flow types that serve different automation scenarios. Cloud flows run in the Microsoft cloud and connect cloud-based services and applications. Desktop flows, also known as robotic process automation, automate interactions with desktop applications and legacy systems that do not have APIs, using recorded interactions with the user interface to perform repetitive tasks. Business process flows guide users through multi-step procedures in model-driven apps, ensuring that data is entered consistently and completely before moving to the next stage of a process. Understanding the appropriate use case for each flow type and knowing how to build flows that handle errors gracefully, process data in loops, and make conditional decisions based on data values are all skills tested in the PL-100 certification exam.
Power BI is the business intelligence and data visualization component of the Power Platform, enabling users to connect to data sources, transform raw data into meaningful insights, and share interactive reports and dashboards with colleagues and stakeholders. For the PL-100 exam, candidates need to understand Power BI concepts at a level appropriate for an app maker rather than a dedicated BI developer, focusing on how Power BI integrates with Power Apps and Power Automate and how reports and dashboards can be embedded in applications to provide contextual data insights to users.
Power BI Desktop is the application used to build reports, where data from multiple sources is imported or connected in live query mode, transformed using Power Query to clean and shape it into the desired format, and then visualized using a rich library of chart types, maps, tables, and custom visuals. The data model in Power BI uses DAX, the Data Analysis Expressions language, to define calculated columns and measures that perform aggregations and business logic calculations on the data. Published reports are hosted in the Power BI service, where they can be shared with other users, organized into workspaces, and embedded in other applications including Power Apps canvas apps and SharePoint pages. Understanding how to consume and share Power BI content and how to embed reports in Power Apps solutions is the level of Power BI knowledge most relevant to the PL-100 certification.
Connectors are the integration layer that allows Power Platform applications and flows to communicate with external services, databases, and APIs. Microsoft provides over nine hundred pre-built connectors covering a wide range of popular services including SharePoint, Excel, SQL Server, Dynamics 365, Salesforce, Twitter, Dropbox, Gmail, and many others. Standard connectors are available to all Power Platform users, while premium connectors require a higher-tier license and provide access to more specialized services. Understanding the licensing implications of connector usage is important for solution design because choosing a premium connector for a widely used application can significantly increase the organizational cost of deploying that solution.
Custom connectors allow app makers to connect Power Platform solutions to APIs and services that do not have a pre-built connector in the Microsoft library. Building a custom connector requires defining the API endpoints, authentication method, and available actions and triggers using either an OpenAPI definition file or a manual configuration process within the Power Platform maker portal. On-premises data gateway extends the reach of cloud-based Power Platform solutions to connect to data sources hosted in on-premises environments such as SQL Server, Oracle, and SharePoint Server installations that cannot be directly accessed from the internet. Understanding how to work with connectors, manage their connections securely, and troubleshoot connectivity issues is a practical skill that appears throughout the PL-100 exam in various scenario-based questions.
Solutions are the packaging mechanism used to transport Power Platform components between environments during the application lifecycle. A solution is a container that holds related app components including apps, flows, tables, columns, security roles, connection references, and environment variables together so they can be exported from a development environment and imported into testing and production environments as a coherent package. Understanding how solutions work and how to manage application lifecycle management using solutions is an important aspect of professional Power Platform development that the PL-100 exam tests directly.
Managed solutions and unmanaged solutions behave differently and are used for different purposes in the deployment pipeline. Unmanaged solutions are used in development environments where components need to be freely modified, customized, and deleted. Managed solutions are used in testing and production environments where the solution publisher wants to control what changes can be made to the deployed components. Environment variables within solutions store configuration values that differ between environments, such as SharePoint site URLs or API endpoint addresses, allowing the same solution to work correctly in different environments without modification. Publisher prefixes identify the creator of solution components and prevent naming conflicts when multiple solutions from different publishers are installed in the same environment.
Security and governance are critical considerations in any Power Platform deployment, and the PL-100 exam tests candidates on their understanding of how to implement appropriate security controls and follow organizational governance policies. Data loss prevention policies are administrator-defined rules that control which connectors can be used together in a flow or app, preventing sensitive data from being inadvertently sent to unauthorized external services. For example, a DLP policy might allow SharePoint and Outlook connectors to be used together while blocking the combination of SharePoint with a personal social media connector, ensuring that organizational data stays within approved channels.
Environment management is another governance topic covered in the exam. Power Platform environments are containers that hold apps, flows, and data, and organizations typically maintain separate environments for development, testing, and production to prevent untested changes from affecting live business operations. Environment administrators control who can create apps and flows, which connectors are available, and what data policies apply within each environment. The Power Platform admin center provides a centralized interface for managing environments, monitoring usage, reviewing audit logs, and enforcing governance policies across the entire organizational Power Platform deployment. Understanding these governance mechanisms and knowing how to work within them appropriately is an important aspect of being a responsible and professional Power Platform app maker.
Power Virtual Agents enables app makers to build intelligent chatbots that can handle common user questions, guide users through processes, and integrate with back-end systems to retrieve or update information, all without writing traditional code. Bots built with Power Virtual Agents use a visual topic authoring interface where conversation flows are defined as trees of trigger phrases, bot responses, conditions, and actions. Topics are the individual conversation scenarios that a bot can handle, and each topic begins with a set of trigger phrases that cause the bot to recognize when a user is asking about that particular subject and respond appropriately.
Integrating Power Virtual Agents bots with Power Automate flows allows the bot to perform actions beyond simple question-and-answer interactions, such as looking up information from a database, creating a support ticket, or sending a notification email based on information provided by the user during the conversation. Bots can be deployed to multiple channels including Microsoft Teams, a company website, Facebook Messenger, and mobile apps, reaching users wherever they prefer to interact. The PL-100 exam tests knowledge of how to create and configure bots, define topics and conversation flows, integrate with Power Automate for back-end actions, and publish bots to different channels. Understanding when a bot is an appropriate solution for a given business problem and how to design conversations that feel natural and helpful to end users are judgment skills that distinguish effective app makers from those who simply know the mechanics of the tool.
Effective application design goes beyond technical implementation to consider how real users will interact with the solution in their daily work. The PL-100 exam recognizes that app makers are responsible for creating solutions that are not only functionally correct but also intuitive, efficient, and accessible to their intended user population. Principles of good user experience design including consistent layout and navigation, clear labeling, appropriate use of color and contrast, logical grouping of related information, and providing meaningful error messages when something goes wrong all contribute to the adoption and effectiveness of Power Platform solutions.
Accessibility considerations are increasingly important in application design, and Power Apps includes features that help app makers build solutions that work for users with visual, motor, or cognitive disabilities. Screen reader support, keyboard navigation, sufficient color contrast ratios, and avoiding the use of color alone to convey important information are accessibility practices that align with the Web Content Accessibility Guidelines and organizational policies in many regulated industries. Responsive design ensures that apps work well across different screen sizes and device types, which is particularly important for solutions used by field workers or front-line employees who access applications primarily on smartphones or tablets rather than desktop computers. Considering these design factors during the development process rather than attempting to retrofit them later produces better applications more efficiently.
Thorough testing is essential for delivering Power Platform solutions that work reliably in production environments and meet the expectations of the business stakeholders who depend on them. Testing a canvas app involves verifying that all data connections work correctly, that formulas produce the expected results across a range of input values including edge cases and invalid inputs, that navigation between screens behaves correctly, and that the application performs acceptably when working with realistic volumes of data. Testing should be performed by people other than the developer who built the solution, because familiarity with the design can cause developers to unconsciously avoid the interaction patterns that expose bugs.
Testing Power Automate flows requires verifying that the trigger fires correctly under all expected conditions, that actions execute in the correct sequence, that error handling branches activate when expected failures occur, and that the flow completes successfully within acceptable time limits. Using test data that covers both typical scenarios and boundary conditions helps identify issues that would only emerge under specific circumstances in production. The Power Platform solution checker is a tool that automatically analyzes apps and flows for common performance, reliability, and security issues, flagging problems that should be addressed before deployment. Maintaining a record of test cases and their outcomes provides documentation that supports future maintenance and modification of the solution and demonstrates due diligence if questions arise about solution quality.
Preparing effectively for the PL-100 exam requires a combination of conceptual learning through official study materials and extensive hands-on practice building real solutions in the Power Platform. Microsoft Learn provides a free official learning path for the PL-100 that covers all exam objectives through structured modules with interactive exercises and knowledge checks. Working through this learning path systematically ensures that your study covers all the topics that the exam tests and familiarizes you with Microsoft's terminology and recommended approaches for common development scenarios.
Hands-on practice is even more important for the PL-100 than for many other certifications because the exam includes scenario-based questions that test your ability to make sound design and implementation decisions, not just recall facts. Creating a free Power Apps developer account gives you access to a personal Power Platform environment where you can build canvas apps and model-driven apps, create Power Automate flows, work with Dataverse, and experiment with Power Virtual Agents without incurring any cost. Building complete end-to-end solutions that address realistic business scenarios, such as a leave request management system, an inventory tracking application, or a customer feedback collection tool, develops the integrated understanding of how the platform components work together that is essential for answering complex exam questions correctly.
Earning the PL-100 certification opens a range of career opportunities for professionals who want to work at the intersection of business analysis and technology implementation. The role of Power Platform developer or citizen developer is increasingly recognized as a distinct and valuable position within IT and business operations teams. Organizations that have adopted the Power Platform as their low-code development strategy need professionals who can gather requirements from business stakeholders, design appropriate solutions, build and test those solutions, and support them after deployment. These roles are available across virtually every industry and in organizations of every size from small businesses to global enterprises.
The PL-100 certification also serves as a strong foundation for more advanced Power Platform credentials. Microsoft's PL-200 Power Platform Functional Consultant certification builds on PL-100 knowledge by covering more complex solution design, advanced Dataverse customization, and integration with Dynamics 365 applications. The PL-400 Power Platform Developer certification targets professionals who want to extend Power Platform solutions with custom code using Azure Functions, custom connectors, and the Power Apps component framework. For professionals interested in the data analytics side of the platform, the PL-300 Power BI Data Analyst certification provides a dedicated path to expertise in business intelligence report building and data modeling. Each of these advanced certifications builds meaningfully on the foundation established by PL-100, making it a strategic starting point for a Power Platform specialization career.
Building real-world solutions on the Power Platform requires more than knowing how to use individual tools in isolation. Effective app makers understand how to analyze a business problem, identify which Power Platform components are most appropriate for addressing it, design a solution architecture that uses those components together efficiently, and implement the solution in a way that is maintainable, secure, and scalable as business needs evolve. This end-to-end problem-solving capability is what separates professional app makers from casual users who can build simple solutions but struggle with complexity.
Common real-world scenarios where Power Platform solutions add significant value include automating approval workflows that previously required manual email chains, replacing paper-based forms and spreadsheet tracking systems with proper database-backed applications, building self-service reporting dashboards that give business managers access to operational data without requiring IT involvement, and creating chatbots that handle common employee or customer inquiries around the clock without human agent involvement. Each of these scenarios requires thoughtful design decisions about data storage, security, user experience, and integration with existing systems that draw on the full breadth of knowledge tested in the PL-100 certification. The ability to recognize which scenarios are well-suited to Power Platform solutions and which require more traditional development approaches is a judgment skill that develops through experience and that the PL-100 certification helps validate.
The Microsoft PL-100 Power Platform App Maker certification represents a genuinely transformative credential for professionals who want to leverage low-code technology to drive meaningful change in their organizations. Throughout this comprehensive guide, we have explored every major knowledge domain that the certification covers, from the foundational components of the Power Platform ecosystem through canvas and model-driven app development, Dataverse data management, Power Automate workflow automation, Power BI data visualization, connector integration, solution management, security and governance, Power Virtual Agents chatbot creation, application design principles, testing practices, and career development opportunities.
What makes the PL-100 certification particularly relevant in today's technology landscape is the fundamental shift it represents in who can build enterprise-grade software solutions. For decades, creating business applications required specialized programming knowledge that was inaccessible to the vast majority of business professionals who understood the problems that needed solving but lacked the technical skills to build the tools to solve them. The Power Platform changes this equation dramatically, and the PL-100 certification validates that you have the skills to participate meaningfully in this new era of democratized application development.
The business impact of Power Platform solutions built by certified app makers can be substantial. Organizations that empower their business users to build solutions to their own problems reduce the backlog of IT development requests, accelerate the delivery of solutions that are closely aligned with actual business needs, and free professional developers to focus on the most complex and strategically important projects. App makers who can identify automation opportunities, quantify the time and cost savings they enable, and deliver working solutions quickly become highly valued contributors in their organizations regardless of their formal job title.
From a professional development perspective, the skills and knowledge validated by the PL-100 certification continue to grow in value as Microsoft expands and deepens the Power Platform capabilities with each product update. New connectors, improved AI features through AI Builder, enhanced Dataverse capabilities, and tighter integration with Microsoft 365 and Azure services are continuously added to the platform, providing ongoing opportunities for certified app makers to expand their capabilities and deliver even more sophisticated solutions. The foundational understanding developed through PL-100 preparation provides the conceptual framework needed to absorb and apply these new capabilities quickly as they become available.
Approach your PL-100 preparation with genuine curiosity about how the tools work and how they can be applied to solve real problems in your organization or industry. Build solutions that matter, seek feedback from the users who will rely on them, iterate based on that feedback, and share your experiences with the growing Power Platform community. The combination of certified knowledge and practical experience positions you as someone who can make a genuine difference through technology, which is ultimately the most rewarding outcome any certification journey can deliver.
Go to testing centre with ease on our mind when you use Microsoft Power Platform PL-100 vce exam dumps, practice test questions and answers. Microsoft PL-100 Microsoft Power Platform App Maker certification practice test questions and answers, study guide, exam dumps and video training course in vce format to help you study with ease. Prepare with confidence and study using Microsoft Power Platform PL-100 exam dumps & practice test questions and answers vce from ExamCollection.
Purchase Individually

Microsoft PL-100 Video Course

Top Microsoft Certifications


Top Microsoft Certification Exams
Site Search:

SPECIAL OFFER: GET 10% OFF


Pass your Exam with ExamCollection's PREMIUM files!
SPECIAL OFFER: GET 10% OFF
Use Discount Code:
MIN10OFF
A confirmation link was sent to your e-mail.
Please check your mailbox for a message from support@examcollection.com and follow the directions.

Download Free Demo of VCE Exam Simulator
Experience Avanset VCE Exam Simulator for yourself.
Simply submit your e-mail address below to get started with our interactive software demo of your free trial.