Pass Your Microsoft Desktop MD-101 Exam Easy!
Microsoft Desktop MD-101 Exam Questions & Answers, Accurate & Verified By IT Experts
Instant Download, Free Fast Updates, 99.6% Pass Rate
Microsoft Desktop MD-101 Exam Screenshots

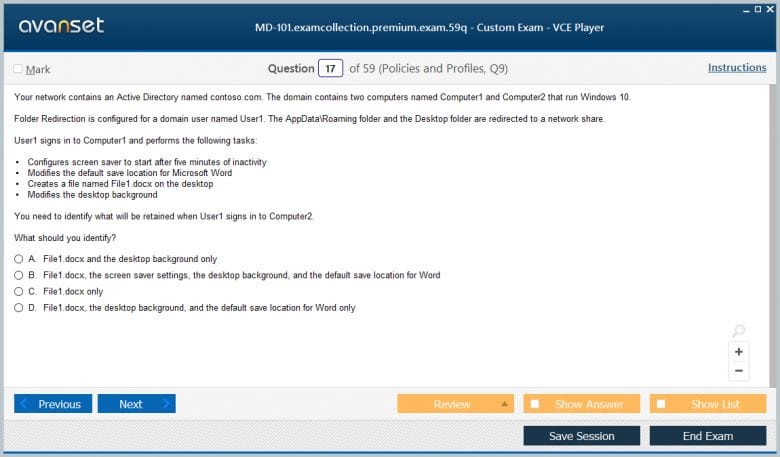
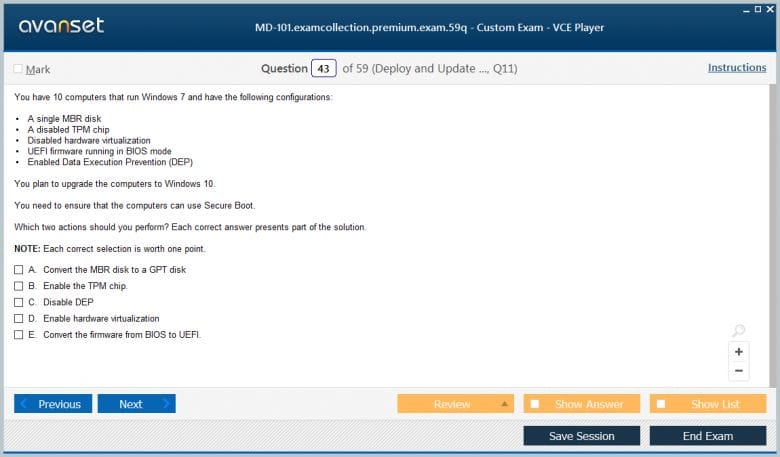
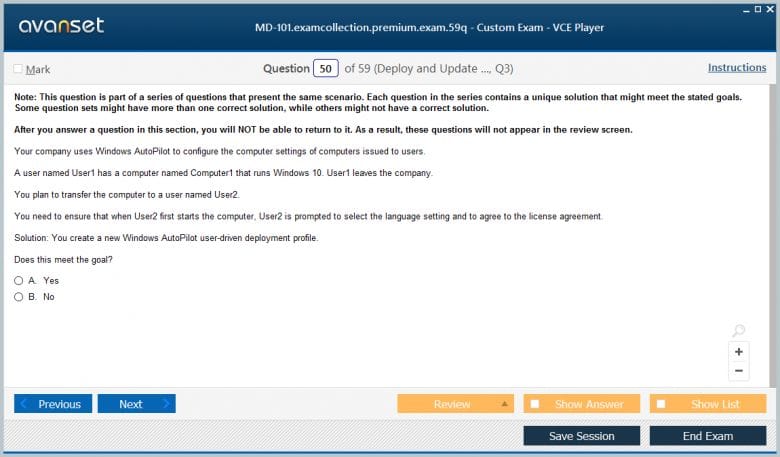
Microsoft Desktop MD-101 Practice Test Questions in VCE Format
| File | Votes | Size | Date |
|---|---|---|---|
File Microsoft.real-exams.MD-101.v2023-08-06.by.lijuan.189q.vce |
Votes 1 |
Size 4.95 MB |
Date Aug 06, 2023 |
File Microsoft.onlinetest.MD-101.v2021-12-27.by.wangqiang.182q.vce |
Votes 1 |
Size 4.51 MB |
Date Dec 27, 2021 |
File Microsoft.examlabs.MD-101.v2021-10-26.by.jackson.167q.vce |
Votes 1 |
Size 4.22 MB |
Date Oct 26, 2021 |
File Microsoft.realtests.MD-101.v2021-09-23.by.charlie.143q.vce |
Votes 1 |
Size 3.6 MB |
Date Sep 23, 2021 |
File Microsoft.onlinetest.MD-101.v2021-08-19.by.daisy.122q.vce |
Votes 1 |
Size 2.81 MB |
Date Aug 19, 2021 |
File Microsoft.vceplayer.MD-101.v2021-05-14.by.jack.101q.vce |
Votes 1 |
Size 2.05 MB |
Date May 14, 2021 |
File Microsoft.certkiller.MD-101.v2021-04-06.by.lewis.28q.vce |
Votes 1 |
Size 623.03 KB |
Date Apr 06, 2021 |
File Microsoft.testking.MD-101.v2020-10-08.by.lukas.93q.vce |
Votes 2 |
Size 2.17 MB |
Date Oct 08, 2020 |
File Microsoft.Prep4sure.MD-101.v2019-06-11.by.Treven.47q.vce |
Votes 4 |
Size 1.74 MB |
Date Jun 12, 2019 |
File Microsoft.Testking.MD-101.v2019-03-12.by.Oscar.26q.vce |
Votes 8 |
Size 1.2 MB |
Date Mar 13, 2019 |
Microsoft Desktop MD-101 Practice Test Questions, Exam Dumps
Microsoft MD-101 (Managing Modern Desktops) exam dumps vce, practice test questions, study guide & video training course to study and pass quickly and easily. Microsoft MD-101 Managing Modern Desktops exam dumps & practice test questions and answers. You need avanset vce exam simulator in order to study the Microsoft Desktop MD-101 certification exam dumps & Microsoft Desktop MD-101 practice test questions in vce format.
An Introduction to the Microsoft MD-101 Exam and the Modern Desktop Administrator Role
The Microsoft MD-101 exam, officially titled Managing Modern Desktops, is a certification test designed for IT professionals who are responsible for deploying, configuring, securing, managing, and monitoring devices and applications in an enterprise environment. It serves as one of the two exams required to earn the Microsoft Certified: Modern Desktop Administrator Associate credential, alongside the MD-100 exam which covers Windows client installation and configuration. Together these two exams validate a comprehensive set of skills that modern desktop administrators need to perform their roles effectively in today's hybrid workplace environments.
This certification has grown in significance as organizations have shifted away from traditional on-premises desktop management toward cloud-connected and cloud-native management approaches. The skills tested in the MD-101 exam reflect this industry shift by focusing heavily on Microsoft Endpoint Manager, Microsoft Intune, Azure Active Directory, and co-management scenarios that bridge the gap between legacy on-premises management tools like Configuration Manager and modern cloud-based management platforms. Professionals who earn this credential demonstrate that they can operate effectively in both traditional and modern desktop management environments simultaneously.
Modern Desktop Administrator Role
The modern desktop administrator is responsible for the full lifecycle of devices within an organization, from initial deployment and enrollment through ongoing configuration, security, and eventual retirement. This role has evolved significantly over the past several years as cloud technologies have changed the way devices are provisioned, managed, and secured. Where desktop administrators once relied almost exclusively on physical imaging processes and on-premises management infrastructure, today they increasingly work with cloud-based tools that allow them to manage devices remotely regardless of where those devices are physically located.
The scope of the modern desktop administrator role extends beyond simply keeping devices operational. These professionals are responsible for implementing security policies that protect organizational data on both corporate-owned and personally-owned devices, managing application lifecycles from deployment through updates and removal, and ensuring that devices remain compliant with organizational and regulatory requirements. The role requires both technical depth in areas like Windows client configuration and policy management, and strategic awareness of how endpoint management decisions affect organizational security, productivity, and cost efficiency.
Exam Domain Structure Breakdown
The MD-101 exam is organized around four primary domain areas that together cover the full scope of modern desktop administration responsibilities. These domains are deploying and updating operating systems, managing policies and profiles, managing and protecting devices, and managing apps and data. Each domain carries a specific percentage weight in the overall exam score, and candidates who understand this weighting can prioritize their study time more effectively by dedicating proportionally more attention to the higher-weighted domains during their preparation.
Candidates should review the official Microsoft exam skills outline before beginning their study plan because it provides the most accurate and current breakdown of topics within each domain. Microsoft periodically updates exam content to reflect changes in the products and technologies being tested, so relying on the official skills outline rather than third-party summaries ensures that your preparation aligns with what the current version of the exam actually tests. The skills outline is freely available on the Microsoft certification exam page and serves as the definitive guide to what you need to know.
Operating System Deployment Methods
Operating system deployment is a foundational responsibility of the modern desktop administrator, and the MD-101 exam tests several different deployment methods that organizations use to provision Windows devices at scale. Windows Autopilot is the primary modern deployment technology covered in the exam, and candidates must know how it works, what prerequisites it requires, and how to configure different Autopilot deployment profiles for various organizational scenarios. Autopilot allows organizations to ship devices directly to end users who can self-provision them into a corporate-configured state without requiring IT staff to physically handle the devices beforehand.
Traditional deployment methods using Microsoft Deployment Toolkit and Configuration Manager task sequences also receive coverage in the exam because many organizations continue to rely on these approaches for specific deployment scenarios. Candidates should know the difference between thick image, thin image, and hybrid image deployment strategies and understand when each approach is appropriate. Subscription Activation, which allows organizations to upgrade Windows editions programmatically based on Azure AD group membership, is another deployment concept that candidates must be familiar with as it represents an increasingly common approach to managing Windows edition licensing in modern enterprise environments.
Windows Update Management Strategies
Keeping Windows devices current with the latest updates is one of the most critical and ongoing responsibilities of the modern desktop administrator, and the MD-101 exam tests update management concepts in considerable depth. Windows Update for Business is the primary update management technology for cloud-managed devices, and candidates must know how to configure update rings, set deferral periods for feature updates and quality updates, and use deployment rings to stage the rollout of updates across an organization in a controlled and risk-managed way.
The integration between Windows Update for Business and Microsoft Intune is a key topic that candidates should study carefully. Intune policies allow administrators to configure Windows Update for Business settings across managed devices without requiring any on-premises update infrastructure. Candidates should also know how Update Compliance, which is a Log Analytics-based solution for monitoring update status across the device fleet, provides visibility into which devices have successfully installed updates and which devices are falling behind. For organizations using Configuration Manager alongside Intune in a co-management scenario, understanding how update management responsibilities are divided between the two tools is an important exam topic.
Microsoft Intune Device Enrollment
Microsoft Intune is the cloud-based mobile device management and mobile application management platform that sits at the center of the modern desktop administration model, and the MD-101 exam tests Intune extensively across multiple domains. Device enrollment is the process by which devices are registered with Intune so that they can receive policies, applications, and compliance settings from the cloud management platform. Candidates must know the different enrollment methods available for Windows devices including automatic enrollment through Azure AD join, bulk enrollment using provisioning packages, and enrollment through Windows Autopilot.
The distinction between different Azure AD join types and their implications for device management is a concept that candidates must understand clearly. Azure AD joined devices, hybrid Azure AD joined devices, and Azure AD registered devices each have different management capabilities and enrollment paths in Intune. Candidates should know which join type is appropriate for different organizational scenarios, how each type interacts with on-premises Active Directory, and what the implications of each join type are for the policies and applications that can be delivered through Intune. These distinctions frequently appear in scenario-based exam questions that require candidates to recommend the appropriate device configuration for a described organizational requirement.
Configuration Profiles and Policies
Configuration profiles in Microsoft Intune allow administrators to push settings to managed devices without requiring manual configuration on each individual device. The MD-101 exam tests your ability to create, assign, and troubleshoot configuration profiles across different profile types. Device restriction profiles control settings like camera access, screen capture, and app installation permissions. Endpoint protection profiles configure Windows Defender settings, firewall rules, and BitLocker encryption. Administrative templates in Intune provide access to the same Group Policy settings that administrators have traditionally managed through on-premises Active Directory, delivered through the cloud to Intune-managed devices.
Profile assignment and targeting is another important configuration topic that the exam covers. Candidates must know how to assign profiles to Azure AD user groups and device groups, understand the difference between user-targeted and device-targeted profile assignments, and know how to use assignment filters to refine which devices within a group receive a specific profile. Conflict resolution between multiple profiles that apply different values to the same setting is a troubleshooting scenario that candidates should be prepared to analyze and resolve, as it represents a common real-world challenge in environments where multiple overlapping policies are applied to the same devices.
Compliance Policies and Conditional Access
Compliance policies in Microsoft Intune define the rules that a device must meet to be considered compliant with organizational standards. The MD-101 exam tests your ability to create compliance policies that check settings such as minimum operating system version, BitLocker encryption status, antivirus and antimalware status, and password complexity requirements. Devices that fail to meet compliance policy requirements are marked as non-compliant in Intune, which can trigger a range of consequences depending on how the compliance and conditional access policies are configured.
Conditional access is the Azure Active Directory feature that uses device compliance status, along with other signals like user identity and location, to make access decisions for cloud applications and resources. Candidates must know how compliance policies and conditional access policies work together to create a system where only compliant and trusted devices can access sensitive organizational resources. Configuring conditional access policies that require compliant devices as a condition for accessing Microsoft 365 services is a common exam scenario, and candidates should be comfortable with both the Intune compliance policy configuration and the Azure AD conditional access policy configuration required to implement this type of control.
Endpoint Security and Defender
Microsoft Defender for Endpoint is the enterprise security platform that provides advanced threat protection for managed devices, and the MD-101 exam covers its integration with Microsoft Intune and Microsoft Endpoint Manager. Candidates must know how to onboard devices to Defender for Endpoint through Intune, configure security baselines that apply recommended security settings to managed devices, and use the Microsoft Endpoint Manager security policies to manage Defender antivirus settings, attack surface reduction rules, and exploit protection configurations.
Security baselines deserve particular attention during exam preparation because they represent Microsoft's recommended security configuration for Windows devices and are a commonly tested topic. Candidates should know what security baselines are available in Intune, how to deploy them to device groups, and how to handle conflicts between security baseline settings and other configuration profiles applied to the same devices. Threat and vulnerability management concepts, including how vulnerability findings from Defender for Endpoint can be integrated with Intune remediation workflows, give candidates a view of how endpoint security operates as a continuous and integrated process rather than a one-time configuration activity.
Application Deployment Approaches
Application management is a core responsibility of the modern desktop administrator, and the MD-101 exam tests several different application deployment approaches that organizations use to deliver software to managed devices. Microsoft Store for Business applications, Win32 application packages deployed through Intune, Microsoft 365 Apps deployment, and line-of-business applications packaged in MSIX format are all application types that candidates should know how to deploy through Intune. The Intune Management Extension, which is the agent that enables Win32 app deployment and PowerShell script execution on Intune-managed devices, is an important component that candidates should understand.
Application assignment types in Intune give administrators flexible control over how applications are delivered to users and devices. Required assignments push applications to devices automatically without user interaction, available assignments make applications accessible through the Company Portal for users who want to install them optionally, and uninstall assignments remove applications from devices. Candidates should know when each assignment type is appropriate and understand how assignment conflicts are resolved when a device receives both a required and an available assignment for the same application from different group assignments. Supersedence relationships between application versions and dependency configurations between applications that require other applications to be installed first are additional deployment topics that appear in the exam.
Microsoft 365 Apps Management
Microsoft 365 Apps, formerly known as Office 365 ProPlus, is one of the most widely deployed application suites in enterprise environments, and its management receives specific coverage in the MD-101 exam. Candidates must know how to deploy Microsoft 365 Apps through Intune using the dedicated Microsoft 365 Apps deployment type, configure the Office Customization Tool settings to control which applications are installed and how they are configured, and manage update channels that determine how frequently devices receive new features and fixes for the Office application suite.
The different Microsoft 365 Apps update channels, including Current Channel, Monthly Enterprise Channel, and Semi-Annual Enterprise Channel, represent different tradeoffs between receiving new features quickly and maintaining a stable tested environment. Candidates should know the characteristics of each channel and be able to recommend the appropriate channel for a given organizational scenario based on factors like risk tolerance, compatibility testing requirements, and the need for specific new features. Activation management for Microsoft 365 Apps, including how shared computer activation works in environments like Remote Desktop Services where multiple users share the same device, is another application management topic that the exam covers.
Mobile Device Management Principles
Mobile device management extends beyond traditional Windows PCs to include iOS, Android, and macOS devices in many modern enterprise environments, and the MD-101 exam touches on MDM concepts that apply across these platforms. Candidates should know the difference between device enrollment management, which applies device-level policies and provides full management control, and mobile application management without enrollment, which protects organizational data within specific applications on personally-owned devices without requiring full device enrollment and management.
App protection policies in Microsoft Intune are the primary tool for implementing mobile application management on both enrolled and non-enrolled devices. These policies can enforce controls like requiring a PIN to access managed applications, preventing copy and paste between managed and unmanaged applications, blocking screen capture within managed applications, and requiring device encryption as a condition for accessing managed app data. Candidates should know how to configure app protection policies, assign them to user groups, and understand how they interact with conditional access policies to create a comprehensive data protection strategy that accommodates both corporate-owned and personally-owned device scenarios.
Co-Management Configuration Manager
Co-management is the configuration where a Windows device is managed simultaneously by both Microsoft Configuration Manager and Microsoft Intune, and it represents the most common transitional state for organizations that are moving from traditional on-premises management toward cloud-based modern management. The MD-101 exam covers co-management concepts thoroughly because most large enterprises are in some stage of this transition rather than operating exclusively in either the traditional or modern management model. Candidates must know the prerequisites for enabling co-management, how to configure the co-management settings in Configuration Manager, and how workloads are divided between the two management platforms.
Co-management workloads are specific management responsibilities that can be shifted individually from Configuration Manager to Intune on a sliding scale, allowing organizations to move at their own pace rather than making an all-or-nothing switch. Workloads include compliance policies, resource access policies, endpoint protection, device configuration, client apps, Office 365 apps, and Windows Update policies. Candidates should know what each workload controls, what the implications of shifting each workload to Intune are, and how to use pilot collections to test workload shifts on a subset of devices before rolling them out to the full device population.
Monitoring and Reporting Tools
Monitoring the health, compliance, and security status of managed devices is an ongoing responsibility that the MD-101 exam addresses through several different reporting and monitoring tools. The Intune reporting framework provides built-in reports covering device compliance status, app installation status, device configuration profile assignment status, and Windows Update deployment progress. Candidates should know how to interpret these reports, identify devices that are not compliant or not receiving expected configurations, and use the information to drive remediation actions that bring devices back into the desired state.
Log Analytics integration with Microsoft Endpoint Manager extends the monitoring capabilities beyond what the built-in Intune reports provide. Candidates should know how to configure the Intune Data Warehouse connection, use Endpoint analytics to assess device startup performance, application reliability, and recommended software improvements, and leverage the insights provided by these tools to make informed decisions about device management policies and hardware refresh priorities. Microsoft Sentinel integration for security event monitoring and the role of Microsoft Defender for Endpoint in providing device health and threat status information round out the monitoring and reporting capabilities that the exam covers.
Exam Preparation Study Resources
Microsoft Learn is the authoritative and freely available resource for MD-101 exam preparation, offering learning paths that map directly to the exam domain structure and cover every objective in the official skills outline. The interactive modules on Microsoft Learn combine reading content with knowledge checks and hands-on exercises that use sandbox environments where candidates can practice Intune and Azure AD configurations without requiring their own Azure subscription. Working through the complete MD-101 learning path on Microsoft Learn should form the foundation of every candidate's preparation strategy.
Practice exams from providers like MeasureUp and Whizlabs provide exposure to the question style and difficulty level of the actual exam, helping candidates identify areas where their knowledge needs further development before they sit the real test. Microsoft's own practice assessment, available free on the exam page, gives candidates a representative sample of exam questions that accurately reflect the current exam content. Joining the Microsoft Tech Community forums and following active Microsoft MVP blogs focused on endpoint management topics provides access to current real-world insights and discussions about the technologies the exam covers, supplementing formal study materials with practical community knowledge.
Conclusion
Earning the MD-101 certification and the Microsoft Certified: Modern Desktop Administrator Associate credential represents a significant professional achievement for anyone working in enterprise IT support, device management, or systems administration. The knowledge validated by this certification is not theoretical or abstract but directly applicable to the real challenges that organizations face every day as they manage diverse fleets of devices across distributed and hybrid work environments. Passing this exam demonstrates that you possess the skills to deploy, configure, secure, and manage the devices that employees depend on to perform their work effectively and securely.
The preparation journey for the MD-101 exam is demanding but genuinely rewarding because every topic you study builds practical competence that translates immediately into better performance in your professional role. The Intune configuration skills you develop while studying compliance policies and configuration profiles, the deployment knowledge you build while working through Autopilot and co-management concepts, and the security understanding you develop while studying Defender for Endpoint and conditional access are all skills you will use regularly throughout your career as endpoint management continues to evolve and grow in importance.
The modern desktop administration field is in a period of sustained transformation driven by the ongoing shift to cloud-based management, the growth of hybrid work models that require devices to be managed securely from any location, and the increasing sophistication of security threats targeting endpoints as entry points into organizational networks. Professionals who stay current with the technologies covered in the MD-101 exam, particularly Microsoft Intune, Azure Active Directory, and Microsoft Defender for Endpoint, will remain relevant and valuable as these platforms continue to evolve and expand their capabilities in the years ahead.
Beyond the immediate career benefits of improved job prospects and professional recognition, the MD-101 certification establishes a foundation for continued growth within the Microsoft certification ecosystem. Professionals who build on their Modern Desktop Administrator Associate credential by pursuing related certifications in security, identity management, and cloud administration will develop a comprehensive and highly marketable skill set that positions them for senior roles with greater responsibility and compensation. The Microsoft certification pathway rewards continuous learning, and every credential you earn builds on the foundation established by the ones that came before it.
Approach your preparation with consistency, build hands-on experience through Microsoft Learn sandboxes and your own Azure trial environment, practice the configuration tasks that appear in simulation questions until they feel completely natural, and trust that the investment you make in thorough preparation will produce results that extend far beyond a passing score. The modern desktop administrator role is one of the most practically important positions in enterprise IT today, and the MD-101 certification is your formal recognition of the skills that make that role possible.
Go to testing centre with ease on our mind when you use Microsoft Desktop MD-101 vce exam dumps, practice test questions and answers. Microsoft MD-101 Managing Modern Desktops certification practice test questions and answers, study guide, exam dumps and video training course in vce format to help you study with ease. Prepare with confidence and study using Microsoft Desktop MD-101 exam dumps & practice test questions and answers vce from ExamCollection.


Microsoft MD-101 Video Course

Top Microsoft Certifications


Top Microsoft Certification Exams
- AZ-104
- AZ-305
- DP-700
- AB-100
- SC-300
- MD-102
- AB-900
- PL-300
- MS-102
- SC-200
- AZ-900
- SC-401
- AI-900
- AI-103
- DP-600
- AZ-700
- AZ-500
- SC-100
- AB-730
- AI-102
- AB-731
- GH-300
- PL-400
- AZ-140
- AZ-204
- AZ-400
- DP-300
- SC-900
- AZ-801
- MS-700
- AZ-800
- PL-600
- PL-200
- AI-300
- MB-800
- PL-900
- AI-901
- MB-310
- SC-500
- MB-330
- DP-900
- MB-820
- DP-800
- MB-280
- MS-721
- MB-230
- GH-200
- DP-750
- MB-500
- GH-900
- MB-700
- DP-100
- DP-420
- PL-500
- MB-335
- GH-100
- GH-500
- MS-900
- AZ-120
- SC-400
- MB-240
- MO-200
- 62-193
- MO-400
- MS-203
- DP-203
- AB-410
Site Search:


Is there any update regarding this exam?
Does anyone know if this premium dump is valid?
Premium still valid?
Hello, Have you any news for updating MD 101 at 08/03/2021 ?
I took the exam on July in Spain and studied using the premium dump. I was getting 99%-100% during my studying. It is important to mention that some of the questions were new. Most of the questions had different orders and some had different wordings, so you need to be careful and learn the answers, not the orders. Focus on the ones that has drag and drop, since you can't randomize the order of the answers on the VCE programs. Learn the answers by memory. I passed the exam with 803 score using this method. And my work colleague passed with 701. So prepare and study.
I can guarantee that the premium dumps are valid, because I was able to clear the test with 800+. I used the combination of the video lectures available in the premium bundle, a guide, premium dumps, and Azure training environment. It is highly recommended to understand the technology, because the questions may be rephrased differently, or they may be asked in another manner.
Fortunately, I passed the MD-100 exam yesterday with the premium dump. I got 743 points. It was unexpected to see about 80% of the questions from the dump in the exam. There were about 5-7 new or reword questions, but it was possible to answer them if you understand the content.
Passed today with 750 in 20 minutes :-)
Premium full valid 2 new questions no lab !
Thx examcollection
Passed yesterday with the 133q dump. 8xx score, about 6 new questions.
Took the exam yesterday en scored 8XX, around 10 new questions.Premium file is valid! Good luck to all of you!
Passed today - 6 new questions, Premium VCE still valid! 42 Questions and 1 Case Study.
Got a typo on my previous post - dumps by Gary has "NO" new questions...
I used Premium VCE and Gary's VCE (shorter version) for my review.