


Premium File
75 Q&A
$76.99$69.99
Juniper JNCIS-SEC JN0-333 Exam Questions & Answers, Accurate & Verified By IT Experts
Instant Download, Free Fast Updates, 99.6% Pass Rate
75 Questions & Answers
Last Update: May 20, 2026
$69.99
Juniper JNCIS-SEC JN0-333 Exam Screenshots
Juniper JNCIS-SEC JN0-333 Practice Test Questions in VCE Format
| File | Votes | Size | Date |
|---|---|---|---|
File Juniper.Train4sure.JN0-333.v2017-08-31.by.Carol.41q.vce |
Votes 13 |
Size 1010.51 KB |
Date Sep 01, 2017 |
Juniper JNCIS-SEC JN0-333 Practice Test Questions, Exam Dumps
Juniper JN0-333 (Security, Specialist (JNCIS-SEC)) exam dumps vce, practice test questions, study guide & video training course to study and pass quickly and easily. Juniper JN0-333 Security, Specialist (JNCIS-SEC) exam dumps & practice test questions and answers. You need avanset vce exam simulator in order to study the Juniper JNCIS-SEC JN0-333 certification exam dumps & Juniper JNCIS-SEC JN0-333 practice test questions in vce format.
The JN0-333 exam is the gateway to the Juniper Networks Certified Specialist Security (JNCIS-SEC) certification. This credential validates a candidate's understanding of security technologies and their ability to configure and troubleshoot Juniper's SRX Series devices. Passing this exam demonstrates a thorough comprehension of Junos security principles, moving beyond introductory concepts into more advanced, practical applications. It is designed for networking professionals with intermediate knowledge of the Junos OS and security fundamentals, who are ready to specialize in the Juniper security track. This series will serve as a detailed guide to the topics covered in the JN0-333 blueprint.
Achieving the JNCIS-SEC certification signals to the industry that a professional is proficient in implementing, monitoring, and troubleshooting Juniper's security solutions. The JN0-333 exam curriculum is comprehensive, covering topics from basic firewall policies and network address translation to more complex subjects like IPsec VPNs, intrusion prevention, and high availability. Success requires not only theoretical knowledge but also an understanding of how these features are configured and interact within a live network environment. This initial part of our series will lay the groundwork, focusing on the core architectural and operational components of Junos security.
Juniper Networks promotes a strategy known as Connected Security, which posits that security should be an active, integrated part of the entire network infrastructure, not a collection of siloed appliances. The JN0-333 exam content is built upon this philosophy. The core idea is to enable the network itself to be the first line of defense, with visibility and enforcement points everywhere, from the edge to the data center and into the cloud. This approach allows for automated and coordinated threat response across disparate network elements, providing a more robust and scalable security posture than traditional perimeter-based models.
The SRX Series Services Gateways are central to this vision. They are not just firewalls but multifaceted security platforms capable of providing a wide range of services. Understanding this holistic approach is crucial for the JN0-333 exam, as questions may test your comprehension of how different security features work together to protect the network. This includes knowing how firewall policies, intrusion prevention, and advanced threat prevention can be combined to create a layered defense strategy. The goal is to see the network and its security as a single, cohesive system working to identify and mitigate threats in real time.
At the heart of Juniper's security offerings are the SRX Series devices, which come in various form factors, from branch office appliances to large chassis-based systems for data centers and service providers. A key concept tested in the JN0-333 exam is the separation of the control plane and the data plane. The control plane, run by the Routing Engine (RE), is responsible for management, routing protocols, and system processes. It builds the forwarding tables and security policies that are then pushed down to the data plane, which handles the actual transit traffic at high speed.
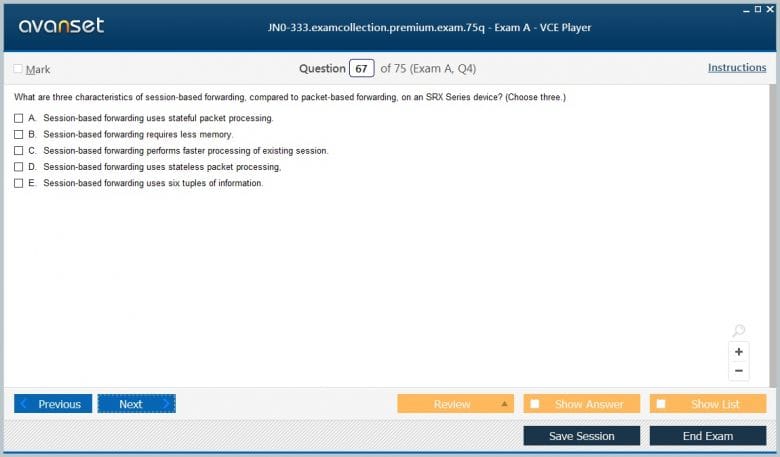
The data plane, managed by the Packet Forwarding Engine (PFE), is where the real work of security enforcement happens. On SRX devices, traffic processing is flow-based. When the first packet of a new session arrives, it is processed by the control plane to determine if it should be permitted. If allowed, a session is created and installed in the data plane's session table. Subsequent packets belonging to that same session are processed directly by the PFE in hardware, allowing for extremely high throughput. This flow-based architecture is a fundamental principle you must grasp for the JN0-333 exam.
The Junos operating system is the common software that powers all of Juniper's platforms, including the SRX Series. Its consistent command-line interface (CLI) and operational model are significant advantages. For the JN0-333 exam, you must be proficient in navigating the Junos CLI. This includes understanding the two primary modes: operational mode and configuration mode. Operational mode is used for monitoring, troubleshooting, and restarting the device. Commands in this mode typically start with words like 'show', 'monitor', 'test', and 'request'. It is where you verify the state of the network and the security platform.
Configuration mode is where all changes to the device's setup are made. You enter this mode by typing 'configure' from the operational prompt. The configuration is structured hierarchically, which makes it logical and easy to read. A key feature is the candidate configuration model. Changes are made to a copy of the active configuration, which is not applied until a 'commit' command is issued. This allows you to stage and verify changes before they go live, minimizing the risk of errors. Mastering commands like 'set', 'delete', 'show | compare', and 'commit' is essential for the JN0-333.
Security zones are the foundational building blocks for security policies on SRX devices. A zone is a logical grouping of one or more network interfaces that share a common security level or function. Instead of creating policies between individual interfaces, you create policies between zones. This dramatically simplifies policy management, especially in large and complex networks. For example, you might create a 'trust' zone for your internal corporate network, an 'untrust' zone for the internet, and a 'dmz' zone for public-facing servers. Each physical or logical interface must be bound to a single security zone.
The power of zones lies in their default security posture. By default, all traffic entering an SRX device is dropped unless a security policy explicitly permits it. This is the "deny-all" principle. Furthermore, traffic is allowed to flow freely between interfaces within the same zone, but traffic is not allowed to flow from one zone to another without a permissive policy. Understanding this behavior is critical for the JN0-333 exam. You must know that to allow traffic from the 'trust' zone to the 'untrust' zone, a specific policy must be configured.
The configuration of security zones is a straightforward but critical task that you will be tested on for the JN0-333. Within configuration mode, all zone settings are found under the 'security zones' hierarchy. First, you define a security zone by giving it a name. Once the zone is created, you must bind interfaces to it. For example, to place the ge-0/0/0 interface into the 'trust' zone, you would navigate to the 'security zones security-zone trust interfaces' hierarchy and add 'ge-0/0/0.0'. The '.0' indicates the logical unit, which is also a key concept.
In addition to binding interfaces, you can define which system services and host-inbound protocols are allowed for traffic destined to the SRX device itself from a particular zone. For example, you might allow SSH and ping from the 'trust' zone for management purposes but block them from the 'untrust' zone. Verifying your zone configuration is done in operational mode. The 'show security zones' command provides a summary of all configured zones, their attached interfaces, and allowed services. The 'show interfaces' command will also display which zone an interface is bound to.
Before traffic is ever evaluated by a security policy, it can be subjected to screening. Junos Screen is a set of security features designed to detect and block various types of reconnaissance attacks and denial-of-service (DoS) attacks. These screens operate at the zone level and inspect packets for suspicious patterns before a session is even established. This provides an initial layer of defense that protects the device's resources from being overwhelmed by malicious traffic. The JN0-333 exam expects you to be familiar with the purpose and application of these screen options.
Screens can defend against attacks such as IP sweeps, port scans, SYN floods, and land attacks. They are configured under the 'security screen' hierarchy and then applied to a security zone. For example, you could configure a screen option to limit the number of incomplete TCP sessions from a single source IP address, which helps mitigate a SYN flood attack. When a packet matches a screen's criteria, it is dropped, and an event is logged. Knowing how to configure a basic screen and apply it to an untrusted zone is a key skill for the JNCIS-SEC.
A portion of the JN0-333 exam will cover the basic setup and management of an SRX device. Before you can configure zones and policies, the device itself must be properly initialized. This includes setting the root password, configuring a hostname, and setting up management access. Management access typically involves configuring an IP address on a dedicated management interface (like fxp0) or a revenue port and ensuring that services like SSH or J-Web (the web-based GUI) are enabled. Proper user account management, including creating user classes with specific permissions, is also a part of this domain.
System services like DNS and NTP (Network Time Protocol) are also crucial for proper operation. DNS is required for features like web filtering that rely on resolving domain names, while NTP is essential for accurate timestamping of log messages, which is critical for security event correlation and troubleshooting. The JN0-333 exam requires you to know the configuration hierarchy for these basic system parameters. You should be comfortable with the initial setup process from a factory-default state, as it forms the basis for all subsequent security configurations.
This first part has laid the foundation for your JN0-333 studies. We have covered the philosophy behind Juniper's security solutions, the architecture of the SRX platform, the basics of Junos OS navigation, and the fundamental building blocks of security zones and screens. These concepts are not just introductory; they are the principles upon which all other security features are built. A solid understanding of flow-based processing, the control and data plane separation, and the default deny-all nature of zones is absolutely essential for success on the exam.
As you move forward in this series, we will build upon these concepts. The next part will dive deep into the heart of the firewall: security policies. We will explore how to craft granular policies that control traffic flow between zones, inspect application-level traffic, and incorporate advanced objects like custom applications and schedulers. For now, ensure you are comfortable with the topics discussed here. Practice navigating the Junos CLI, configuring zones, and verifying their status. A strong foundation is the key to mastering the more complex topics ahead on your journey to the JNCIS-SEC certification.
Security policies are the heart of any firewall, and on SRX Series devices, they are the rules that govern the flow of traffic between security zones. The JN0-333 exam places a heavy emphasis on your ability to understand, configure, and troubleshoot these policies. A security policy is essentially a set of match criteria and a corresponding action. The most common match criteria include the source zone, destination zone, source IP address, destination IP address, and the application or service being used. If traffic matches all the criteria of a policy, the specified action, typically 'permit' or 'deny', is taken.
Policies are organized into a list and are evaluated in the order they are configured. When a new session attempts to traverse the firewall from one zone to another, the SRX device checks the policy list from top to bottom. It uses the first policy that matches the traffic and takes the action defined in that policy. No further policies are evaluated for that session. If no policy matches the traffic, a final, implicit default policy denies the traffic. This top-down processing logic is a critical concept for the JN0-333 and has significant implications for policy design and troubleshooting.
To create an effective security policy for the JN0-333, you must first understand its components, often referred to as objects. The primary components are addresses and applications. An address object is a named entity that represents one or more IP addresses, subnets, or ranges. Instead of typing IP addresses directly into every policy, you can create an address book entry, such as 'WEB-SERVERS', and reuse it across multiple policies. This simplifies management and reduces the chance of error. Address books can be configured globally or specific to a security zone.
Similarly, an application object defines the protocol and port information for a service. Junos comes with a large pre-defined list of common applications like 'junos-http' or 'junos-ssh'. However, you may need to create custom application definitions for non-standard services. This involves specifying the protocol (TCP, UDP, or others) and the source and destination port numbers. For the JN0-333 exam, it is crucial to know how to create and use address book entries and custom application objects as they form the match criteria for almost every security policy you will write.
The process of configuring a security policy involves defining a rule that specifies traffic moving from a 'from-zone' to a 'to-zone'. All policy configuration is done under the 'security policies' hierarchy. Within this hierarchy, you define the policy pair, for example, 'from-zone trust to-zone untrust'. Inside this context, you create individual policies, each with a unique name. For each policy, you specify the match criteria using the address and application objects discussed earlier. You can specify multiple source addresses, destination addresses, and applications within a single policy.
The final step is to define the action. The most common actions are 'permit', 'deny', or 'reject'. A 'permit' action allows the traffic and creates a session. A 'deny' action silently drops the packet, sending no notification back to the source. A 'reject' action also drops the packet but sends an ICMP 'destination unreachable' message back to the source, which can be useful for troubleshooting. For the JN0-333, you should be comfortable constructing policies with these elements and understand the difference in behavior between the 'deny' and 'reject' actions.
Traditional firewalls make policy decisions based on Layer 3 and Layer 4 information, such as IP addresses and port numbers. However, modern applications often use common ports like 80 and 443, making it difficult to distinguish between them. This is where Application Firewalling (AppFW) becomes essential. AppFW provides deeper visibility and control by identifying applications based on their unique signatures, regardless of the port they use. This is a key topic for the JN0-333 exam, reflecting the evolution of network security.
AppFW policies build upon standard security policies. Once a session is permitted by the standard policy, it can be further inspected by the AppFW policy to identify the specific application. For example, you could identify Facebook traffic even though it runs over standard HTTP or HTTPS ports. This allows for more granular control. You could create a policy that allows general web browsing but specifically blocks social media applications for certain users or departments. AppFW provides a level of control that is impossible with port-based rules alone.
To simplify configuration, Juniper introduced unified security policies. In earlier versions of Junos, standard zone policies and advanced security services like AppFW and Intrusion Prevention Systems (IPS) were configured in separate hierarchies. This could be complex to manage. Unified policies streamline this by allowing you to specify both the traditional Layer 4 information and the dynamic Layer 7 application within a single policy rule. This creates a more intuitive and efficient workflow for security administrators, a concept you need to understand for the JN0-333.
With a unified policy, the 'match' criteria can include a 'dynamic-application'. The SRX will first perform a standard match based on source/destination address and port. If a session is permitted, it will then proceed to identify the specific application. The identified application is then compared against the 'dynamic-application' match criteria in the policy. If it matches, the policy's action is taken. This allows you to create a single rule that says, for example, "allow traffic from internal users to the internet, but only if the application is not a peer-to-peer file-sharing service."
Not all security rules need to be active 24/7. In many environments, it is useful to have policies that are only enforced during specific times or on certain days. This is achieved using schedulers. A scheduler defines a time window, which can be a one-time event or a recurring schedule, such as during business hours from Monday to Friday. Once a scheduler is created, it can be attached to a security policy. The policy will then only be active and enforced during the times defined in the scheduler. This is a practical feature tested on the JN0-333.
For example, you might want to allow employees to access certain recreational websites but only during their lunch break. You could create a scheduler for 12:00 PM to 1:00 PM and apply it to the security policy that permits this traffic. Outside of this window, the policy would be inactive, and the traffic would be denied by the default rule. Schedulers provide an extra layer of granularity and control, enabling policies that align more closely with business operations. Knowing how to configure a scheduler and apply it to a policy is a key skill.
Creating policies is only half the battle; you also need to monitor their effectiveness and troubleshoot issues. Logging is a critical component of this process. Within a security policy, you can specify what information should be logged when a session is established or terminated. By default, policies do not log traffic. You must explicitly enable logging within the 'then' statement of the policy rule. You can choose to log 'session-init' (when the session starts), 'session-close' (when it ends), or both. This is an important detail for the JN0-333.
These logs are sent to the device's local log files or to an external syslog server. They contain valuable information, including the source and destination IP addresses, ports, the policy that was matched, and the action taken. By analyzing these logs, you can verify that your policies are working as intended, identify unauthorized access attempts, and gather data for network traffic analysis. The 'show security flow session' command is another invaluable tool for viewing active sessions in real time, which is essential for live troubleshooting.
When network connectivity fails, a misconfigured security policy is often the culprit. The JN0-333 exam will test your ability to troubleshoot common policy-related problems. A primary troubleshooting step is to check the security flow session table using 'show security flow session'. This command can tell you if a session for the traffic in question has been established. If no session exists, the traffic is likely being dropped by a policy or another security feature. The next step is to use the security flow traceoptions feature.
Traceoptions provides a detailed, real-time log of how the SRX device is processing a specific packet flow. You can configure it to trace packets based on specific criteria like source and destination IP addresses. The output will show which zone the packet entered, the policy evaluation process, and the final action taken. This is an incredibly powerful tool for diagnosing why traffic is being dropped. For example, the trace might reveal that the traffic is matching an unexpected 'deny' policy or that no policy is being matched at all, causing it to hit the default deny rule.
While the JN0-333 focuses on technical configuration, understanding best practices is also important. Policies should be structured logically. It is common practice to place more specific rules at the top of the policy list and more general rules toward the bottom. This ensures that specific traffic is handled correctly before it can be matched by a broader rule. Policies should also have clear, descriptive names that indicate their purpose, which greatly aids in future management and troubleshooting. Using address and service objects extensively instead of hardcoding values is another key best practice.
Regularly reviewing and cleaning up your policy set is also crucial. Over time, policies may become obsolete, or rules may have been created for temporary purposes. Unused or redundant policies can clutter the configuration and potentially create security holes. Finally, always include a "cleanup" rule at the end of your policy list. This should be a rule that matches any remaining traffic and explicitly denies and logs it. This ensures that no traffic is permitted by accident and provides visibility into any traffic that is not matching your intended policies.
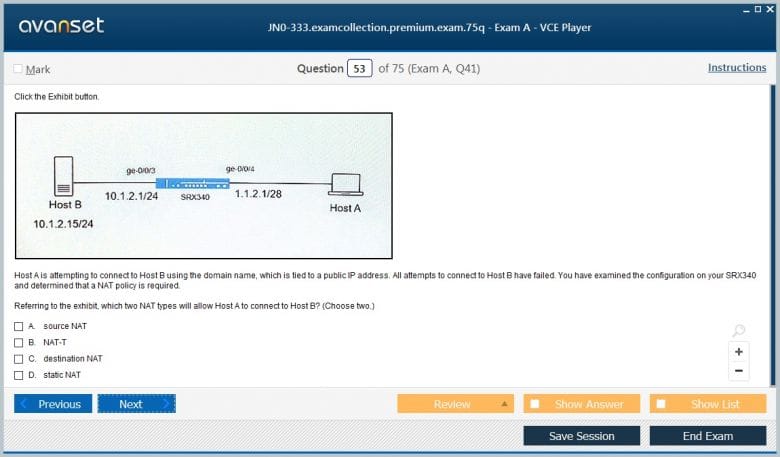
Network Address Translation, or NAT, is a fundamental technology used in almost every network and is a major topic on the JN0-333 exam. Its primary function is to modify the IP address information in packet headers while they are in transit. The most common use case is to translate private, non-routable IP addresses (like those in the 192.168.0.0/16 range) into a public, routable IP address. This allows multiple devices on a private network to share a single public IP address to access the internet, conserving the limited global IPv4 address space.
On Juniper SRX devices, NAT is a powerful and flexible feature that is processed closely with security policies. The Junos implementation allows for various types of NAT, including Source NAT, Destination NAT, and Static NAT. It is important to understand that NAT processing occurs in relation to the security policy flow. Understanding the order of operations—when NAT is applied versus when a policy lookup occurs—is critical for both correct configuration and troubleshooting, and is a key area of focus for the JN0-333 certification.
Source NAT is the most common form of NAT. It changes the source IP address of packets as they leave the network. This is typically used when hosts on a private internal network need to communicate with hosts on the public internet. The SRX device translates the private source IP address of the internal host to its own public IP address on the external interface. This process is stateful; the SRX keeps track of the translation in a session table so that return traffic from the internet can be translated back to the original private IP address and forwarded to the correct internal host.
There are two main types of Source NAT pools you must know for the JN0-333: interface-based and pool-based. In interface-based Source NAT, the SRX automatically uses the IP address of the egress interface for the translation. This is simple to configure and very common. In pool-based NAT, you define a specific pool of one or more public IP addresses to be used for translation. This is useful when you have multiple public addresses or want to separate NAT traffic for different groups of users. The configuration is done under the 'security nat source' hierarchy.
While Source NAT changes the source address of outgoing traffic, Destination NAT changes the destination address of incoming traffic. This is typically used to allow external users to access a server (like a web server or email server) that is located on a private internal network. When a packet arrives at the SRX's public interface destined for a public IP address, Destination NAT translates that public destination address to the private IP address of the internal server. The packet is then forwarded to the server after security policy inspection.
For the JN0-333, you need to know how to configure a Destination NAT pool, which contains the private IP address of the internal server, and a rule set that maps the public address to this pool. A common scenario is port mapping, or Port Address Translation (PAT), where you can map a specific port on the public IP to a different port on the internal server's private IP. For example, external traffic to public IP 203.0.113.1 on port 8080 could be translated to internal server 192.168.1.10 on port 80.
Static NAT provides a fixed, one-to-one mapping between a private IP address and a public IP address. Unlike Source and Destination NAT, which are typically used for many-to-one or many-to-many translations, Static NAT is used when a specific internal device, like a server, must always be reachable at a specific public IP address. It essentially creates a bidirectional translation. Outbound traffic from the internal server will have its source address translated to the public IP, and inbound traffic to that public IP will have its destination address translated to the private IP.
This is useful for servers that need to both initiate connections to the outside world and be accessible from it. The configuration for Static NAT on an SRX is also found under the 'security nat' hierarchy. You define a rule set that specifies the one-to-one mapping. A key point to remember for the JN0-333 is understanding the NAT processing order. For Static NAT, both source and destination addresses can be translated before the security policy lookup, which simplifies policy creation as you can often use the post-translation (private) IP addresses in your rules.
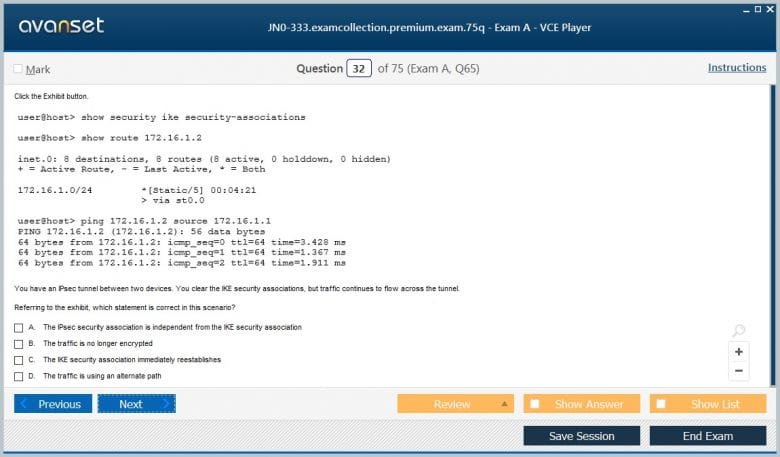
A Virtual Private Network (VPN) creates a secure, encrypted connection, or "tunnel," over an untrusted network like the internet. IPsec is a suite of protocols used to secure communications at the IP layer and is the standard for building site-to-site VPNs. The JN0-333 exam requires a deep understanding of IPsec fundamentals and its configuration on SRX devices. IPsec provides three main security services: confidentiality through encryption, integrity through hashing algorithms, and authentication of the peers. It ensures that data transmitted between two sites remains private and unaltered.
IPsec VPNs operate in two phases. Phase 1, managed by the Internet Key Exchange (IKE) protocol, is where the two VPN peers authenticate each other and negotiate a secure channel to protect subsequent negotiations. Phase 2 is where the peers use the secure channel created in Phase 1 to negotiate the specific security parameters (the IPsec Security Association or SA) that will be used to protect the actual user data. Understanding the distinct roles of IKE (Phase 1) and IPsec (Phase 2) is absolutely essential for passing the JN0-333.
The first step in building an IPsec VPN tunnel on an SRX device is configuring the IKE, or Phase 1, proposal and policy. An IKE proposal is a set of security parameters, including the authentication method (like pre-shared keys or digital certificates), the encryption algorithm (like AES), the hashing algorithm (like SHA-256), and the Diffie-Hellman (DH) group for key exchange. Both VPN peers must have at least one matching proposal to successfully establish the Phase 1 tunnel.
Once the proposal is defined, you create an IKE policy that references it. The policy also specifies whether the SRX is in main mode or aggressive mode for the negotiation. Main mode is more secure as it protects the identity of the peers. Finally, you configure an IKE gateway, which defines the IP address of the remote VPN peer and references the IKE policy. You must know the configuration hierarchy under 'security ike' and be able to define these components for the JN0-333 exam.
After the Phase 1 tunnel is established, the peers negotiate the Phase 2 SA to protect the actual data. Similar to Phase 1, this involves an IPsec proposal and an IPsec policy. The IPsec proposal defines the protocol (ESP or AH), the encryption algorithm, and the authentication (hashing) algorithm for the data tunnel. ESP (Encapsulating Security Payload) is most common as it provides both encryption and integrity, while AH (Authentication Header) only provides integrity.
The IPsec policy references the proposal and can optionally specify Perfect Forward Secrecy (PFS). PFS uses a new Diffie-Hellman exchange in Phase 2 to generate a unique session key for the data, ensuring that even if the Phase 1 key is compromised, the data traffic cannot be decrypted. These components are then combined within an IPsec VPN configuration object, which gives the VPN a name and binds the IKE gateway and the IPsec policy together. Mastering the 'security ipsec' hierarchy is a JN0-333 requirement.
Juniper SRX devices support two primary types of IPsec VPNs: policy-based and route-based. This is a very important distinction for the JN0-333. A policy-based VPN encrypts and tunnels traffic based on a specific security policy. In this model, the policy's match criteria (source/destination address, service) define what traffic is considered "interesting" and should be sent through the VPN tunnel. This method can become cumbersome to manage if you have many subnets that need to communicate.
The more flexible and scalable approach, and the one favored by Juniper, is the route-based VPN. In this model, a virtual interface called a Secure Tunnel (st0) interface is created and bound to the VPN. This st0 interface acts as the logical entry point to the VPN tunnel. You then simply use routing to direct traffic into the tunnel. For example, a static route can be created pointing to the remote subnets with the st0 interface as the next-hop. Security policies are then configured to allow traffic to flow between zones, using the st0 interface as if it were a normal physical interface.
Once a VPN is configured, you must know how to verify its operation and troubleshoot problems. The JN0-333 will test your knowledge of key operational commands. The 'show security ike security-associations' command is used to check the status of the Phase 1 tunnel. If the state is 'UP', Phase 1 has been successfully established. If not, you need to check for mismatches in IKE proposals or pre-shared keys.
For Phase 2, the command is 'show security ipsec security-associations'. This will show you if the data SAs have been created. Another crucial command is 'show security flow session', which can be filtered to show traffic being processed and encrypted for the VPN. If traffic is not flowing, ensure you have the correct routes pointing to the st0 interface and that your security policies are correctly configured to permit traffic between the local zone and the zone containing the st0 interface. Enabling IKE traceoptions can provide detailed debugging information for negotiation failures.
Unified Threat Management, or UTM, refers to a single security appliance that provides multiple security functions in one box. The Juniper SRX Series is a prime example of a UTM device. Instead of deploying separate appliances for a firewall, web filter, antivirus scanner, and spam filter, you can enable all of these services on a single SRX platform. This approach simplifies network architecture, reduces costs, and provides a centralized point of management and policy enforcement. The JN0-333 exam requires a solid understanding of the various UTM features available on the SRX and how to configure them.
The core UTM services include antivirus, antispam, web filtering, and content filtering. These features are typically applied to traffic that has already been permitted by a standard security policy. They provide a deeper level of inspection to protect the network from malware, phishing attacks, and inappropriate content, and to enforce corporate acceptable use policies. Understanding how to create UTM policies and attach them to firewall policies is a key skill set for the JNCIS-SEC certification. These features move beyond simple packet filtering into the realm of true content security.
The antivirus feature on SRX devices scans traffic for viruses, spyware, trojans, and other forms of malware. When a user attempts to download a file over protocols like HTTP, FTP, or email protocols like SMTP and IMAP, the SRX can intercept the file and scan it against a database of known malware signatures. This signature database is regularly updated from the cloud to protect against the latest threats. This is a critical layer of defense, stopping malware at the network edge before it can ever reach an end user's computer. The JN0-333 exam expects you to know how this feature works.
To configure antivirus protection, you first create a UTM custom object, specifically an antivirus profile. Within this profile, you define parameters such as which file types to scan and what action to take if a virus is detected (e.g., 'block'). This profile is then referenced in a UTM policy, which is in turn attached to a standard security policy. This means you can selectively apply antivirus scanning only to specific traffic flows, such as traffic from the 'untrust' zone to the 'trust' zone, optimizing performance by not scanning unnecessary traffic.
Web filtering is a UTM feature used to control and monitor the websites that users can access. It allows organizations to enforce acceptable use policies by blocking access to categories of websites, such as social media, gambling, or adult content. It can also be used for security purposes by blocking access to known malicious websites that host malware or are involved in phishing campaigns. For the JN0-333, you should understand the different types of web filtering available on the SRX platform.
The SRX offers several web filtering options. A simple method is using blacklists and whitelists to explicitly block or allow specific URLs. A more powerful and scalable method is category-based filtering. The SRX uses a cloud-based database that categorizes millions of websites. Administrators can then create policies to block or allow entire categories. For example, a school might block the 'Games' category during school hours. Like other UTM features, a web filtering profile is created and then applied to traffic via a UTM policy attached to a firewall rule.
While web filtering controls access based on a website's URL or category, content filtering inspects the actual content of the traffic itself. This feature can be used to block specific file types from being uploaded or downloaded, or to prevent sensitive information from leaving the network. For example, you could create a content filtering policy to block executable files (.exe) from being downloaded from the internet to prevent users from installing unauthorized software. This is another important security control covered by the JN0-333 curriculum.
Content filtering works by inspecting MIME types and file extensions within traffic flows like HTTP and FTP. You can define lists of file types or protocols to either block or permit. This provides a granular level of control over the data that traverses your network perimeter. This feature is often used as part of a data loss prevention (DLP) strategy, helping to ensure that confidential or proprietary information does not leave the corporate network. The configuration follows the standard UTM model of creating a profile and applying it via a UTM policy.
An Intrusion Prevention System (IPS) is a more advanced security technology that actively analyzes network traffic for malicious activity, exploits, and policy violations. Unlike UTM features that often focus on content, IPS focuses on attack patterns and protocol anomalies. The IPS engine on an SRX device uses a database of known attack signatures to inspect traffic. When traffic matches a signature, the IPS can take action to block the connection, preventing the attack from succeeding. The JN0-333 exam places significant importance on understanding and configuring IPS.
The SRX IPS can detect and block a wide range of attacks, including buffer overflows, port scans, and application-specific exploits against services like web servers or databases. The signature database is continuously updated by Juniper's security research team to protect against emerging threats. A key difference between an IPS and an older Intrusion Detection System (IDS) is that an IPS sits in-line with the traffic and can actively block threats, whereas an IDS typically only generates alerts.
Configuring IPS on an SRX device involves several steps. First, you download the IPS signature database to the device. Next, you create an IPS rulebase, which is a collection of rules. Each rule specifies match conditions (like source/destination zone or IP address) and a corresponding action. The action determines which signature attack objects will be inspected for that specific traffic flow. This allows you to apply different levels of inspection to different types of traffic. For example, you might apply very strict IPS rules to traffic destined for your critical DMZ servers.
Once the rulebase is defined, you create an IPS policy. The IPS policy is what activates the rulebase and applies it to the traffic flow. This IPS policy is then attached to a standard security policy. This layered approach is a common theme in Junos security. A packet must first be permitted by the main security policy, and only then is it passed to the IPS engine for deeper inspection. This ensures that the resource-intensive IPS engine only inspects traffic that has already been deemed legitimate by the firewall rules.
The effectiveness of an IPS is highly dependent on the quality and timeliness of its signature database. The JN0-333 requires you to know how to manage this database. The SRX device needs a specific license to download the IPS signature database updates. The update process can be configured to run automatically on a schedule, ensuring the device is always protected against the latest known threats. You can also manually trigger an update. The 'request security idp security-package download' command is used to initiate the download, and 'request security idp security-package install' is used to compile and install the new signatures.
The signature database contains thousands of individual signatures, which are grouped into logical categories based on the type of attack or the protocol being targeted. When you build your IPS rules, you can select these predefined groups, which simplifies configuration. For example, instead of selecting hundreds of individual signatures related to web server attacks, you can simply select the 'HTTP:SERVER' signature group. You also have the option to create custom signatures for unique threats or applications within your environment.
For the JN0-333 exam, it is important to understand the distinct roles of UTM and IPS, even though they are both configured as application services on the SRX. UTM features are generally focused on content and policy enforcement. Antivirus checks for malicious payloads in files, web filtering checks URLs against categories, and content filtering checks for specific file types. They are primarily concerned with what the data is.
In contrast, IPS is focused on how the data is being transmitted and whether it matches a known attack pattern or exploit. It looks for malicious behavior and protocol anomalies. For instance, IPS might detect a buffer overflow attempt targeted at a web server, while web filtering would only be concerned with whether access to that web server's URL category is allowed. The two sets of features are complementary and are often used together to provide a robust, layered security posture. A single security policy can have both a UTM policy and an IPS policy attached to it.
Once UTM and IPS are configured, monitoring their activity is crucial. The SRX device generates detailed log messages for any events triggered by these services. When the antivirus engine blocks a file, the web filter denies a URL, or the IPS stops an attack, a log entry is created. These logs can be viewed on the device locally or, more commonly, sent to an external syslog or Security Information and Event Management (SIEM) platform for analysis and correlation. Reviewing these logs is essential for understanding the threat landscape your organization faces.
Several 'show' commands are useful for verification, a key skill for the JN0-333. The 'show security utm status' command provides a high-level overview of the health of the UTM processes. For IPS, 'show security idp status' shows the state of the IPS engine, and 'show security idp counters' provides statistics on the number of sessions inspected and attacks detected. These commands are invaluable for verifying that the services are running correctly and for initial troubleshooting steps.
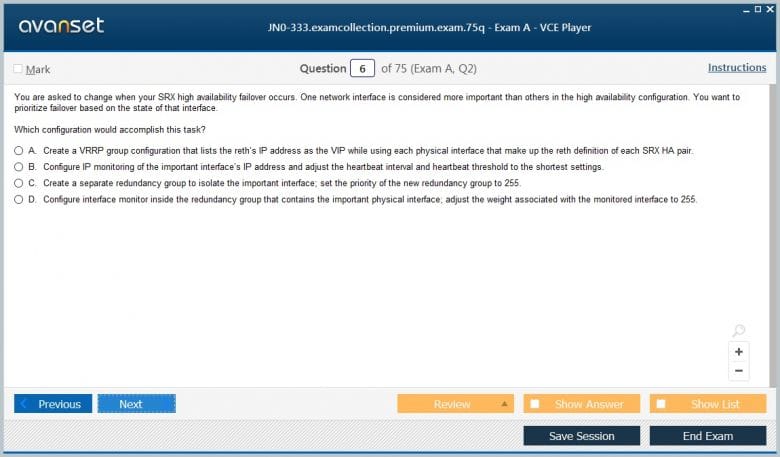
In modern networks, security devices like firewalls are critical points of infrastructure. If a firewall fails, it can result in a complete loss of internet connectivity or access to essential resources, causing significant business disruption. High Availability (HA) is the solution to this problem. HA involves deploying two or more devices in a redundant configuration so that if one device fails, another can take over its functions automatically with minimal or no interruption to service. For the JN0-333 exam, understanding Juniper's chassis cluster technology for HA is mandatory.
The primary goal of HA is to eliminate single points of failure. On SRX Series devices, this is achieved by connecting two identical SRX platforms together to form a single, logical device known as a chassis cluster. This cluster presents itself to the network as one device, sharing a common configuration and state information. This ensures a seamless transition, or failover, in the event of a hardware or software failure on the active device.
A chassis cluster consists of two SRX devices, designated as node 0 and node 1. To form the cluster, the devices are physically connected via two special links: the control link and the fabric link. The control link is used to synchronize the configuration between the two nodes and for heartbeat messages that monitor the health of the peer device. If heartbeats are missed, a failover is triggered. The control link does not pass any user data traffic. This is a key detail for the JN0-333.
The fabric link, on the other hand, is used to pass user data traffic between the nodes. In an active/passive cluster, the fabric link is used to synchronize session state information. In an active/active cluster, it is also used to forward traffic that ingresses on one node but needs to be processed or egress on the other node. Both the control and fabric links are critical for the proper functioning of the cluster. Dedicated interfaces must be used for these links, and they cannot be used for regular network traffic.
SRX chassis clusters can operate in two primary modes: active/passive and active/active. In active/passive mode, one node (the primary) actively processes all traffic, while the other node (the secondary) remains in a standby state, ready to take over if the primary fails. The session table and other state information are continuously synchronized from the primary to the secondary node over the fabric link. This ensures that upon failover, existing sessions can continue without interruption. This mode is simpler to configure and troubleshoot and is a common deployment model.
In active/active mode, both nodes in the cluster can process traffic simultaneously. This can provide better resource utilization. However, it's important to understand for the JN0-333 that a single traffic flow will still only be processed by one node. Different flows are distributed across the two nodes. This mode introduces more complexity, especially regarding traffic symmetry, as return traffic for a session must be processed by the same node that handled the initial traffic. This mode is typically used in scenarios with very high traffic loads.
Go to testing centre with ease on our mind when you use Juniper JNCIS-SEC JN0-333 vce exam dumps, practice test questions and answers. Juniper JN0-333 Security, Specialist (JNCIS-SEC) certification practice test questions and answers, study guide, exam dumps and video training course in vce format to help you study with ease. Prepare with confidence and study using Juniper JNCIS-SEC JN0-333 exam dumps & practice test questions and answers vce from ExamCollection.
Purchase Individually

Top Juniper Certifications


Top Juniper Certification Exams
Site Search:

SPECIAL OFFER: GET 10% OFF

Pass your Exam with ExamCollection's PREMIUM files!
SPECIAL OFFER: GET 10% OFF
Use Discount Code:
MIN10OFF
A confirmation link was sent to your e-mail.
Please check your mailbox for a message from support@examcollection.com and follow the directions.

Download Free Demo of VCE Exam Simulator
Experience Avanset VCE Exam Simulator for yourself.
Simply submit your e-mail address below to get started with our interactive software demo of your free trial.
Is premium still valid?
Juniper.BrainDumps > valid dump passed Jan 2k19
Is the premium dump valid ? Thak
The premium dumps are valid!
Can anyone verify if the premium dump is valid? Thanks