- Home
- Popular IT Certifications
- Static and Default Routing: How to Configure
How to configure, verify static routing and default routing?
For routing in between the routers to work effectively in the internet works, the routers should have the knowledge of the other network ID or be configured with the default route. In the large internet works, routing table has to be maintained, hence the traffic will always travel along the optimal paths. This chapter will get you know how to configure and verify both the static routing and default routing in detail. There are 3 different ways the routing table is built such as dynamically, by default and statically. In the below session, the static and default routing is explained clearly.
3.3 Configure and verify static routing
The static routing is the form of the routing, which occurs when the router uses the manually configured routing entry, instead of information from the dynamic routing protocol to forward the traffic. The network administrator with the internetwork topology knowledge, manually builds and also updates a routing table, programming entire routes in a routing table. The static routers will work goof for the small internetworks, however, it does not scale to the large or else dynamically changing internetworks due to manual administration. The internetwork is the one defined as 2 or more networks connected to the routers or a router. The routers will read the network portion of the IP addressing to find out where the net world a host is and use the routing table to find the best path to a network that a destination host is located on. Once the network is located, then the packet is sent to a destination network by just forwarding the hop to hop, packet, until it reaches a particular router which directly connected to a destination host network. This static routing is used in complementary with the dynamic routing to offer the failsafe backup in the event which a dynamic routes are unavailable. The static routing is most often used to transfer the routing information from 1 routing protocol to the other.
The static route operations are divided into three stages such as, the network administrator can configure manually the static route on a router, the router install the route on a router and finally the packets are routed with the help of the static route.
The routers forward the packets with the help of either route information from a route table entry which is manually configured or route information which is calculated by using the dynamic routing algorithm. The static routes, that define the explicit paths in between the 2 routers, which cannot be updated automatically and it needs to be reconfigure the static routes manually when the network changes happen. The static routes will use the less bandwidth when compared to the dynamic routes. It is possible to supplement the dynamic routes with the static routes wherever appropriate. It can be redistribute the static routes into a dynamic routing algorithm. But it cannot be redistribute the routing information which is calculated by the dynamic routing algorithm into a static routing table. The administrative distance is the number that measures the source trustworthiness of a route information. Then lower the administrative distance means the trustworthy source is more.
The static routing adds the security because the administrator can select to permit routing access to specific networks only and there is no bandwidth usage in between the routers as well as no overhead on the router CPU. It is important to use the static routes in the environments where a network traffic is accurately predictable and also where the design of the network is simple. It is essential to avoid the static routes in constantly changing and large networks because the static routes will never cope up and react to the network changes.
The static routing also used in the stub networks to give the gateway of the last report. When using the ip route in the configuration, then anyone can identify where the packets must be routed in 2 ways, such as the exit interface and the next hop address.
The next hop address: in this command, the next hop router address which will get the packet, and also forward it to a remote network. The exit interface is the command, in which is used to place the next hop address and also shows up directly connected quote.
Every routing protocol is always prioritized to the least reliable with the help of the administrative distance value. The static routes have the default administrative distance of one. The router always prefers the static route to the dynamic route. Before configuring the static route, ensure with the correct VDC.
Step 1:
Command: configure terminal
This command helps to enter into the configuration mode.
Ex:

Step 2:
Command: ip route
This step configures the static route and also interface for that static route. Use ? to show a list of the supported interface. Specify the null interface with the help of null 0. Then optionally configure a next hop address. Then the preference value will set the administrative distance ranges from 1 to 255. Here the default is 1.
Ex:

You can use the ipv6 instead of ip route here:
Ex:

Step 3:
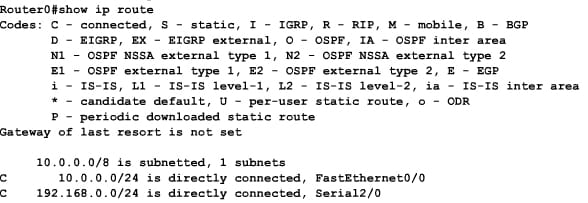
( optional)Command: show {ip | ipv6} static route
This step helps to display the information about a static route.

Step 4:
( optional) Command: copy running-config startup-config
This step will save the configuration change.

Then configure the static route in the VRF:
Step 1: configure terminal
Step 2: vrf context
Step 3: ip route
Step 4 : show {ip | ipv6} static-route vrf
Step 5: copy running-config startup-config
Here, in the second step, creates the VRF and also enters into the VRF configuration
Verifying the configuration:
In order to display the configuration of the static routing, it is essential to perform the following tasks:
show ip static-route helps to display a configured static route
show ipv6 static-route vrf helps to display the static route information for the each VRF.
show hardware proxy layer-3 detail helps to display information on a proxy routing from the NK-F -132-15 type module to an M series type module in a chassis which comprises both module types.
show hardware proxy layer-3 counters {brief | detail} helps to display the amount of packets which is sent by a N7K-F-132-15 type module to every M series type module for the proxy forwarding.
3.4 configure and verify default routing
The default route for the any network to which an ASA is not connected directly. Without a default or static route defines, then the traffic to non connected networks or hosts generate the error message. All the packets for the destinations not accomplished in a routing table are sent through the default route. The default route in the IPv4 is proposed as the zero address in the CIDR notation and it is often known as the quad-zero Route. Then the subnet mask is provided as /0 which efficiently specifies all the networks and it is the shortest match possible. The route lookup which does not match with any other route will fall back to this route. In the same way, in IP version 6, the default route is mentioned by the : : /0.
In a higher level segment of the networks, the administrators will normally point the default route for the provided host towards a router which has the connection to the network service provider. Hence =, the packets with the destinations outside any organizational LAN, typically destination on the internet or a WAN, are forwarded to a router with a connection to that provider. The device to which a default route points are often called as the default gateway and it mostly carries out the other functions including proxy server, firewall, packet filtering operations.
The simplest way is to configure the default route to send whole traffic to the upstream routers, relying on a router to route the traffic. Although, In some circumstances, the default gateway may not reach the destination network, so it's essential to configure more particular routes. In case, if the default gateway is outside, then a default route will not direct traffic to any of the inside networks which are not directly connected to an ASA.
The default route is used when no network or the host route matches. The router which is listed as a next hop of a default route is the default gateway which is the gateway of the last report in the Cisco.
In the transparent firewall mode, the traffic which originates on an ASA and it is designated for the non directly connected network, here configure either the default or static routes, so that an ASA know out of the which interfaces to send traffic. The traffic which originates on an ASA may include communication to the syslog server, AAA server, N2H2 server or websense. If the servers which cannot be reached via the single default route, then configure with the static routes. In addition to that, an ASA supports the 3 equal cost routes on a same interface for the load balancing. It can define the 3 equal entries of default route per device. There is no inherent mechanism to determine whether the default route is up or down. It remains in the routing table, even though if a next hop gateway turns unavailable. Then the routes are only removed from a routing table if any of the associated interface on an ASA goes down. This route tracking feature offers the method of tracking all the availability of the default route as well as installing the backup rout, in case the primary route fails. When selecting the monitoring target, assure that it respond for the ICMP echo request. Consider using the following things for monitoring the target.
- Next hop gateway address
- ISP gateway address or for dual ISP support
- Persistent network objects on a destination network
- Server on a target network, including the AAA server, which the ASA requires to communicate with that.
The default routing identifies the IP address's gateway to which an ASA sends the whole IP packets. The default static route is just the static route with the 0.0.0.0/0 as a destination IP address. The routes that identify the particular destination which take precedence over a default route.
The default route is the special static route which uses the quad zero format: ip route 0. 0. 0. 0 0. 0. 0. 0 [next-hop-address | outgoing interface]. If the packet does not match the particular route in the routing table, it will be routed to a 0.0.0.0 network. Any of the IP addresses 0.0.0.0 when ended with the mask 0.0.0.0. In the below example, no routing protocol is used. Instead, the default route will be used to permit router0 to direct the traffic to an ISP router.
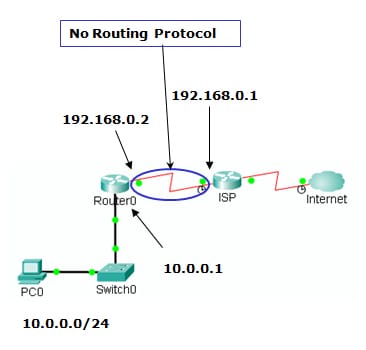
The Router0 can view 2 routers directly connected networks and cannot route the traffic into the internet.
In adding the default route, enter the quad zero route on the router0 allow a router to send all the remote traffic to a next hop.

Viewing the default route:
Then enter the quad zero route on the Router0 permits the router to send all the remote traffic to an ISP.
The routers on the internet must have the route in the routing table which points to the router0 or the router that establishes the same. Otherwise, the Router0 can be able to route the traffic to servers on an internet, but the internet routers cannot able to route responses back to the Router0.
It is possible to configure the static route tracking for the statically default routes or defined routes gained through the PPPoE or DHCP. Enable PPPoE clients on the multiple interface with the route tracking.
The routing is a process in which the router uses to forward the packets towards the packet's destination. The routing decisions are merely based on the destination of IP address of the packet. In the routing method, static routing and default routing are very popular. As per the above description, the static routing is configured manually with little maintenance. This chapter will give you great knowledge on how to configure and verify the static routing and default routing. Based on the requirements the routers are used.


Site Search:


