- Home
- Popular IT Certifications
- OSPF Neighbor Relationship & Authentication
How to Configure, verify OSPF neighbor relationship and authentication
The neighbors on a same network segment is called as neighbors. The 2 routers are connected with one another to become the neighbors if it has the same subnet, area ID, hello or dead intervals and authentication. The neighbor process begins with the hello packets. The hello packet is sent periodically out of the every interface with the help of IP multicast. The routers become the neighbors as soon as they find themselves listed in a neighbors hello packet. It is the 2 way communication. This section will help you understand how to configure and verify the OSPF neighbor relationship and authentication.
The OSPF will directly encapsulate the 5 different types of the OSPF messages inside the IP packets by using the IP protocol 89. The packets are categorized into hello, database description (DBD or DD), link state request (LSR), link state update (LSU) and link state acknowledgement (LSAck). When the specific data link first reaches, the OOSPF routers will become neighbor as the first step using the hello messages. At this point, it exchange the topology information with the help of the other 4 OSPF messages. The OSPF router will keep the state machine for the every neighbor, listing the recent neighbor state in output command of show ip ospf neighbor. The neighbor state change as a neighbor progress via their messaging. When the neighbors settles down into the full state, then the process is over.
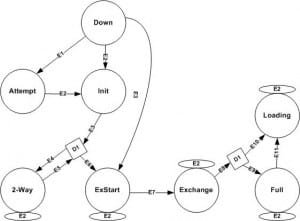
The OSPF routers will go through the series of the adjacency state while accomplishing the relation. Some of those states are transitory and will reflect in different stage of building the adjacency, when some are stable state in which the routers can, in topological changes absence, remain for the unlimited time period. The knowledge of the neighbor state is important to understand the OSPF adjacency troubleshooting and build up.
Down:
It is the initial state of the neighbor. It is the state which is mostly seen when the working adjacency to the neighbor is torn down or when the manually configured neighbor will not respond to the initial hello packets. Having the neighbor in a down state indicates that a router already knows about the neighbor IP address.
Attempt:
It is the valid state only on the non broadcast multi-access and the point to point nonbroadcast network. The neighbor is immediately placed into an attempt state and also contacted by the hello packets sent on the usual intervals on these networks. If the neighbor did not respond in between the dead interval, then it will be placed again back into a down state and connected at the reduced rate.
Init:
The neighbor is now placed into a Init state if the valid hello packets have been received from that, but the seen routers list in the hello packets will not contain a receiving RID of the router. It means that the router may hear the about the other router but is not at specific whether another router can hear the router here.
Two-way:
This state implies that a router is seen in its won router ID in a neighbor field of a neighbors hello packets, that means the bidirectional conversation is established. On the multi access networks, the neighbors should be in in that state or higher to get eligible and to elected as the BDR or DR. 2 will routers will then form the neighbor adjacency and also stay in the state if it is not the BDR or DR on a network segment.
If already the neighbor update dead timer, if not yet, then adds the new neighbor and also move to the next step.
Exstart:
The master slave is selected in this state. The router getting high priority can become the master if they have the same then the higher RD will break the tie. The master sends information at first to the slave.
Loading:
In this state, the router begins to store the information in the memory. The slave will send LSR, mater reply with the LSU, in the same way master request for the missing information by LSR and the slave rely with the LSU. In this process, the neighbors will get synchronized.
Exchange state:
The routers can describe the all the link state database by simply sing the database description packets. In this stage, the packets might be flooded to the other interfaces on a router.
Full:
In the full state the neighbors are synchronized, the SPF algorithm is run for the calculation shortest path. Neighbors are fully adjacent and an adjacencies will appear in the network LSA and Router LSA. At this state, the routing tables are recalculated or calculated, if an adjacency was reset.
Before getting into the configuration of OSPF neighbor relationship and authentication, it is important to know about the terms involved in the OSPF.
Router ID
The router ID indicates the name of the router in an OSPF domain. Before the OSPF router sends any OSPF message, it should choose the unique 32 bit identifier which is also known as router identifier. In Cisco, if the router ID is configured manually, then it can be the router ID. If you have not configured the Router ID manually and a loopback interface arises, the highest loopback address can be a router ID. If the Loopback interface will not exist, the highest active physical interface address. In the router ID, the RID will not reachable and the OSPF can continue to use the RID learned from the physical interface however if an interface subsequently deleted or fails. The interface from where the RID is gotten will not have to be matched by the OSPF network command. If an RID is configured through the router ID command, then the command remains unchanged, the RID does not change for that router. If the RID changes, the rest of the router in a same area required to perform the new SPF calculation.
Hello protocol:
The hello protocol is the most important one which plays a major role in the neighbor relationship. It will perform many functions in the OSPF. It discovers the OSPF speaking neighbors and the hello packets will act as the keep alive in between the neighbors. It also advertises many parameters on which 2 routers have to agree before it becomes neighbors. The OSPF speaking routers will periodically send the hello packet out every OSPF enabled interfaces. This period is called as Hello interval. In the Cisco networks, the hello messages only sent once every ten seconds at the point to point network or broadcast and the hello messages are sent once every thirty seconds on the NBMA networks. In OSPF, every shared segment must have the BDR and DR, to prevent the unnecessary LSA flooding. If one or more neighbors in the subnet include their own interface address in n BDR field, then the neighbor with a higher priority becomes a BDR, if it is tie, the highest router ID has to be chosen
You can configure an OSPF by 2 ways, such as:
1. By ip ospf command under a desire interface which is supported by only IOS new versions
2. By network command under an OSPF process
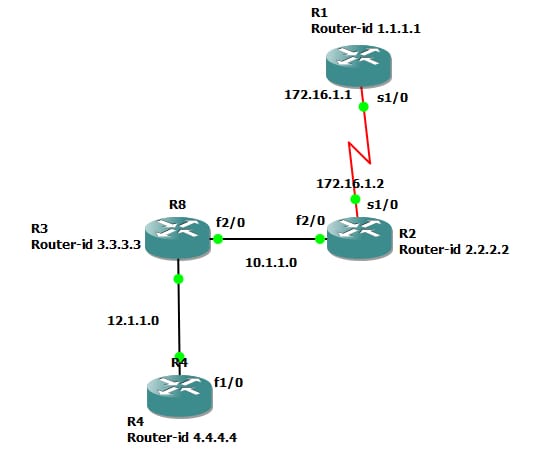
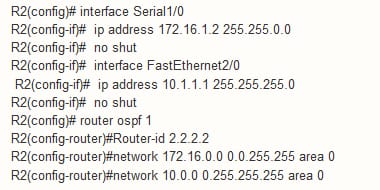
In the below configuration, configured R2 and R1 by second method and another 2 by the first method.
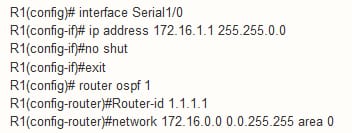
Configuration for R1 as follows:
Configuration for R5 as follows:
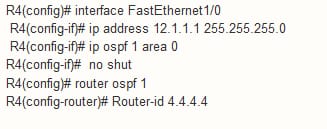
Configuration for R4 as follows:
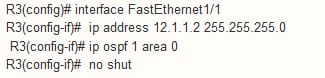
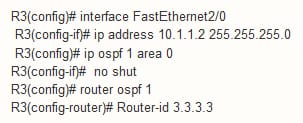
Configuration for R3 configuration as follows:
Verification:
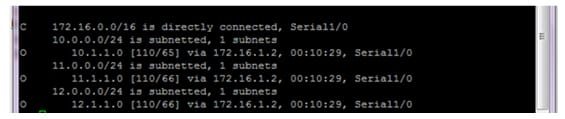
Step 1:
Use the command show ip route to find the 3 OSPF routes on the each router
Step 2:
End to end ping must be successful
Authentication:
The OSPf can authenticate each and every OSPF message. It is usually done to prevent the rogue router from injecting the false routing information and hence causing the denial of service attack. There are 3 types of authentication which is supported by the OSPF such as:
MD5 authentication
Plain text authentication or clear text authentication
Null authentication
The OSPF are fairly straightforward and easy to configure. While configuring the password, avoid entering the encryption type for the password on an interface. Rather than, use the global service password encryption command to enable all the password protection after the entire configuration is over. The null authentication is also known as the type 0 and it implies that no authentications are included in a packet header. It means it is default. The plain text is called known as the type 1 authentication, which uses the simple clear text password. The MD5 is also known as the type 2 authentication, which uses the MD5 cryptographic passwords. The authentication need not require to be set. Even it is set, all the peer routers on a same segment should have a same password as well as the authentication method. Take a look at the plain text and MD5 authentication types.
Take the below network example for the authentication:

The plain text authentication is mostly used when the devices within the area does not support the very secure MD5 authentication. This type authentication leaves an internetwork vulnerable to the sniffer attack in that packets are captured by the protocol analyzer and also the password may be readable. Even, it is useful while performing the reconfiguration, instead of the security.in case, the separate password is used for the newer and older OSPF routers, which shares the common broadcast network to prevent it from talking with one another. The plain text authentication will not have the same throughout the area, but it must be a same one between the neighbors.
R1:
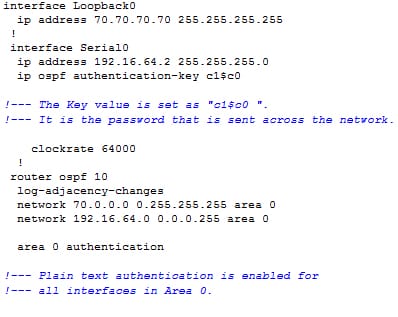
R2:
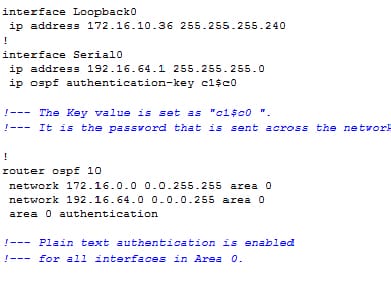
The command of area authentication in the above configuration enables the authentication for the entire interfaces of a router in the specific area. The command of ip ospf authentication can also be used under an interface to configure the plain text authentication for an interface. This type of command can use if no authentication or different authentication method is configured under which area it belongs to. It also overrides an authentication configured for that area. It is the useful one if different interfaces that belongs to a same area required to use the different authentication method.
MD5 authentication:
The MD5 authentication offers higher security than the plain text authentication. This authentication uses an MD5 algorithm to compute the hash value of the content of a password and OSPF packet. The hash value is transmitted in a packet with the non decreasing sequence number and key ID. Then the receiver knows that the same password, calculate the own hash value. Suppose no changes in the messages, then the hash value of a receiver must match to the sender hash value which is transmitted with a message.
Cisco recommends to use the command service password encryption on all the routers to configure. It causes a router to encrypt the password in in any configuration file display and also guards against a password being learned by acquiring a text copy of the router configuration.
R2:
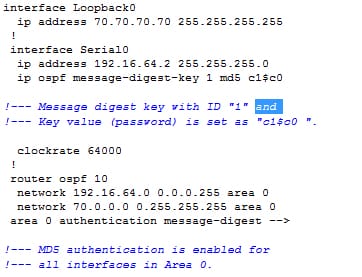
R1:
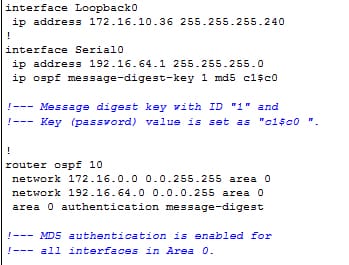
The command area authentication message digest used in this configuration will enable the authentication for the entire router interfaces in the specific area. The command of ip ospf authentication message digest is also used under an interface to configure the MD5 authentication for the particular interface. That command is used if no authentication method or the different authentication method configured for that area. It is the most useful in case different interfaces which belongs to a same area require to use the different authentication methods.
After any configuration and authentication are very essential to verify it by using command or any relevant method.
Use the command show ip ospf interface to view the authentication configured for the interfaces.
The command of show ip ospf neighbor will display the neighbor table which comprises of the neighbor details.
The command show ip route will display the routing table.
You can learn OSPF authentication that allows the flexibility to authenticate the OSPF neighbors. It enables authentication in the OSPF to exchange the routing update information in a secure way. From the above section, you can grasp the types of neighbor state involved in the OSPF configuration. It will guide you how to configure and verify the OSPF neighbor relationship and authentication. In the authentication different methods of the OSPF authentication are discussed.


Site Search:


