- Home
- Popular IT Certifications
- OSPF Path Preference, Operations & OSPF for IPv6
How to Configure and verify OSPF path preference, OSPF operations and OSPF for IPv6
The path preferences are used to choose which route is installed in a forwarding table when several protocols calculate the routes to a same destination. A path with the lowest preference is selected mostly. The main operation of an OSPF protocol will occur in 3 consecutive stages and also leads to the convergence of an internetwork. Those stages are compiling the LSDB, calculating the SPF tree and creating the routing table entries. On the other hand the OSPF for IPv6 are discussed in the below section.
How to Configure and verify OSPF path preference
By default, the internal OSPF routes have the preference value of 10 and the external OPSF routes have the preference value of 150. To change these settings is planning to migrate from the OSPF to the different IGP. The OSPF may use the cost as a metric to select a shortest path to the each destination, it is moreover true, but not fully right. The OSPF must first search at the path type to make the decision and also secondly search at a metric. It is the preferred path list, which OSPF uses as follows:
- Intra area
- External type
- NSSA type 1
- Inter area
- External type 2
- NSSA type 2
After a path preference, it will search at a lower cost route. To provide the pretty quick overview: when the prefix "x" is taught as the intra area path and as the inter area path, then OSPF can always select an intra area path, although an inter area path has the lowest cost.
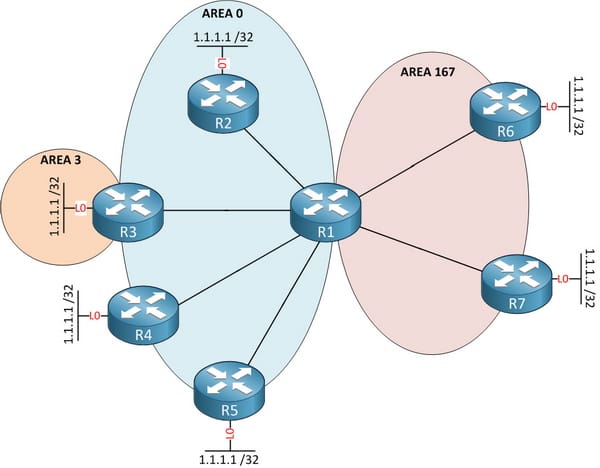
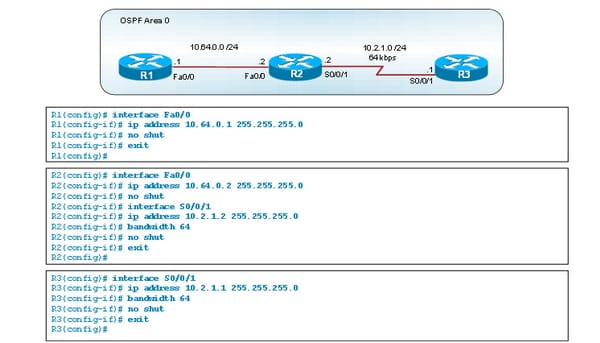
Take above topology as an example. In that, create the loopback0 interfaces on the R2 to R7 by using a same prefix of 1.1.1.1/32 and also advertise it in the OSPF as follows:
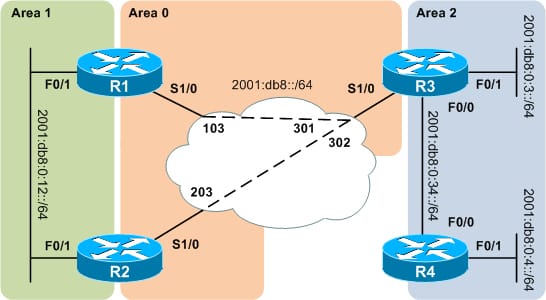
R7: (N2) NSSA type 2
R6: (N1) NSSA type 1
R5: (E2) external type 2
R4: (E1) external type 1
R3: (OIA) inter area
R2: (o) intra area
To check the R1 to find which path that prefer, configure the OSPF at the first step:
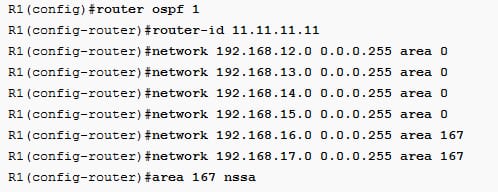
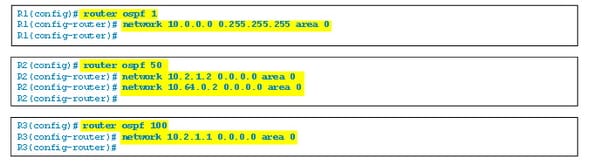
Advertise the right area on the R1. Make the area 167 a NSSA area. Configuration for R2 as follows:

On R2 advertise the 1.1.1.1/32 as the intra area path

The R3 can advertise the 1.1.1.1/32 in the third area to make that as an inter area route.

Then R4 can redistribute the prefix 1.1.1.1/32 as the external type1 route.

The R5 can redistribute the prefix 1.1.1.1/32 as the external type2 route.
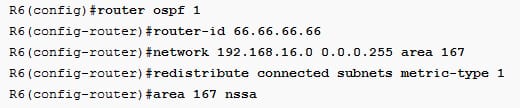
The R6 is the NSSA ABR and can advertise the 1.1.1.1/32 as the N1 route.
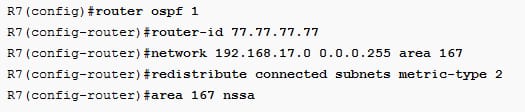
The R7 will redistribute the 1.1.1.1/32 so it displays the N2 route.
Though it is for the loopback interfaces with a same IP addresses on the router R2 to R7, it has the OSPF router ID. Make sure that it was unique on the each router command router id.
Verify the configuration:
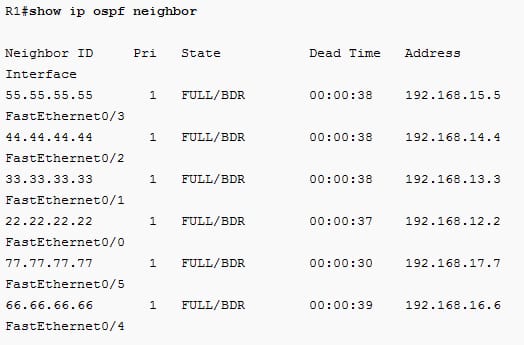
On that, all the OSPf neighbor adjacencies may work. Then make a look on a routing table to check which path has decided to use:

From the above, the R1 uses the route to R2 to mainly reach 1.1.1.1/32. Fastethernet interface and loopback each have the cost of 1, hence that a total cost is mostly 2. This route has been chosen because it is the intra-area route. Let's see what will occur if the cost is increased.

Change a cost to 100, so that route is not interesting at all and routing table as follows:

Then the cost will increase to 1001, but still R1 prefers the route to R2. It is because the intra-area path is mostly preferred over all, even if a cost is higher.


With an intra-area route is mainly out of the way, the R1 prefers an inter area path to R3, eventhough if the cost increasing is stick to that path as shown below:


After increasing a cost to 901, the OSPF stick to an inter-area route will over all the other route. The OSPF puts more faith in their path selection and the path preferences is done prior the lowest cost preference. Consider what the OSPF prefer when the inter-area route is not reachable.


With an intra area as well as inter-area path is out of the way, then OSPF prefers an external type1 route.


Before looking for the lowest cost path, the OSPF will compare the different route and select the one according to a table as mentioned earlier.
How to Configure and verify OSPF operation
As the routing protocol, the main function of the OSPF is to facilitate the exchange of the routing information between the routers. Every router in the OSPF autonomous system which runs the OSPF software which is responsible for the different tasks, including setting the timers to control specific activities that has to occur on the regular basis and also the maintenance of the important data structure like link state database. Each OSPF router has to respond and generate the OSPF messages. The OSPF is the link state routing protocol. It uses the link state advertisement to update the neighbor routers regarding the interfaces and also information on that interface. Each router will maintain the identical database which describes the area topology to assist the router determine the shortest path between them and any neighboring router.
Every OSPF router sends out the hello packets and those hello packets are used to determine if a neighbor is up or not. The hello packets are small and easy to process packets. The hello packets are sent in a periodical manner, mostly in the short interval of time. Once the adjacency is accomplished, trade the information with the neighbor. The topology information is packaged in the link state announcement. These announcements are sent only once and updates only if there is any change occur.
Enable the OSPF routing:
Define the OSPF as the IP routing protocol in the first step:
Router (config)#
Router ospf process- id
Here the process id is the internally used number which identifies the OSPF routing process. The process id need not to match process ID on the other routers. It can also be any positive integer in the range from 1 to 65535.
Identify the OSPF network:
Here define the OSPF networks to advertise to the OSPF neighbors as follows;
Router (config-router)#
Network ip-address[ wildcard- mask] area area-id
In that, the ip-address parameter can be the network, the subnet or address of the directly connected interface. The wildcard mask is the inverse mask used to find out how to interpret the addresses. A mask has the wildcard bits, there 0 is the match and 1 means doesn't care. If 0.0.255.255 denotes the match in the first 2 octets. The area id parameter indicates an OSPF area to be associated with the address.
The optional method to enable the OSPF explicitly on the interface is router (config-if)#
Ip ospf process id area area-id
The commands are configured explicitly for an interface, it also takes the precedence over a network area command.
Given below is the example for single area OSPF:
How to Configure and verify OSPF for IPv6
The OSPFv3 is to IPv6 and OSPFv2 is to IPv4 and these 2 versions are not at all compatible with one another. In the OSPF for IPv6, the addressing semantics are removed from the OSPf protocol packets and main types of LSA, leaving the network - protocol- independent core. The IPv6 address is not present in the OSPF packets except LSA payload carried by the LSU packet. The network LSA and router LSA no longer contain the network address, but express the topology information. The OSPF router ID, LSA link state ID and area ID remain at the IPv4 size. It can be no longer assigned as the IPv6 addresses. The neighboring routers are always identified by the router ID. Earlier, it had been identified by the IPv4 address on the NBMA, point to point links and broadcast. In the OSPF for the IPv6, authentication is removed from an OSPF protocol. The Authentication and Autype field are removed from an OSPF packet header and all the authentication related fields are removed from an OSPF area as well as the interface data structure. The OSPF for IPv6 runs directly over the IPv6. Aside from all this, all the addressing semantics are removed from an OSPF packet headers making it network protocol independent. All of the addressing information is contained in the different types only.
The router ID is the 32 bit number which uniquely identifies the router in an autonomous system. If the router OSPF router ID is changed, then the router's OSPF software must be restarted before a new router ID takes the effect. The size of the router ID is smaller than the IPv6 address, so it cannot be set as one of the routers's IPv6 addresses. The possible router ID procedure for IPv6 includes assign the IPv6 router ID via some local administrative procedure and assign the IPv6 router ID as one of the routers IPv4 addresses.
The global IPv6 address has to be selected as the forwarding address for the NSSA- LSA, which are to be propagated by the NSSA area border router. The selection must proceed as same as the OSPFv2 NSSA support with the additional checking to ensure the IPv6 link local address are not at all selected. The OSPF for IPv6, the external LSA are originated by the AS boundary routers and also describes the destination external to an AS. The OSPF is the IP protocol of 89. This number must be inserted in the field of next header of the encapsulating IPv6 header. The OSPF runs directly over the network layer of IPv6. Hence the OSPF packets are encapsulated solely by the IPv6 and the local link headers. Some of the OSPf messages are multicast when sent over the broadcast networks. In the OSPF for IPv6. The router can have multiple interfaces to the single link associated with a same OSPF area and the instance. All the interfaces can be used for the transmission of data traffic and reception of data traffic while only the single interface sends and receives the OSPF control traffic.
Step 1:
The first step in the configuration is to enable the IPv6 unicast routing as given below:
R1(config)# ipv6 unicast routing
Step 2:
Assign the IPv6 address to the required interfaces. The IPv6 stateless address autoconfiguration will allow the interface ID portion of an address to form the EUI- 64 address automatically. Take it as an advantage by appending a eui-64 keyword to an ipv6 address command and also leaving an interface ID portion of the IPv6 address zeroed.

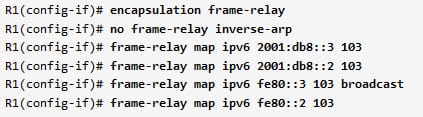
However, can able to address the serial interfaces in a same manner, setting an interface ID makes it very easier to define a mappings of the static frame relay manually. Also have to create the frame relay mapping for a link local addresses, so specify an interface Id address manually.

Making the IPv6 frame relay mapping is very same as the commands provided for the IPv4 addresses. The very most important detail to keep in mind that the link local interface addresses have to be mapped, as all the OSPFv3 communication across the addresses.
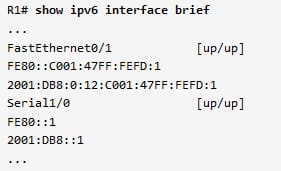
You can verify the each interface has the configured global unicast address and link local address.
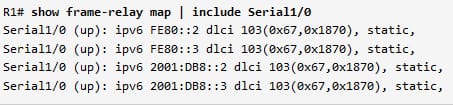
In the same way, verify the frame relay mappings:
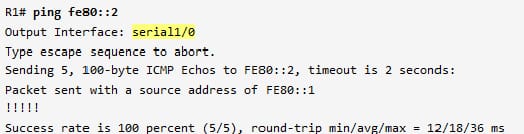
All the interfaces on the router has been addressed, it is better to verify the connectivity across the individual links before configuring the OSPF. Ping global unicast IPv6 address like the IPv4 address, but remember that the outing interface is prompted when pinging the link local address. It is because a router has no other way of knowing that which link you like to reach.
The OSPf features include the fast convergence, outing based on the best path preference, supports VLSM, grouping of members in the areas, efficient use of the bandwidth and also supports for the large network size. So that, every network engineer or professional has to familiarize with the path preference, operation of the OPSF and additionally OSPF for IPv6. This chapter will give you exposure on how to configure and verify the OSPF for IP version6.


Site Search:


