- Home
- Popular IT Certifications
- Configure and Verify NTP, IPv4 and IPv6 DHCP
How to Configure and verify Network Time Protocol (NTP), IPv4 and IPv6 DHCP
Time is inherently the most important function of networks and routers. It offers the reference frame between all the devices on a network. It makes synchronized time as very important. The NTP offers with an easy method to ensure that all the network devices have a same time. The network time protocol is the networking protocol for the clock synchronization between the computer system over data networks, packet switched. The DHCP can be configured for IPv6 and IPv4 also. The DHCP infrastructure elements like DHCP client, IOS DHCP server, DHCP relay are explained along with DHCP options at the end of the section. It will guide you to learn the concepts and helps to configure and verify easily.
6.4 configure and verify network time protocol(NTP)
The NTP synchronize the time of the day among the set of a distributed time client and server. It is one among the oldest protocol, which is still in use. The NTP uses the UDP as the transport protocol. All the NTP communications will use the UTC. The NTP server normally receives the time from the authoritative time source like atomic clock or radio clock attached to the time server and also distributes the time across a network. The NTP is efficient and no more than 1 packet per minute is essential to synchronize 2 machines to within the millisecond of the each other. The NTP uses the stratum to describe a distance between the authoritative time source and network device:
The stratum1 time server is attached directly to the authoritative time source
The stratum2 NTP server gets its time via NTP from the startum1 time server.
The NTP compares the time reported by various devices before synchronizing and does not synchronize with one which is significantly different.
Configuring NTP:
Step 1:
Disabling or enabling NTP
1. Enter the global configuration mode
Command: switch# configure terminal
2. Disables or enables the NTP in the VDC. The NTP is enabled as default
Command: switch(config)# [no] feature ntp
3. Display the NTP application status. It is the optional step.
Command: 
4. It saves the change through the restarts and reboots by copying a running configuration to a startup configuration.
Command:

Step 2: configure a device as the authoritative NTP server
1. Enters the global configuration mode
Command: switch# configure terminal
2. Configure a device as the authoritative NTP server
Command: [no] ntp master [stratum]
3. This step displays an NTP configuration
Command: show running-config ntp
4. This step saves a change via restarts and reboots by copying a running configuration to a startup configuration.
Command:

Step 3: configuring the NTP server and peer
1. Enter the global configuration mode
Command: switch# configure terminal
2. This step forms the association with the server. Use keyword "key" to configure the key to be used when communicating with an NTP server. Here the range for a key id id 1 to 65535. Use the keywords minpoll and maxpoll to configure the minimum and maximum intervals in where to poll the peer.
Command:

3. Form the association with the peer. Can specify the multiple peer association also.
Command:

4. It forms the association with the peer. Can specify the multiple peer associations.
Command:

5. It displays the configured peers and servers. (optional)
Command:

Step 4: configure the NTP authentication
Generally, you can also configure a device to authenticate a time source to which a lock clock is synchronized. While enabling the NTP authentication, a device synchronizes to the time source only. The NTP authentications are disabled by default.
Step 5: configure the NTP access restrictions
Additionally, you can also control access to the NTP service using the access group. You can also specify the request types that a device allows and a server from which that accept the responses.
Verification of NTP configuration:
Use the command "show ntp access-groups" to display an NTP access group configuration.
Use the command "show ntp authentication-keys" to display a configured authentication keys of NTP.
Use the command " show ntp authentication-status" to display the NTP authentication status.
6.4.a NTP master, client, version 3, version 4
Master: The ntp master is the command used to make a router acts as the ntp server with its won hardware clock as the source. The command "ntp server x.x.x.x" is enough to make a router acts as the ntp server.
Ex: router(config)#ntp master stratum-number
Client: The NTP is the server or client application. The ntpclient configuration defines the parameters for the ntpclient program, the small daemon which will maintain the local clock in sync with the time servers on an internet. The default configuration as follows:

NTPv3:
The NTPv3 is used to synchronize the timekeeping among the set of the distributed time clients and servers. In the version 3, the local clock algorithm is overhauled to improve the accuracy and stability. Several inconsistence and also minor errors in the before versions are corrected well in the version3.
NTPv4:
The NTPv3 is the latest version that runs stable on several operating systems. The NTPv4 has made some improvements over the NTPv3 and also has better support for some of the operating system.
6.4.b NTP authentication
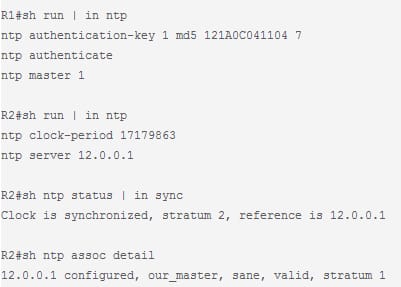
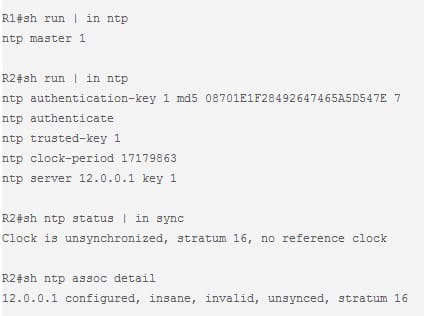
The authentication is mainly used to prevent the tampering with a timestamp on the logs which is generated by the device. To implement the attack on the NTP, the hacker may make their rogue host appear to be the valid NTP server. Hence the NTP authentication is used to authenticate a time source, not a client. Take the below scenario as: R1-12.0.0.0/8-R2
The R2 and R1 shares the segment 12.0.0.0/8. The R1 is an NTP master and the R2 is a client. To get the better understanding of authentication, look at the below example.
No authentication as follows:

No authentication on a client and authentication on server as follows:
Authentication on a client and no authentication on a server as follows:
Suthentication on the client and server as follows:
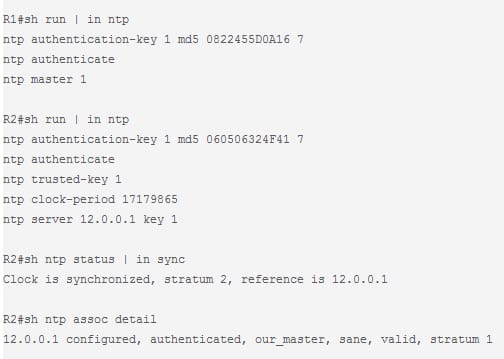
From the above configurations, the NTP authentication is mainly used to authenticate an NTP source and not any associated client. The NTP authentication model is opposite of a typical client server authentication model.
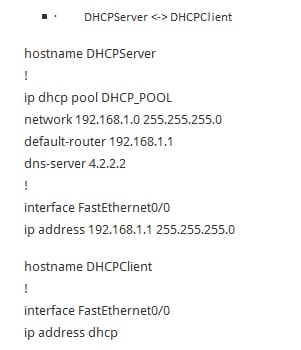
6.5 Configure and verify IPv4 and IPv6 DHCP
The dynamic host configuration protocol is the protocol proposed to enable machines such as server, game console and more. The DHCP supports 3 mechanisms for the IP address allocation such as dynamic allocation, manual allocation and automatic allocation.
The DHCP server will act as the sort of traffic cop who provides the proper identification to access both the internet and local networks at large. The simple configuration steps by the clients to request IP address information since to allow the client to interact with both the internet and LAN.
IPve DHCP broadcast scenario:
IPv6 DHCPv6 link local multicast scenario:
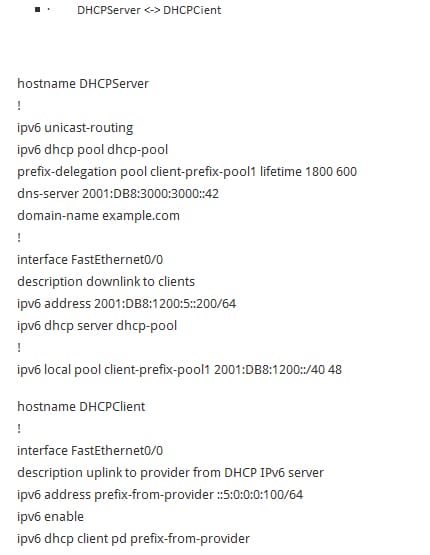
The DHCP can lease both the internet IPv4 and IPv6 addresses. If the IPv6 is not available, then the DHCP service uses IPv4 only.
6.5.a DHCP client, IOS DHCP server, DHCP relay
The DHCP is the standard TCP/IP that reduces the administrative overhead and complexity of managing network client IPv6/IPv4 addresses and also another configuration parameter.
The DHCP infrastructure is comprised of the below elements such as:
DHCP servers: The computers that provide the dynamic configuration of the IPv4 addresses and also related configuration parameters to the DHCP clients
DHCP clients: The network nodes, which support the capability to communicate with the DHCP server to gain the dynamically leased IP version 4 address and also related configuration parameter.
DHCP relay agents: The network nodes, particular router, that listen for unicast and broadcast DHCP relay and message them between the DHCP clients and DHCP servers. Without the DHCP relay agents, have to install the DHCP server on every subnet that contain the DHCP client.
Configuring the DHCP client:
The Cisco routers that running Cisco IOS software such as relay agent and DHCP server are enabled by default. The router can also act as both the DHCP server and DHCP client. Use the command ip address dhcp to acquire the IP address information for a configured interface.
Step 1:
Command: enable
This step enables the privileged EXEC mode.
Ex: router>enable
Step 2:
Command: configure terminal
This step enters the global configuration mode.
Ex: router# configure terminal
Step 3:
Command: interface type number
This step configures the type of the interface and also enters the interface configuration mode.
Ex: Router(config)# interface Ethernet 1
Step 3: (optional)
Command: ip dhcp client client-id {interface-name| ascii string| hex string}
When specify the command no form, a configuration is removed and returns to using a default form. Then it is not at all possible to configure a system not to include the client identifier.
Ex: Router(config-if)# ip dhcp client client-id ascii mytest1
Step 5: (optional)
Command: ip dhcp client class-id {string| hex string}
This step indicate a class identifier
Ex: Router(config-if)# ip dhcp client class-id my-class-id
Step 6: (optional)
Command: ip dhcp client lease days [hours][minutes]
It configures the lease duration for the IP address which is requested from the DHCP client to the DHCP server.
Ex: Router(config-if)# ip dhcp client lease 2
Step 7: (optional)
This step modifies or specifies a hostname sent in a DHCP message.
Command:

Ex:

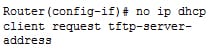
Step 8: (optional)
It configures the DHCP client mainly to request the option from the DHCP server.
Command:

Ex:
Step 9:
This step gains the IP address on the interface from the DHCP.
Command: ip address dhcp
Ex:

To verify the configuration. Use the command debug dhcp detail to display a DHCP packet, which was sent and received. And to display a server side of a DHCP interaction, use the command debug ip dhcp server packets.
6.5.b DHCP options(describe)
The DHCP offers the framework for passing the configuration information to hosts on the TCP/IP network. The configuration parameter and also other control information are mainly carried in the tagged data items which are stored in the option field of the DHCP messages. These data items themselves called as options. The options are the variable length octet strings. There, the 1st octet is an option code, the 2nd octet is the number of the following octets and so the remaining octets are code dependent only.The option exists to identify the vendor and the functionality of the DHCP client. Them the information is the variable length of the octets or characters that has the meaning implied by the vendor of a DHCP client.
All the options begin with the tag octet that uniquely identifies an option. The fixed length option without the data consist of tag octet only. The fixed length option are from 0 to 255. All the other options are variable length to the length octet following a tag octet. Many of the options will supply 1 or more 32 bit IP address. Most of the options can be used with either BOOTP or DHCP.
The DHCP client can also utilize to communicate to a server that it is using some specific type of firmware or hardware is to set the value in the DHCP request called as the vendor class identifier( option 60). That method allows the DHCP server to differentiate between the 2 kinds of the client machines and also process the request from 2 types of the modems. Some of the set top boxes types also set the VCI to inform a DHCP server about the device functionality and hardware type. The value of this option is set to provide the DHCP server the hint about the needed extra information when the client needs in the DHCP response.
The NTP is the vital service for Cisco device and almost every network device. The computer based device requires to be synchronized accurately with the reliable time source like NTP server. The NTP master, client, version 3, version 4 sections give you great ideas about the NTP and its configuration. Many transmission control protocol and internet protocol network use the DHCP servers which are administratively set up to assign TCP/IP configuration information the client on a network. The infrastructure elements of DHCP consist of DHCP server, DHCP clients and DHCP relay agents which is discussed in the above section.


Site Search:


