- Home
- Popular IT Certifications
- Configuring and Verifying Device Access Control
How To Configure And Verify Device Access Control
In the information security and physical security field, the access control is the selective restriction of the access to the place or other resources. One of the most important things to configure on any of the Cisco devices after allowing the SSH or Telnet, is to restrict who is allowed to access a device. Having the password on a line is the most first step, but suppose the telnet is the way of communication, all the password can be sent over a wire in the clear text. It means that if anyone was to sniff a line when you logged into the router using the telnet session, then they might able to view your password and so gain access to that device. It is good bind the control access to the VTY, console and AUX for better security. In the below sections management plane protection and password encryption.
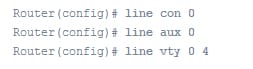
5.3.a Lines (VTY, AUX, Console)
VTY stands for virtual teletype is the command line interface which is created in the router and also used to facilitate the connection to a daemon through Telnet, the network protocol used in the local area networks. To connect to the VTY, users have to present the valid password. This VTY uses the set of CLI command actions that depend on the 3 types of the actions CLI can perform such as movement, editing and advanced. The VTY interface has 3 restricted interface mode commands such as
1. VTY other: Include modes such as TFTP- trivial file transfer protocol
2. VTY Enable: It enables the read and write access to the command line interface
3. VTY View: It enables read only interface access
The VTY line is the virtual terminal line of the router which is used solely to control the inbound telnet communication. It is virtual, in the sense which they are the function of the software. There is no hardware associated with it. You can also use it to connect to a router to make the configuration check or changes the status. Most of the routers have the 5 VTY ports which numbered from 0 to 4. It implies you can have nearly 5 concurrent network admin configuring a router at 1 time. Even though, it is possible to generate many VTY lines. EX: to create the total of 21 lines of VTY, use the following one:
Router (config)# line 0 20
The AUX line is an auxiliary port. While not all the routers have the AUX port these days. The AUX port will not get the lot of use except to access a router if locked out of a console port.
The CTY line type is a console port. On the any router, it will appear in a router configuration as the line con 0 and also in the output of a show line command as the cty. This console port is mostly used for the local system access by using the console terminal. The CTY port is the port where you configure a router when it is the brand new before it has any configuration of the IP address. A console port is the serial port, so have the laptop or PC with the serial interface and also connect to a console with the rolled cable using the DB9 to RJ45 adaptors to connect from a serial port on the computer to a console port.
To access the console configuration mode, make use of the command line console in the configuration mode. Use to form of a line console command, especially to reset a console configuration mode parameter to its default settings such as line console and no line console.
Each of the above line types can be configured with the password authentication. This line can also be configured to use 1 password for user specific password or all users. The user specific password can also be configured locally on a router or use the authentication server to offer authentication.
The most useful and simplest configuration variations of lines on the Cisco router are as follows:
Configuration of the router lines is as follows:
Example:
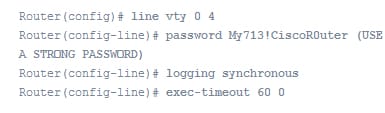
On the VTY lines:

Remember that you must use the command clear line to clear out the connection on the router line if any problem persist.
Verify the configuration:
Verify the configuration of the router that the commands are properly entered. The show running-config is the command which used to display a current configuration of a router. To test the configuration, just log off a console and log in again by using the configured password to access a router.
5.3.b Management Plane Protection
The MPP stands for management plane protection. The MPP feature in the IOS software offers the ability to restrict an interface on which the network management packet is allowed to enter into the device. This MPP feature also allows the network operator to assign 1 or more router interfaces as the management interfaces. The device management traffic is allowed to enter into the device via these management interfaces only. After enabling the MPP, no interface except the assigned management interface can accept destined network management traffic to a device.
The restricting management packet to the designated interface offers greater control over the management of the device, giving more security for the device. It includes benefits like improved performance for the data packet on the nonmanagemnet interface, support for a network scalability, required for a some access control list to restrict the access to a device, management packet flood on routing and switching interface is prevented from reaching a CPU.
The management plane is a logical path of all the traffic related to a management of the routing platform. The management plane is used to manage the device via its network connection. The best example of the protocol processed in a management plane are such as Telnet, SNMP, secure HTTP, SSH, BEEP, FTP, and Telnet.
By using the CLI command, can easily configure, delete or modify the management interface. The Cisco IOS enabled on the management interface remain always available when an MPP feature enabled.
Configuring the device for MPP:
To configure the device which you added to the device or network already running on the network.
Step 1:
It enables the privileged EXEC mode. Provide the password if it prompted.
Ex: Router>enable
Step 2:
This step enters the global configuration mode.
Ex : Router# configure terminal
Step 3:
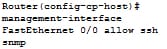
It enters the control plane's host configuration mode.
Ex: Router(config)# control-plane host
Step 4:
It configures the interface to be the management interface that will accept the management protocols and also specifies that which management protocol is allowed. Here, the interface is the name of the interfaces which you are assigned as the management interface and protocol is the management protocol that you like to permit on the assigned management interface.
Ex:
Step 5:
It returns to the privileged EXEC mode.
Ex: Router(config-cp-host)# Ctrl z
Step 6:
It displays the information about a management interface, including a number of the dropped packets & processed, protocol enabled on an interface and the interface type. Here interface is meant for which you like to see information. The protocol denotes that the protocol is indicated, the protocol name is the protocol for that you like to see the information. In that, interface, protocol and protocol name is the optional one.
Ex:

The command show management - interface is the very useful for verifying the configuration.
Ex: router# show management-interface
5.3.c Password Encryption
The password encryption is to secure by restricting the access to the content to those whom have been provided a password. The password encryption did not require any license.
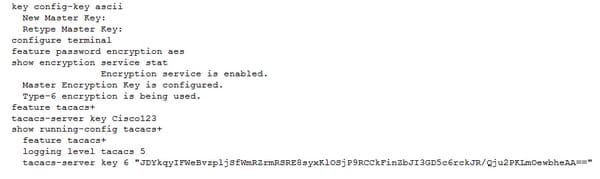
In the password encryption, it is important to know about the AES password encryptions and the master encryption keys. Here, You can also enable strong as well as reversible 128 bits AES password encryption is also called as the type-6 encryption. AES stands for advanced encryption standard. To start using a type-6 encryption, enable the advanced encryption standard feature and also configure the master encryption keys that is also used to decrypt and encrypt the password.
After enabling the AES password encryptions and configure the master key, all newly created and existing clear text password for the supported applications are saved in the type-6 encrypted formats, unless disable the type-6 password encryption. Also possible to configures the NX-OS to convert the entire existing weakly encrypted password to the type-6 encrypted password.
The password encryptions have the bellow configuration limitations and guidelines:
- TACACS+ and RADIUS are the application which can use the feature of AES password encryptions.
- Users with the administrative privilege can only configure the feature of AES password encryptions, associated decryption or encryption commands as well as master keys.
- Before downgrading from the Cisco NX-OS 5.2 to the earlier release, disable the feature of an AES password encryptions, delete a master key and decrypt all the type 6 passwords.
- Enable the feature of an AES password encryptions without the master keys, but encryption only starts when the master is available in the systems.
- To move a device configuration to the other devices, either decrypt a configuration earlier porting that to another device or else configure a same master keys on a device to what configuration it has to apply.
- Deleting a master key will stop the type 6 encryption and also causes all the existing type 6 encrypted password to be unusable, else a same master key is reconfigured again.
- Configuration contains the type-6 encrypted password is not the rollback complaint.
The Default setting for the password encryption are as follows:
Feature of AES password encryptions: disable
Master key: not configured
Configuring password encryption:
Configure the master keys for type 6 encryption and also enable the AES feature.
Step 1:
It configures the master key which has must used with an AES password encryptions. A master key may contain in between 16 to 32 alphanumeric characters. Then you can also use the command no form to delete a master at anytime.
Command: [no] key config-key ascii
Step 2:
It enters the global configuration modes.
Command: Configure terminal
Step 3:
It disables or enables the feature of AES password encryption
Command: [no] feature password encryption aes
Step 4:
It is the optional step. This step helps to display the status of a configuration of a feature AES password encryptions as well as the master keys.
Command: show encryption service stat
Step 5:
It copies a running configurations to a startup configuration. Remember that, the command is essential to synchronize a master key in a startup configuration and a running configuration.
Command: copy running-config startup-config
1. Convert the existing password to the type-6 encrypted password:
Convert the weakly or existing plain encrypted password to type-6 encrypted password.
Command: encryption re-encrypt obfuscated
2. Convert the type 6 encrypted password back to its original state
This command will convert the type-6 password back to its original state.
Command: encryption decrypt type6
3. Delete the type-6 encrypted password
Through this command you can also delete all the type-6 password from a NX-OS Cisco device.
Command: encryption delete type6
Password encryption configurations verification:
It is important to perform the below task to display the information of password encryption. This command enables to verify the configuration of the password encryption.
This command will display the status of a configuration of the feature of AES password encryption and a master key.
Command: show encryption service stat
Below is the example for the password encryptions:
The below example, display way to create the master keys, enable a feature of the AES password encryptions and configure the type-6 encrypted passwords for the TACACS+ application.
Routers are the integral part for most of the modern internetwork. The time, resources and cost of the hardware maintain the network online makes the equipment very expensive. The above various methods of access control on the Cisco routers will protect the network. It is essential to learn these technologies and concepts about the password encryption, management plane protection and line methods are explained in detail.


Site Search:


