


Premium File
266 Q&A
$76.99$69.99
100% Real Google Associate Cloud Engineer Exam Questions & Answers, Accurate & Verified By IT Experts
Instant Download, Free Fast Updates, 99.6% Pass Rate

Associate Cloud Engineer Premium File: 266 Questions & Answers
Last Update: Mar 11, 2024
Associate Cloud Engineer Training Course: 234 Video Lectures
Associate Cloud Engineer PDF Study Guide: 849 Pages
$79.99
Google Associate Cloud Engineer Exam Screenshots
Google Associate Cloud Engineer Practice Test Questions in VCE Format
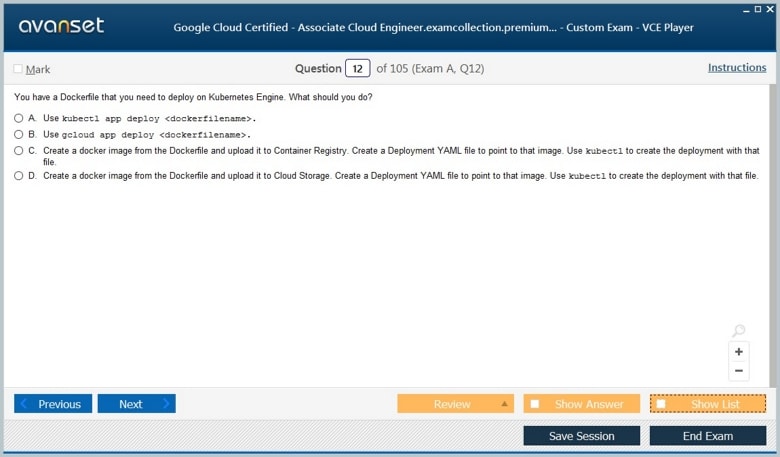
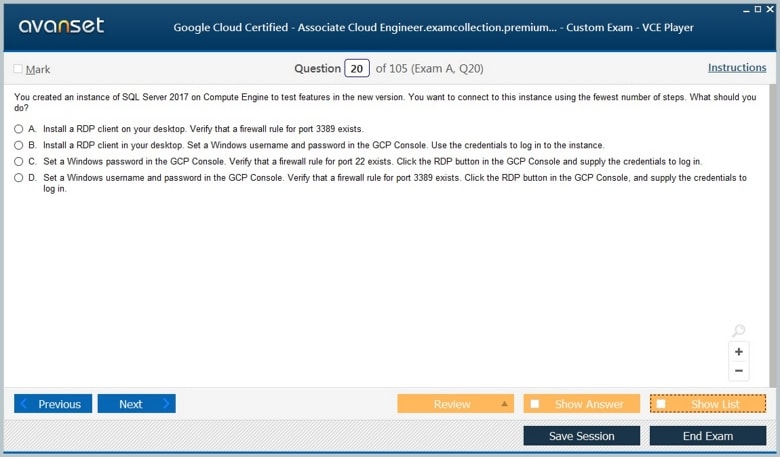
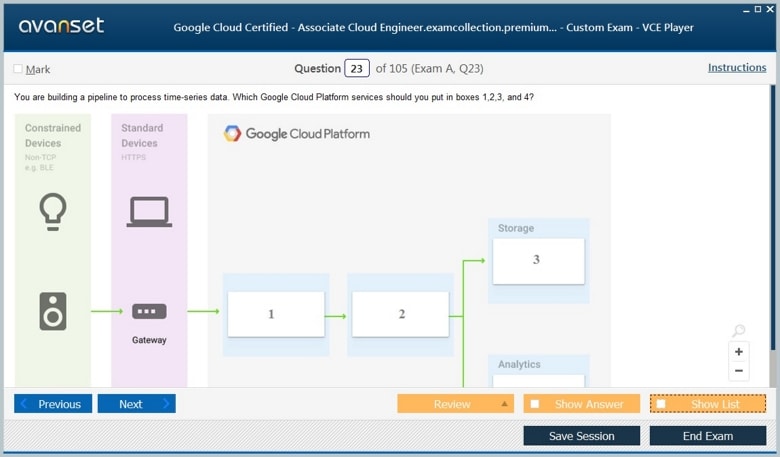
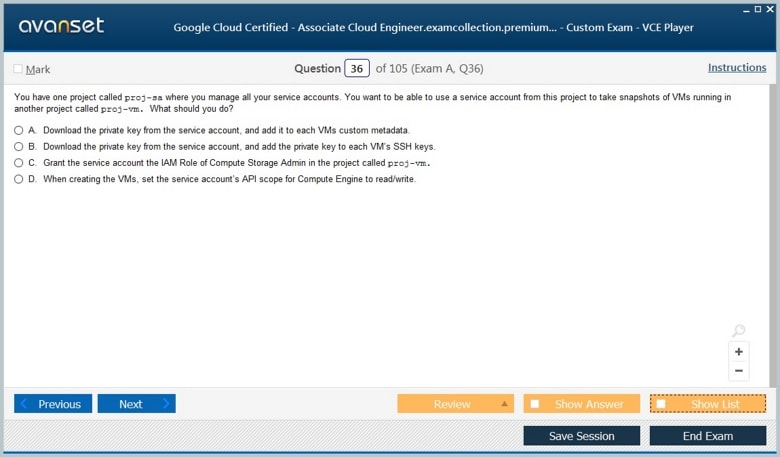
Google Associate Cloud Engineer Practice Test Questions, Exam Dumps
Google Associate Cloud Engineer Associate Cloud Engineer exam dumps vce, practice test questions, study guide & video training course to study and pass quickly and easily. Google Associate Cloud Engineer Associate Cloud Engineer exam dumps & practice test questions and answers. You need avanset vce exam simulator in order to study the Google Associate Cloud Engineer certification exam dumps & Google Associate Cloud Engineer practice test questions in vce format.
Welcome back. In the last step, we started creating our virtual machine. And while the creation of the virtual machine is in progress, let's discuss a few important things about the virtual machines that we created. There are a couple of important choices that we made when we created our virtual machines using the Google Compute Engine. Number one is, what is the hardware? Second, what operating system and software do you want on your specific virtual machine? Let's start with the first decision that we made. What is the hardware that we would want our virtual machine to run on? When we talk about the hardware of a virtual machine, there are two important things that you need to understand. One is the machine family, and two are the machine type. Different machine families are present for different types of workloads. The general purpose is the one that is recommended for most workloads. This provides the best price-performance ratio. So if you want to run a web application or a simple application server, or if you want to create a small or medium-sized database, or if you want to run your dev environment, in those kinds of situations you can go for a general-purpose family. If you have ultra-high memory workloads, you want a lot of RAM to run your applications. In those kinds of situations, you can go for memory-optimized families. Examples are when you want a large in-memory database or if you want to perform analytics in memory. The other type of use case is compute-intensive workloads, for which you would choose compute-optimized families. For example, if you have a gaming application that you want to run, you need a lot of CPU, and in those kinds of situations, you would go for computer-optimized families. So the first choice you are making is based on the type of application you want to run. You are determining the machine family. Once you choose the machine family, you need to choose the machine type. How much of an exact amount of CPU, memory, or disc do you want? For each of the machine families, there are a number of machine types. Earlier, we saw that E2 was a machine family, and for E2, there are a number of machine types. E two, standard two, e two, standard four, e two, standard 816, and 32. Let's take one of them. E, standard two. E-2 here represents the machine type family Standard indicates the type of workload that you would want to run, and two here indicate the number of CPUs. You can see that E to standard two has two vCPUs, E to standard four has four virtual CPUs, E to standard eight has eight, and so on and so forth. The other thing you can observe here is that the memory disc and networking capabilities increase along with the virtual CPUs. So if you go for a larger machine type, you have a higher amount of memory available to you. Furthermore, the discounted networking performance will be improved. Over here, you can see that the memory increases as the number of vCPUs increases. So that's the first choice. What is the hardware you'd want to run your virtual machine on? We would first choose the machine type family, and then we would choose a specific machine type. And the second question is, what is the operating system, and what is the software we would want on a virtual machine instance? That's what we decide by choosing the image. There are two types of images that are present in Google Cloud. One is the public image. Earlier, we chose Debian as the image to create our virtual machine. That's an example of the public image. These public images are maintained by Google or open-source communities or by third-party vendors. The other kind of image is a custom image. These are images created by you and customised by you for your specific projects. Important takeaways: until now, you chose your hardware by deciding your machine type. You choose your software by deciding on your image. Now let's go back to our virtual machine and see if it's ready. When I go to the VM instances, I can see that my virtual machine is up and running. That's cool. You can also see that it's created in a specific zone, the Central one A.And you can see that there is an internal IP and an external IP that are assigned. The external IP is the one that we can make use of to talk to this virtual machine from the Internet. You can also SSH into the virtual machine by using this button, which is present here. Other than that, if you click this specific thing, you can see the different operations that you can perform on the virtual machine instance. You can see that you can stop the virtual machine instance or you can suspend it. Suspend is similar to pausing. So you can pause it and resume it, or you can reset. A reset is nothing but a restart. So the instance would be stopped and restarted immediately. You can also delete the instance. For now, what I would want to do is SSH into it and run a few commands. What I would do is click SSH. When I click SSH, I can see a notification that pop-up windows are blocked. SSH would actually open as a pop-up window. And that's the reason why I would need to enable pop ups.And once I enable pop-ups, I'll be able to connect to the VM instance. If you're having any problems with launching the virtual machine, I would recommend you also try with Google Chrome. Now I'm able to SSH into the virtual machine, and over here I can run a few commands. But the font size is very small. So what I can do is actually go in here and actually switch over. So I'll change the current colour theme to light, and I'd actually change the text size to the largest possible. You'd be able to see this much more clearly, I guess. And now I can go in here and type in a command. Who am I? You can see my username printed here. Let's print the current work directly. PWD displays the current working state directly. Let's list all the files that are present here. You can see that there are no files present in this specific directory. We launched our virtual machine and were able to escape into it in this step. Let's play with it. Furthermore, in the subsequent steps.
In the previous step, we launched our virtual machine and were able to run a few commands on it. Let's see how to set up an HTTP server on our Compute Engine virtual machine. I would want to install some software on the specific machine. So before I do anything, I need to actually become a root user. So I would say sudo space su; this is the command to actually become a root user. And once I do that, what I would want to do is update all the packages that are present in here. App is a package manager that comes standard with Debian. And I can do app updates. I can do an app update to pull in all the latest changes. So let's do an app space update. Now, once I update the package index, what I would like to do is install Apache. Apache is the HTTP server that we would want to run on the virtual machine. The way we can do that is by saying "App install Apache 2." So Apache Two is the name of the package. So we want to install Apache Two Packets using the package manager apt. Let's press Enter. So you can see that it's providing us with a little bit of information about the Apache package. It is showing what would be installed, how much memory would be needed, and it's asking us, "Do you want to continue?" and I would say yes. You can see that it's downloading the package, and it's installing it in here. So Apache Two would be installed in a little while. It took about a minute to install the Apache service, and at the end of it, the Apache service is now installed. Now I can go back to the virtual machine instance. One of the interesting things to know is that if you see a panel come up like this, you can click the Hide Info panel. So show and hide. So when you select a specific virtual machine, you can click the Show Info panel. It would show information about that specific virtual machine. And if you want to hide the Infopanel, you can actually hide it as well. that might be useful as you play with the console a lot more. We have launched an Apache server, and we want to look at the page behind that. The way we can do that is by clicking the external IP. So you can go in here and click the link to the external IP, and you should see the home page of Apache on Debian. Come up over here. You'll see a lot of information about configurationof Apache and you'd see that the defaultdebian document route is this specific folder. Now we want to customise this page. So instead of this page, we want our own page to come in here. How can we do that? That's where we would want to customise something present in this specific directory. So I'll copy this directly from here. So slashwirew I'll say "lsswirewwhml make sure that you don't have a dot or anything in there, and you can press Enter, and you can see that there is an index dot HTML file that is present in here, and that's the index dot HTML where we want to put our content in echo. Let's say hello, and I would put a double quote to end this "hello" echo world. So this would print "Hello World" in here. Now what I would want to do is to actually sendthis out to a file so I can use a pipecharacter so it's nothing but the greater than symbol. So you can pipe the output into this file. So HTML indexes HTML, so this is where we would want to write "Hello World" into, and let's press Enter. Now let's go in here and refresh the page. Cool. Now I see Hello World in here, so that's cool. So we are able to create a simple Apache server serving a simple "hello, world" page. Now let's try and make this a little bit more complex. Let's say I would want to actually have my host name in here instead of just saying "hello world." I would want to actually add in a host name to say this is the host name where this response is coming from. How can I do that? Let's start with echo. Let's try and print that out. So the way we can print the hostname is by saying the dollar host name within parentheses. As a result, dollar within parentheses hostname So this would actually print the host name. The host name that we gave earlier to this particular virtual machine is my first VM, and similar to that, you can actually do an echo hostname, and this would give you the IP address. So what I would want to do is add this information to my index dot HTML.So let's start with actually printing echohello world from dollar within parentheses hostname and let's press Enter. Let's see what would happen. Yeah, this is printing Hello World from my first VM. That looks cool. I'll say hello from this specific host name, and I'll also want to print the IP address, so I'll say "dollar" within parentheses and put hostname. This is printing "Hello World" from my first VM and the IP address. If you go in over here, you'll see that this is the internal IP address. So ten internal IP addresses of 1280. That is what is being printed here. So that looks cool. So what I would want to do is to actually take this message and send it to the index HTML. So I'll simply take the same thing -- echo "Hello, world!" -- from this specific thing and pipe it wherever you want to pipe it to this specific file. So let's paste that in and let's see ifwe are able to see it in here. Cool. You can see Hello World from my first VM, at 1280 bytes. In this step, we install Apache on our virtual machine. You saw that it was very easy to do all that we needed to do: SSH into it, install the software that we needed, and easily customise the page that we want to render from our Apache web server. There are a lot of other things that we would want to learn about virtual machines, and this example would be a great starting point to learn all of them. I'm sure you're having a lot of fun, and I'll see you in the hall.
Welcome back. In the last step, we saw a couple of IP addresses assigned to a virtual machine. We saw internal and external IP addresses that are assigned to this virtual machine. Let's understand a little bit more about internal IP and external IP. in this specific step. External IP addresses can be accessed via the Internet.We were able to call this specific external IP from outside, right? I am on the Internet, and I'm reaching out to a specific virtual machine that is installed inside the Google Cloud Platform. So this is Internet addressable.Internal IP addresses are internal to a corporate network. In a specific example, the virtual machine is installed inside the GCP network, and the internal IP address can only be used inside the Google Cloud Network. So you won't be able to use this one, dot 128, dot zero, dot two, and send a request to it. That is not allowed. Whenever we talk about external IP addresses, you cannot have two resources with the same IP address. The external IP is published over the Internet, and therefore you cannot have two resources with the same public IP. However, two different corporate networks can have resources with the same internal IP address. Because the internal IP addresses are not available on the Internet, they are just internal to some networks. Similar internal IP addresses can be used on two different networks. Whenever you create a VM instance, by default it is assigned at least one internal IP address. Whenever you are creating a VM instance, you can choose if you want to create an external IP address for it. An important thing to remember is that whenever you stop a VM instance, the external IP address is lost. Let's now see the internal and external IPS in play. Let's go over to our virtual machine that we created earlier. And what I would do is actually try to stop this. So let's go ahead and say stop, and I'll say stop on the pop-up, which comes up as well. Before we stop, this virtual machine had an internal IP and an external IP. Let's see what would happen when it stopped. You can also note down the external IP. Right now it's 341-23-6112. You might have a different external IP, but make sure that you note it down. Let's wait for the VM to be stopped. Let's try to refresh et's wait It took a few moments, about a minute, and then my virtual machine was shutdown.And when the virtual machine is stopped, you can see that it is still assigned an internal IP. However, there is no external IP that is assigned to it. Now what I would do is go in here and Start or resume," and I'll say "Start over here as well." Let's see what would " and I'll sI can see that the start of the virtual machine was successful, and it has been assigned a different external IP. Earlier, this was the external IP I made use of: 34, 123, 6, and 112. And if I refresh that right now, you'll see that I get a page not found or some other error.because the external IP has now changed. You can see that my SSH connection is also not working. It reports that the connection via cloud-identity aware proxy failed.So I can actually go ahead and close the SSH one as well. because the external IP has changed. The earlier external IP is no longer useful. Now, what I would do is actually SSH again. So you can see that the SSH is opening up as a pop-up window right now. And over here I want to execute the command to start the Apache server earlier. We stopped and restarted the instance. Before doing that, let's do pseudo-su to become the root. And after that, I can execute a command service on Apache 2. That's the service that we installed earlier, and we can say "Start." So we want to start the Apache Two service. And once this service is up and running, I can go in and use the external IP. And you can see from my first VM ten that it's saying hello world.In this step, we understood the concept of internal and external IP addresses. External IP addresses are addressable over the Internet. Our internal IP addresses belong only to a specific corporate network. You cannot use them on the Internet. We also saw that when we stopped and started a VM instance, the internal IP address remained the same. However, the external IP address is changed when we restart a VM instance. The fact that an external IP address changes and I have to restart a virtual machine can be problematic. How do we fix that? Let's see that in the next step.
In the last step, we talked about external IP addresses, and we saw the fact that an external IP address changes when I stop and start a virtual machine. How do I get a constant external IP address? For a VM instance, one of the easiest ways to do that is to assign a static IP address to the VM. A little later, we'll look at a better solution using load balances. But for now, let's actually use a static IP address. Let's see how to use a static IP address. Right now I'll go to our Google platform, and over here you can type in external IP addresses. So we are going into external IP addresses, which is part of something called a VPC (Virtual Private Cloud). And this is where you can see the external IP addresses that are assigned to our virtual machines. So over here, you can see that there is an external IP address that is already created for our specific virtual machine. So whenever you create a virtual machine with an external IP address, you can come over here and see the details of the external IP address that is created. However, what we want is not just an external IP address; what we want is a static external IP address. And how can we reserve that? The way we can reserve that is by asking for a reserve static address. So I go into the system and say Reserve static address. So I've clicked that, and over here, now I can go in and say, When you're creating a static IP address, you can choose the network service tier. So what kind of network performance do you want? There are two levels that are offered. One is premium and standard. The default is Premium. I would go with it. You can also choose what kind of IP address format you want to use. I want to use either an IPaddress four format or a six format. I would go with IP address four. And you can also choose whether you'd want to create a regional static address or a global static address. Over here, we would want to assign the static address to a virtual machine. A virtual machine is a resource that is created in a specific zone. So a regional static address would be sufficient for us. I would go ahead and say reserve. Now, this would actually create a static address. You can also see the type in this area. So by default, whatever external IP address is directly assigned to a VM is Ephemeral. Ephemeral means that it changes. So when you restart the instance, it changes. However, the address that wecreated just now is static. You can see the static address here. 341-23-6112. Now, we want to assign this to our virtual machine. How can we do that? If you actually zoom out a little, I mean, the "change" button is well hidden by Google Cloud, so you'd see a button called "Change" in here. So on the static IP address: If you zoom out a little, you should see a button called "Change" in here. And that's the one on which you need to click to change the IP address. and I'll go back to the normal zoom. And over here, I can actually attach it with a VM. I would say my first VM, and I would say, "Okay, so you'd see that a static IP address is now assigned to the VM instance." And when you refresh, you'll see that the ephemeral address is automatically released. So when I assign a static IP address to a VM instance, the earlier IP address that was assigned to it is automatically removed. So if I actually refresh this, this is the earlier IP address that was assigned. This was the external IP address, which was ephemeral. and you can see that this does not work anymore. And now I can actually use the static IP address. So I can take the static IP address and use that. And the amazing thing about the static IP address is if I go back to instances, for example, let's go back, type in "VM instances," and let's go back to our Compute Engine VM instances. And over here, let's say I go in here, and I'll say stop. The stop would take a little while. Let's wait for it to be complete. Let's try refreshing. The stop is still going on. Okay, it took about a minute. Now this top is complete. So even though we stopped the VM instance, the static IP address is still assigned to your VM instance. In the next step, we look at how to get a constant external IP address for a VM instance. The solution was to use a static IP address. We saw how to create a static IP address and how we can assign it to a VM instance. Let's talk a little bit more about static IP addresses in the next step.
Welcome back on the scene. Let's look at a few things that you need to remember about static IP addresses. The important thing that you need to remember about static IP addresses is that you can actually switch them from one VM instance to another within the same project. So if you actually create a new VM instance in here, you can easily switch the static IP address from the current one to the new one. The next important thing to remember is that the static IP remains attached even if we stop the instance. As you can see here, we have stopped the specific instance. Still, the static IP is assigned. It is important to remember that you have been billed for a static IP when you are not using it as well. So you'd be billed for it when you are using it as well as when you are not using it. One surprising thing is that the bill for not using it is much higher than the bill you pay when you use it. So if you have a static IP and you are not making use of it, the recommendation is to immediately release it. So make sure that you explicitly release a static IP when you are not using it. Let's go ahead and do it. Right now, what I would do is go in and delete this specific instance. So I'll go ahead and say, "Delete the VM instance." When I refresh the VM instances, I don't really have a VM instance. If I actually type in external IP addresses and go into a VPC network, you can see that the static address is still available. So this static IP address is not used by anybody right now. And this is the kind of scenario where you would be billed for it. And that's the reason why the best practise when it comes to static IP addresses is to go ahead and release them. So I'll select this and go ahead and say, "Release static IP address." So whenever you're not using a static IP address, the best practise is to go ahead and release it, because you'd be billed for it if you're not using a static IP address. So make sure that you actually explicitly release a static IP when you're not using it. In the shop, we learned a little bit more about the static IP address. I'll see you at the next step. Bye.
Go to testing centre with ease on our mind when you use Google Associate Cloud Engineer vce exam dumps, practice test questions and answers. Google Associate Cloud Engineer Associate Cloud Engineer certification practice test questions and answers, study guide, exam dumps and video training course in vce format to help you study with ease. Prepare with confidence and study using Google Associate Cloud Engineer exam dumps & practice test questions and answers vce from ExamCollection.
Purchase Individually


Google Associate Cloud Engineer Video Course

Top Google Certifications


Top Google Certification Exams
Site Search:

SPECIAL OFFER: GET 10% OFF

Pass your Exam with ExamCollection's PREMIUM files!
SPECIAL OFFER: GET 10% OFF
Use Discount Code:
MIN10OFF
A confirmation link was sent to your e-mail.
Please check your mailbox for a message from support@examcollection.com and follow the directions.

Download Free Demo of VCE Exam Simulator
Experience Avanset VCE Exam Simulator for yourself.
Simply submit your e-mail address below to get started with our interactive software demo of your free trial.
Has anyone given the exam recently, is premium questions valid
SQL - Did you passed the exam? Do you have the new questions?
anyone passed using these premium materials
@SQL did you pass exam?
@VIK December 9th
@SQL when did you take exam?
15 New questions. 35 Questions from Premium DUMP.
Is the Premium Dump Valid?, thank you
I would like to know this too.
Is this VCE Premium valid? Still no comments here.
Add Comment
Feel Free to Post Your Comments About EamCollection VCE Files which Include Google Associate Cloud Engineer Exam Dumps, Practice Test Questions & Answers.